Add more features to your ATtiny85 timer alarm by adding a user-interactive OLED display.
Introduction
Previously, you’ve made a simple DIY ATtiny85 timer with a single push button and a buzzer. There, you’ve learned how to use the millis() function as a timer and implemented simulation through WOKWI. You’ve also learned how to add an OLED display for an ATtiny85. Having learned all of these, you can upgrade your timer to have a user interactive display, making it more versatile and appealing to the user.
An ATTiny85 Timer Alarm with Interactive OLED Display
This timer has more advanced features, utilizing only one push button to interact with the display. A delay is calculated while going through the available time durations. After the delay expires, the timer countdown automatically starts. When the timer expires, an alarm is sounded. After this, the user can re-select another alarm time duration. The process provides the user with a seamless experience.
Circuit Diagram
Here is the proposed ATtiny85 Timer with OLED interface.
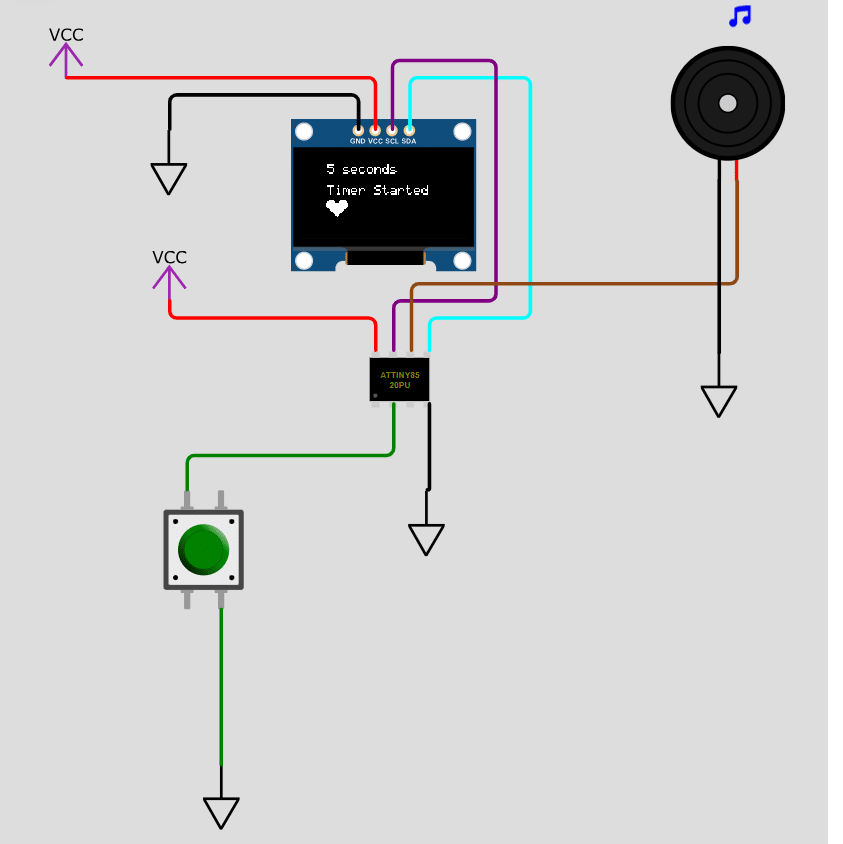
Above, as in the previous projects, the OLED is connected to PB2 – SCL and PB0 – SDA of the ATtiny85. The tact switch push button is connected to port PB3 while the buzzer is connected to PB1. You can learn more about simulating your circuits in WOKWI on the WOKWI Online Electronics Simulator blog.
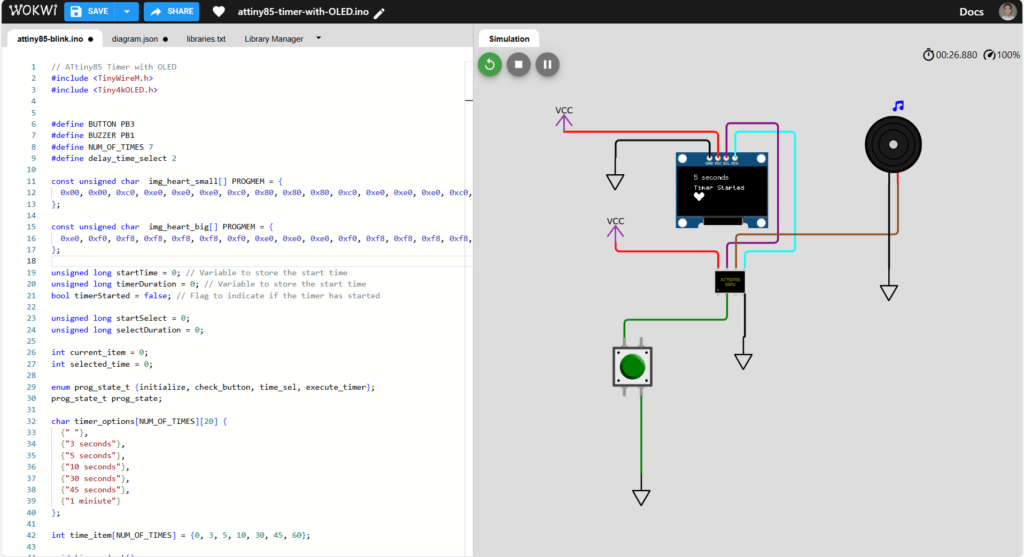
Circuit Simulation
And here is the actual circuit simulation in WOKWI.
Coding for the Circuit
You can simulate your code in WOKWI first to avoid the hassles of debugging code in hardware. Below is the entire code.
					// ATtiny85 Timer with OLED
#include <TinyWireM.h>
#include <Tiny4kOLED.h>


#define BUTTON PB3
#define BUZZER PB1
#define NUM_OF_TIMES 7
#define delay_time_select 2

const unsigned char  img_heart_small[] PROGMEM = {
  0x00, 0x00, 0xc0, 0xe0, 0xe0, 0xe0, 0xc0, 0x80, 0x80, 0x80, 0xc0, 0xe0, 0xe0, 0xe0, 0xc0, 0x00, 0x00, 0x00, 0x00, 0x00, 0x01, 0x03, 0x07, 0x0f, 0x1f, 0x3f, 0x1f, 0x0f, 0x07, 0x03, 0x01, 0x00, 0x00, 0x00
};

const unsigned char  img_heart_big[] PROGMEM = {
  0xe0, 0xf0, 0xf8, 0xf8, 0xf8, 0xf8, 0xf0, 0xe0, 0xe0, 0xe0, 0xf0, 0xf8, 0xf8, 0xf8, 0xf8, 0xf0, 0xe0, 0x00, 0x01, 0x03, 0x07, 0x0f, 0x1f, 0x3f, 0x7f, 0xff, 0x7f, 0x3f, 0x1f, 0x0f, 0x07, 0x03, 0x01, 0x00
};

unsigned long startTime = 0; // Variable to store the start time
unsigned long timerDuration = 0; // Variable to store the start time
bool timerStarted = false; // Flag to indicate if the timer has started

unsigned long startSelect = 0;
unsigned long selectDuration = 0;

int current_item = 0;
int selected_time = 0;

char timer_options[NUM_OF_TIMES][20] {
  {" "},
  {"3 seconds"},
  {"5 seconds"},
  {"10 seconds"},
  {"30 seconds"},
  {"45 seconds"},
  {"1 miniute"}
};

int time_item[NUM_OF_TIMES] = {0, 3, 5, 10, 30, 45, 60};

enum prog_state_t {initialize, check_button, time_sel, execute_timer};
prog_state_t prog_state;

void time_select()
{
    // cycle through the timer options
    if(current_item < NUM_OF_TIMES-1)
    {
      current_item++;

      oled.clear();
      oled.on();
      oled.setCursor(20, 1);
      oled.print(timer_options[current_item]);

      selected_time = time_item[current_item];

    }else{
      current_item = 0;
      oled.clear();
      oled.on();
    }


}

void timer_proc()
{
  if (!timerStarted) {
    // Start the timer
    startTime = millis();
    timerStarted = true;
    timerDuration = selected_time * 1000.0; // in seconds
    oled.setCursor(20, 3);
    oled.print(F("Timer Started"));
  }

  // Check if the timer has started and if the duration has passed
  if (timerStarted && (millis() - startTime >= timerDuration)) {
    // Output buzzer sound with heart beat on OLED
    for (int i = 0; i < 25; i++) { // Buzzer sounds 10 times
      digitalWrite(BUZZER, HIGH);
      oled.bitmap(20, 4, 37, 6, img_heart_big);
      delay(100); // Adjust the delay for sound length
      digitalWrite(BUZZER, LOW);
      oled.bitmap(20, 4, 37, 6, img_heart_small);
      delay(100);
    }

    oled.clear();
    oled.on();
    oled.setCursor(20, 1);

    oled.print(F("Timer Elapsed!"));


    // Reset the timer
    timerStarted = false;
  }
}

void setup() {

  // Init button
  pinMode(BUTTON, INPUT_PULLUP);
  pinMode(BUZZER, OUTPUT);
  selectDuration = delay_time_select * 1000.0; // select button wait before executig timer

  // Initialize OLED screen
  oled.begin(128, 64, sizeof(tiny4koled_init_128x64br), tiny4koled_init_128x64br);

  // Two fonts are supplied with this library, FONT8X16 and FONT6X8
  oled.setFont(FONT6X8);

  // To clear all the memory
  oled.clear();
  oled.on();


}

void loop() {

  switch (prog_state){
    case initialize:
      if(digitalRead(BUTTON) == 0){
        delay(300); // debounce
        prog_state = time_sel;
        // To clear all the memory
        oled.clear();
        oled.on();

      }else{
        prog_state = initialize;
      }
      break;
    case check_button:
      if (millis() - startSelect >= selectDuration){
        // execute timer
        prog_state = execute_timer;
        current_item = 0;
      }else{
        // go back to select time
        if(digitalRead(BUTTON) == 0){
          delay(300);
          prog_state = time_sel;
        }else{
          prog_state = check_button;
        }
      }
      break;
    case time_sel:
      time_select();
      startSelect = millis();  // reset select timer
      prog_state = check_button;
      break;

    case execute_timer:
      timer_proc();
      if(timerStarted == false){
        prog_state = initialize;  // if finished, initialize (restart)
      }else{
        prog_state = execute_timer;
      }
      break;

    default:
      break;
  }


}
Code Explanation
Initialization code
					// ATtiny85 Timer with OLED
#include <TinyWireM.h>
#include <Tiny4kOLED.h>


#define BUTTON PB3
#define BUZZER PB1
#define NUM_OF_TIMES 7
#define delay_time_select 2

const unsigned char  img_heart_small[] PROGMEM = {
  0x00, 0x00, 0xc0, 0xe0, 0xe0, 0xe0, 0xc0, 0x80, 0x80, 0x80, 0xc0, 0xe0, 0xe0, 0xe0, 0xc0, 0x00, 0x00, 0x00, 0x00, 0x00, 0x01, 0x03, 0x07, 0x0f, 0x1f, 0x3f, 0x1f, 0x0f, 0x07, 0x03, 0x01, 0x00, 0x00, 0x00
};

const unsigned char  img_heart_big[] PROGMEM = {
  0xe0, 0xf0, 0xf8, 0xf8, 0xf8, 0xf8, 0xf0, 0xe0, 0xe0, 0xe0, 0xf0, 0xf8, 0xf8, 0xf8, 0xf8, 0xf0, 0xe0, 0x00, 0x01, 0x03, 0x07, 0x0f, 0x1f, 0x3f, 0x7f, 0xff, 0x7f, 0x3f, 0x1f, 0x0f, 0x07, 0x03, 0x01, 0x00
};
Include the necessary header files and add definitions for the button, buzzer, number of available time durations, and the user select delay time. Additionally, a simple heartbeat graphics is included which came from an example WOKWI code. These graphic images are stored in program memory.
					unsigned long startTime = 0; // Variable to store the start time
unsigned long timerDuration = 0; // Variable to store the start time
bool timerStarted = false; // Flag to indicate if the timer has started

unsigned long startSelect = 0;
unsigned long selectDuration = 0;

int current_item = 0;
int selected_time = 0;

char timer_options[NUM_OF_TIMES][20] {
  {" "},
  {"3 seconds"},
  {"5 seconds"},
  {"10 seconds"},
  {"30 seconds"},
  {"45 seconds"},
  {"1 miniute"}
};

int time_item[NUM_OF_TIMES] = {0, 3, 5, 10, 30, 45, 60};
As in DIY ATtiny85 Alarm Timer, set variables for the timer to run. Additionally, you’ll need new variables to be able to successfully select your desired time. These variables include a 2-dimensional character array of strings that hold text to store the available time durations, and an integer array of the time durations themselves.
					enum prog_state_t {initialize, check_button, time_sel, execute_timer};
prog_state_t prog_state;
Lastly, to be able to apply the user seamless experience, a state machine is implemented. This state machine takes care of the order of the process of selecting, waiting, running, and executing the timer. If you want to learn more about state machines, please go to Working with State Machines to Implement Well-Defines and Efficient Program Flows.
How to Select the Time
					void time_select()
{
    // cycle through the timer options
    if(current_item < NUM_OF_TIMES-1)
    {
      current_item++;

      oled.clear();
      oled.on();
      oled.setCursor(20, 1);
      oled.print(timer_options[current_item]);

      selected_time = time_item[current_item];

    }else{
      current_item = 0;
      oled.clear();
      oled.on();
    }


}
The alarm time duration is selected through the time_select() function. This function displays the array of strings of times on the OLED and assigns the actual time value to an integer variable.
Running the Timer
					void timer_proc()
{
  if (!timerStarted) {
    // Start the timer
    startTime = millis();
    timerStarted = true;
    timerDuration = selected_time * 1000.0; // in seconds
    oled.setCursor(20, 3);
    oled.print(F("Timer Started"));
  }

  // Check if the timer has started and if the duration has passed
  if (timerStarted && (millis() - startTime >= timerDuration)) {
    // Output buzzer sound with heart beat on OLED
    for (int i = 0; i < 25; i++) { // Buzzer sounds 10 times
      digitalWrite(BUZZER, HIGH);
      oled.bitmap(20, 4, 37, 6, img_heart_big);
      delay(100); // Adjust the delay for sound length
      digitalWrite(BUZZER, LOW);
      oled.bitmap(20, 4, 37, 6, img_heart_small);
      delay(100);
    }

    oled.clear();
    oled.on();
    oled.setCursor(20, 1);

    oled.print(F("Timer Elapsed!"));


    // Reset the timer
    timerStarted = false;
  }
}
The code for running the timer is similar to the DIY ATtiny85 Alarm Timer. However, graphics are displayed on the OLED here.
Setup Code
					void setup() {

  // Init button
  pinMode(BUTTON, INPUT_PULLUP);
  pinMode(BUZZER, OUTPUT);
  selectDuration = delay_time_select * 1000.0; // select button wait before executig timer

  // Initialize OLED screen
  oled.begin(128, 64, sizeof(tiny4koled_init_128x64br), tiny4koled_init_128x64br);

  // Two fonts are supplied with this library, FONT8X16 and FONT6X8
  oled.setFont(FONT6X8);

  // To clear all the memory
  oled.clear();
  oled.on();


}
The setup code assigns the functions of the ATtiny85 pins and initializes the OLED screen. It also calculates the select duration time.
Loop Code
					void loop() {

  switch (prog_state){
    case initialize:
      if(digitalRead(BUTTON) == 0){
        delay(300); // debounce
        prog_state = time_sel;
        // To clear all the memory
        oled.clear();
        oled.on();

      }else{
        prog_state = initialize;
      }
      break;
    case check_button:
      if (millis() - startSelect >= selectDuration){
        // execute timer
        prog_state = execute_timer;
        current_item = 0;
      }else{
        // go back to select time
        if(digitalRead(BUTTON) == 0){
          delay(300);
          prog_state = time_sel;
        }else{
          prog_state = check_button;
        }
      }
      break;
    case time_sel:
      time_select();
      startSelect = millis();  // reset select timer
      prog_state = check_button;
      break;

    case execute_timer:
      timer_proc();
      if(timerStarted == false){
        prog_state = initialize;  // if finished, initialize (restart)
      }else{
        prog_state = execute_timer;
      }
      break;

    default:
      break;
  }


}
Here is the main loop code. The main loop code is composed of the state machine code itself. It’s composed of the initialization sequence, timer selection, button check, and timer execution.
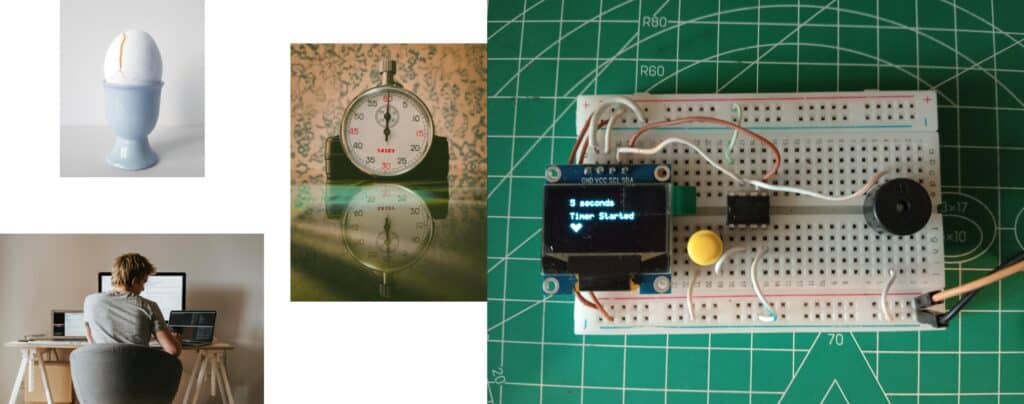
HArdware Implementation
Here is the circuit implemented in actual hardware programmed through Arduino IDE.