
KY-002 – Vibration Switch Sensor Module
A digital shock sensor that outputs a high-level signal when a shock is detected.
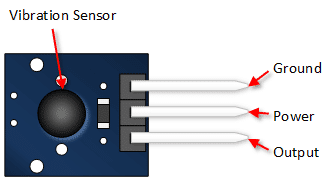
Pin Out:
1: Signal
2: V+
3: GND
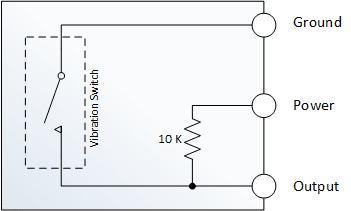
Schematic
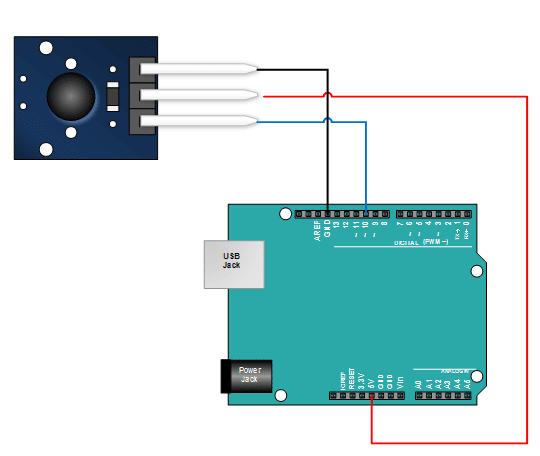
Example Sketch & Connection
//Print notice when shock is detected
//Referenced from: Henry's Bench
//KY-002 Shock Sensor Tutorial

int shockPin = 10; // Use Pin 10 as our Input
int shockVal = HIGH; // This is where we record our shock measurement
boolean bAlarm = false;

unsigned long lastShockTime; // Record the time that we measured a shock

int shockAlarmTime = 250; // Number of milli seconds to keep the shock alarm high


void setup ()
{
  Serial.begin(9600);
  pinMode (shockPin, INPUT) ; // input from the KY-002
}
void loop ()
{
  shockVal = digitalRead (shockPin) ; // read the value from our sensor

  if (shockVal == LOW) // If we're in an alarm state
  {
    lastShockTime = millis(); // record the time of the shock
    // The following is so you don't scroll on the output screen
    if (!bAlarm){
      Serial.println("Shock");
      bAlarm = true;
    }
  }
  else
  {
    if( (millis()-lastShockTime) > shockAlarmTime  &&  bAlarm){
      Serial.println("No Shock");
      bAlarm = false;
    }
  }
}
//Activate Arduino LED when shcok is detected
//Referenced from; Joy IT Datasheet
int Led = 13 ;// Declaration of the LED output pin
int Sensor = 10; // Declaration of the Sensor input pin
int val; // Temporary variable
void setup ()
{
 pinMode (Led, OUTPUT) ; // Initialisation output pin
 pinMode (Sensor, INPUT) ; // Initializstion sensor pin
 digitalWrite(Sensor, HIGH); // Activating of the internal pull-up resistors
}
void loop ()
{
 val = digitalRead (Sensor) ; // The active signal at the sensor will be read
 if (val == HIGH) // If a signal was noticed, the LED will be on
 {
 digitalWrite (Led, LOW);
 }
 else
 {
 digitalWrite (Led, HIGH);
 }
}