XL4015 5A Adjustable CC / CV Step Down DC Power Supply Module
INTRODUCTION
Thank you for purchasing the XL4015 5A Adjustable CC/CV Step Down DC Power Supply Module. This module has different kinds of applications besides just supplying power to your load. Such applications include a constant current source, a lithium-ion or lead acid battery charger, and an LED driver. Additionally, this XL4015 module can be programmed with a current limit to protect your load while trying to maintain its constant voltage output.
MAIN FEATURES
- A Constant Voltage Source
- Current Limit Feature that can also act as a Constant Current Source
- Display LEDs to inform the user what mode you are in
- Can act as a Battery charger
- Can act as an LED driver
- Short-circuit protection
| Product Specifications | |
|---|---|
| Input Voltage | 4 - 38V |
| Output Voltage | 1.25 - 36V Continuously Adjustable |
| Output Current | Adjustable, Max 5A |
| Output Power | 75W Maximum |
| Working Temperature: | -40C to +85C |
| Operating Frequency: | 180KHz |
| Conversion Efficiency: | up to 96% |
| Short Circuit Protection: | Yes (limit current 8A) |
| Overtemperature Protection: | Automatically shut off the output after overtemperature |
| Input Reverse Polarity Protection: | None |
| Installation: | 4x3mm screws |
| Weight: | 23g |
| Dimensions | 51mm x 26mm x 15mm |
TOOLS REQUIRED
- A Voltmeter
- An Ammeter with at least 10A rating.
- Small flat-head screwdriver to turn trim pots
- Small Philips screwdriver for screw terminals
BEFORE STARTING
- Ensure you supply the correct polarity. There is no reverse polarity protection for this module.
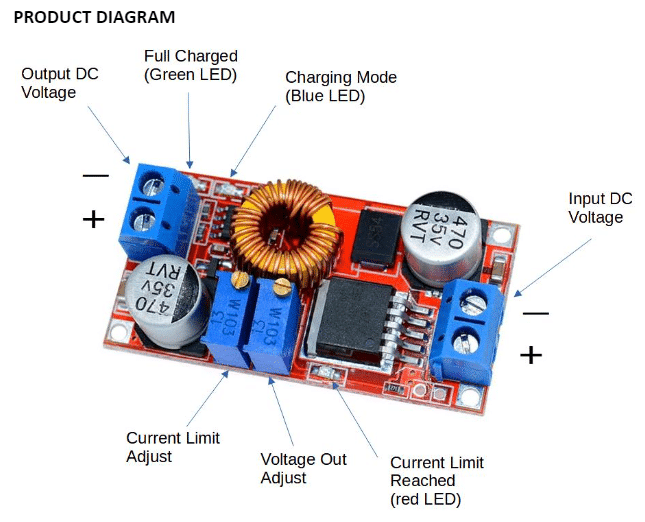
PRODUCT DIAGRAM
HOW TO USE:
MAIN PROCEDURE
There are two trim pots to adjust to ensure the correct operation of this module.
- First, Adjust the Voltage Out Adjust Pot to adjust your output voltage from 1.25V – 36V (This depends on your input voltage).
- After this, short out the output port with an Ammeter (at least 10A max capacity). At this point, measure the current and turn the Current Adjust Trimpot until you reach your desired current limit.
AS A POWER SUPPLY SOURCE WITH CONSTANT VOLTAGE:
The Main Procedure describes what you should do to have a constant voltage source.
AS A POWER SUPPLY WITH CONSTANT CURRENT:
After the Main Procedure, power up your load through the module’s output port. Next, adjust to lower the current of the Current Limit Adjust Trim pot. The new current limit will now become your constant current source value. This can be used for constant current LEDs.
AS A DC VOLTAGE BATTERY CHARGER:
Most DC Voltage Batteries (like a 12V or 6V lead acid battery) need a voltage greater than their battery voltage to be charged. For example, a 12V / 5A sealed lead acid battery may need at least 13.8V to get charged. The charging current should also be adjusted so you don’t overcharge the battery. Typically, a charging current of 25% of the maximum capacity for this battery should be enough. After that, you can end the battery charging cycle with a trickle charge.
- From step 1 in Main Procedure, ensure you have tested your output voltage to be 13.8V (less than 14V). In step 2, ensure you get a current limit of 0.25 of 5A, 1.25A.
- Now clip your battery’s positive and negative terminals to the output of the XL4015 module. The blue LED turns ON, indicating it’s in charging mode.
- The XL4015 module transitions to trickle mode after fully charging the battery. With this, you’ll see the Green LED light up. This indicated that the charging current had decreased to 0.1C from its starting value.
AS A LITHIUM-ION BATTERY CHARGER:
Like in the DC Voltage Battery Charger, Lithium-Ion batteries need a constant current source to be charged correctly. After which, the charging process switches to Constant Voltage or Floating Voltage mode. However, single-cell Lithium Ion batteries can only have a maximum charging voltage of at least 4.2V. Additionally, their maximum charging current is 1C of their maximum charge capacity. In this example, if you have a 3.7V/2200mAH Li-Ion battery:
- From step 1 in Main Procedure, ensure you have tested your output voltage to be 4.2V. In step 2, ensure you get a current limit of 1C of 2200mAH, 2.2A.
- Now clip your battery’s positive and negative terminals to the output of the XL4015 module. You should see the blue LED turn ON, indicating it’s in charging mode.
- The XL4015 module transitions to constant voltage mode after the battery finishes being charged in constant current mode. With this, you’ll see the Green LED light up. This simply indicates that the charging current had gone down to 0.1C from its starting value.