XL4016 DC-DC Adjustable Step Down Power Supply Module User’s Guide
1. Overview
The XL4016 module is a buck converter that steps down DC voltage from a higher input to a lower output. It’s based on the XL4016 IC and supports up to 8A continuous current and 200W max power with proper cooling.
- Input Voltage: 8V – 36V
- Output Voltage: 1.25V – 32V (adjustable)
- Output Current: Up to 8A (adjustable)
- Efficiency: Up to 96%
- Switching Frequency: 180kHz
- Protections: Over-current, thermal shutdown, short-circuit protection
2. Key Features
- Large heatsink for thermal management
- Dual potentiometers for voltage and current adjustment
- Screw terminals for easy wiring
- LED indicators for power and load status
- Built-in protection circuitry for safe operation
3. Setup & Wiring
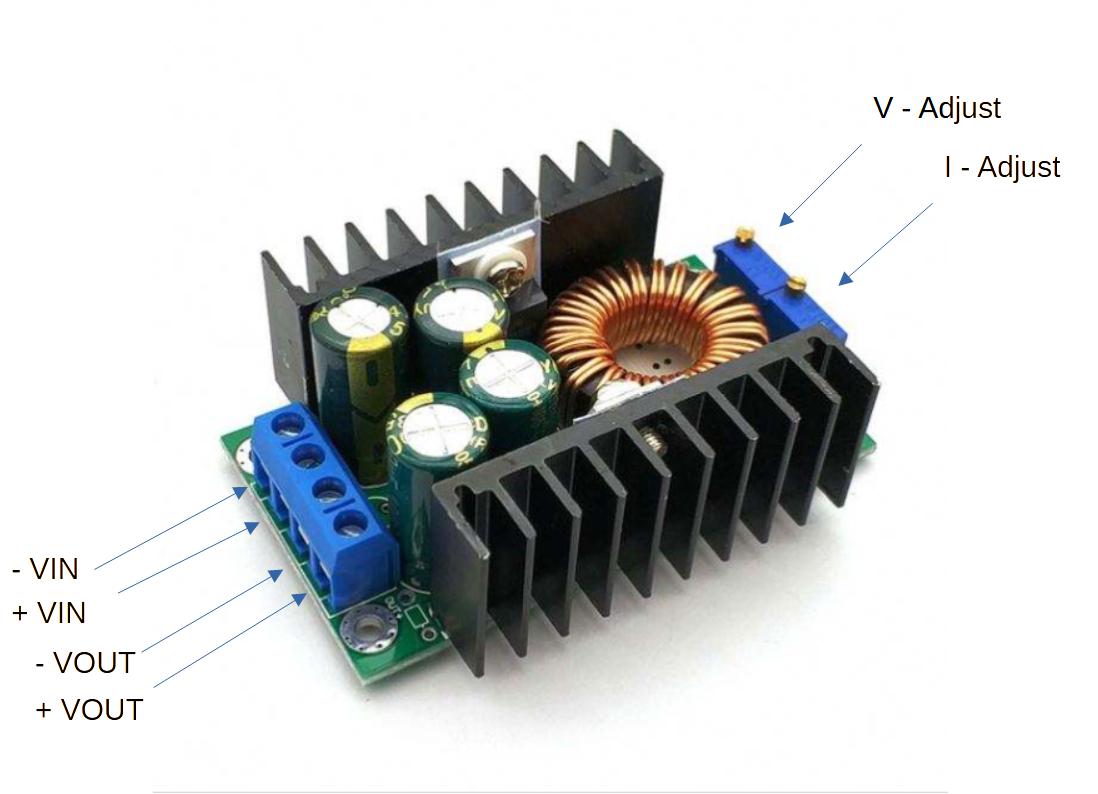
Step 1: Connect Input
- Use the VIN+ and VIN− terminals to connect a DC source (e.g., 24V battery or adapter).
- Ensure input voltage is within the 8–36V range.
Step 2: Connect Output
- Use the VOUT+ and VOUT− terminals to connect your load (e.g., LED strip, battery, motor).
- Confirm polarity before powering on.
Step 3: Adjust Output Voltage
- Turn the voltage potentiometer clockwise to increase output voltage, counterclockwise to decrease.
- Use a multimeter to monitor output during adjustment.
Step 4: Adjust Output Current
- Turn the current potentiometer to set the maximum current limit.
- Useful for battery charging or LED protection.
4. Applications
- Battery Charging: Lithium-ion, lead-acid, LiFePO₄
- LED Driving: High-power LEDs with current control
- DC Regulation: Powering devices from higher-voltage sources
- DIY Projects: Robotics, embedded systems, lab bench supply
5. Safety Tips
- Use a heatsink and fan for loads above 5A.
- Do not exceed 200W total output (e.g., 25V × 8A).
- Always connect input before output.
- Avoid short circuits—while protected, repeated faults can degrade the module.
- Monitor temperature during high-load operation.
6. Troubleshooting
| Issue | Cause | Solution |
|---|---|---|
| No output | Wrong polarity or low input voltage | Check wiring and input source |
| Overheating | Insufficient cooling | Add heatsink/fan |
| Voltage drops | Load exceeds current limit | Adjust current potentiometer |
| Flickering LEDs | Unstable input or loose wiring | Secure connections and check input stability |