Introduction
The open-source Arduino Software (IDE) makes it easy to write code and upload it to the board. It runs on Windows, Mac OS X, and Linux. The environment is written in Java and based on Processing and other open-source software. Throughout this Arduino IDE guide we will examine the various options and funcationalities with a brief sentence explaining what each option does.

Top Bar

Sketch_oct30a – File name created by Arduino when you create new file. Will be changed depending on the file name you choose when saved.
Arduino 1.8.9 – Version of the Arduino IDE installed on your pc.
Minimize, Maximize and Close buttons on the right.
Drop Down Menus

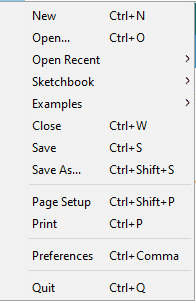
File
- New – Create a new file. (Ctrl + N)
- Open – Open existing file (.ino) that you saved or downloaded. (Ctrl + O)
- Open Recent – To save time locating your recently open files (10).
- Sketchbook – Shows all your recent files (.ino).
- Examples – Shows list of uploaded examples that came along with the Arduino ide and the libraries you installed.
- Close – Close Arduino IDE. (Ctrl + W)
- Save – Save the file (.ino) . (Ctrl + S)
- Save As – Rename existing file/Create copy (.ino) (Ctrl + Shift + S)
- Page Setup – To setup page when printing the codes directly. (Ctrl + Shift + P)
- Print – Print your code. (Ctrl + P)
- Preferences – Setup for your IDE. (Ctrl + Comma)
- Quit – Close IDE. (Ctrl + Q)
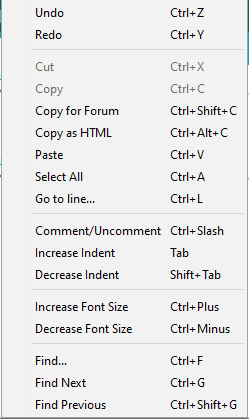
Edit
- Undo – undo the last action. (Ctrl + Z)
- Redo – redo last action. (Ctrl + Y)
- Cut – cut selected line/s. (Ctrl + X)
- Copy – copy selected line/s. (Ctrl + C)
- Copy for Forum – copy whole code in Forum format. (Ctrl + Shift + C)
- Copy as HTML – copy whole code in HTML format. (Ctrl + Alt + C)
- Paste – paste copied/cut code. (Ctrl + V)
- Select All – highlight/select whole code. (Ctrl + A)
- Go to line… – go to specific line in the code. (Ctrl + L)
- Comment/Uncomment – add // to line making the code comment (no function). (Ctrl + Slash)
- Increase Indent – add tab for cleaner look on code (Tab)
- Decrease Indent – remove 1 tab. (Shift + Tab)
- Increase Font Size – enlarge font (Ctrl + Plus)
- Decrease Font Size – reduce font (Ctrl + Minus)
- Find – find code/text (Ctrl + F)
- Find Next – find next code/text (Ctrl + G)
- Find Previous – find previous code/text (Ctrl + Shift + G)
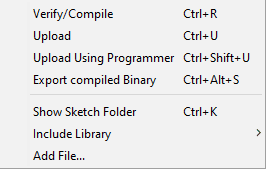
Sketch
- Verify/Compile – saves file and check for errors (Ctrl + R)
- Upload – compiles code and upload to selected board (Ctrl + U)
- Upload Using Programmer – upload directly to board without using bootloader. (Ctrl + Shift + U)
- Export compiled Binary – export as binary code. (Ctrl + Shift + S)
- Show Sketch Folder – open folder location of the file. (Ctrl + K)
- Include Library – add libraries for your components.
- Add File… – add file in new tab.
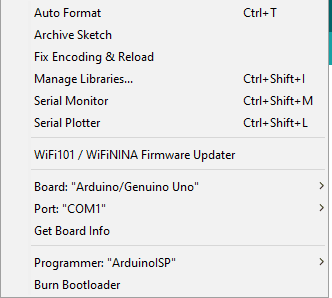
Tools
- Auto Format – clean the sketch (Ctrl + T)
- Archive Sketch – create an archived file for the code
- Fix Encoding & Reload – reload sketch
- Manage Libraries – install/update libraries (Ctrl + Shift + I)
- Serial Monitor – shows serial readings
- (Ctrl + Shift + M)
- Serial Plotter – shows plot of serial readings (Ctrl + Shift + L)
- Wifi101… – update firmware of Wi-Fi boards
- Board: – shows the board type to upload your code
- Port: – shows com port used by the connected device
- Get Board Info – get information of the connected board
- Programmer – choose programmer type
- Burn Bootloader – update bootloader of the device
Help
- Getting Started – Redirects you to an html page that shows a guide on how to use an Arduino. From software installation up to sample program uploading.
- Environment – Redirects you to an html page that explains the functions each button in the Arduino IDE.
- Troubleshooting – Redirects you to an html page that shows basic troubleshooting for Arduino IDE.
- Reference / Find in Refernce – Redirects to an html page that shows three main parts of Arduino programs such as the structure, values (variables and constants), and functions.
- Frequently Asked Questions – Redirects to an html page that shows the frequently asked questions about Arduino and its answers.
- Visit Arduino.cc – Redirects you to the Arduino website.
- About Arduino – Shows an image with the information about Arduino IDE.

Interface BUttons

Buttons labelled are left to right
- Verify – the check button. Check if you’re code has errors before uploading it.
- Upload – the button with arrow pointed to right. Uploads the code into your Arduino.
- New – the button with a file image. Creates a new file with the prerequisite codes.
- Open – the button with arrow pointing up. Opens a .ino file the you saved.
- Save – the button with arrow pointing down. Save the code into .ino file.
- Serial Monitor – the button with magnifying glass. Opens the serial monitor that let’s you see data sent by the Arduino.
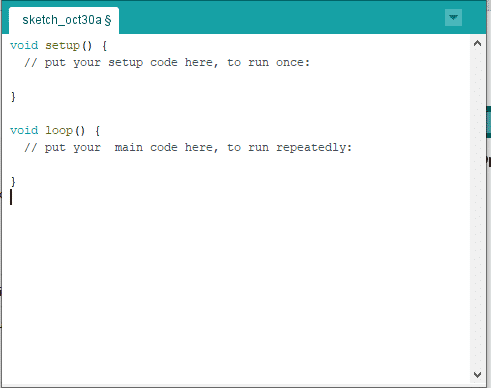
Code Body
- Prerequisites – this is the minimum requirement in your code for it to be uploaded. Every Arduino code requires this.
- void setup() {} – this is the first lines of code that your Arduino will do just once. Mostly the initialization of the components.
- void loop() {} – this is the part of the Arduino code that runs continuously. The code runs from top to bottom and to top again repeatedly unless specified in the code to stop.
Information Output Box
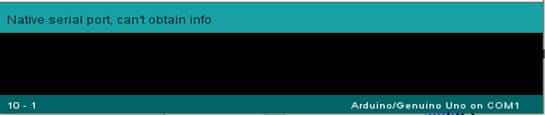
- Information and Errors – this part shows you errors in orange font so you can easily troubleshoot your code.
Arduino Terminologies
Sketch
A sketch is the name that Arduino uses for a program. It’s the code unit uploaded to and run on an Arduino board.
Comments
Everything between the /* and */ is ignored by the Arduino when it runs the sketch. There’s another style for short, single-line comments. These start with // and continue to the end of the line.
Variables
A variable is a place for storing a piece of data. It has a name, a type, and a value. For example, the line from the Blink sketch above declares a variable with the name ledPin, the type int, and an initial value of 13. It’s being used to indicate which Arduino pin the LED is connected to. Every time the name ledPin appears in the code, its value will be retrieved. In this case, the person writing the program could have chosen not to bother creating the ledPin variable and instead have simply written 13 everywhere they needed to specify a pin number. The advantage of using a variable is that it’s easier to move the LED to a different pin: you only need to edit the one line that assigns the initial value to the variable. Often, however, the value of a variable will change while the sketch runs. For example, you could store the value read from an input into a variable.
Functions
A function (otherwise known as a procedure or sub-routine) is a named piece of code that can be used from elsewhere in a sketch. The first line provides information about the function, like its name, “setup”. The text before and after the name specify its return type and parameters: these will be explained later. The code between the { and } is called the body of the function: what the function does.
					void setup()
{
pinMode(ledPin, OUTPUT); //sets the digital pin as output
}
Delay
The delay() causes the Arduino to wait for the specified number of milliseconds before continuing on to the next line. There are 1000 milliseconds in a second, so the line: delay(1000); creates a delay of one second.
setup() and loop()
There are two special functions that are a part of every Arduino sketch: setup() and loop(). The setup() is called once, when the sketch starts. It’s a good place to do setup tasks like setting pin modes or initializing libraries. The loop() function is called over and over and is heart of most sketches. You need to include both functions in your sketch, even if you don’t need them for anything.