Introduction
In this tutorial, we will learn how to use an LCD display module with Arduino.
What is an LCD?
LCD stands for “liquid-crystal display”. It is an optical device that is heavily used in displays. We are generally taught that there are 3 states of matter. Solid, liquid and gas. But, Liquid crystals are yet another state of matter in which at a certain temperature the Liquid Crystals float like a liquid but possess optical properties of solids.
How Does an LCD Work?
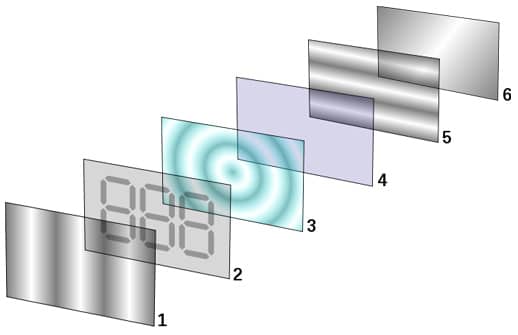
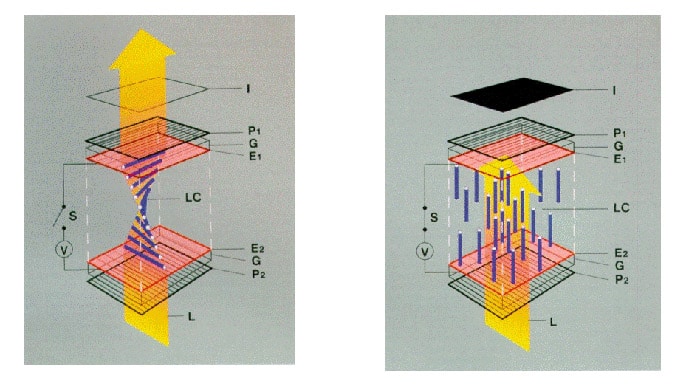
In a typical device, a liquid crystal layer (typically 4 μm thick) sits between two polarizers that are crossed (oriented at 90° to one another). The liquid crystal alignment is chosen so that its relaxed phase is a twisted one. This twisted phase reorients light that has passed through the first polarizer, allowing its transmission through the second polarizer. The device thus appears transparent.
When an electric field is applied to the LC layer, the long molecular axes tend to align parallel to the electric field thus gradually untwisting in the centre of the liquid crystal layer. In this state, the LC molecules do not reorient light, so the light polarized at the first polarizer is absorbed in the second polarizer, and the device loses transparency with increasing voltage. In this way, the electric field can be used to make a pixel switch between transparent or opaque on command.
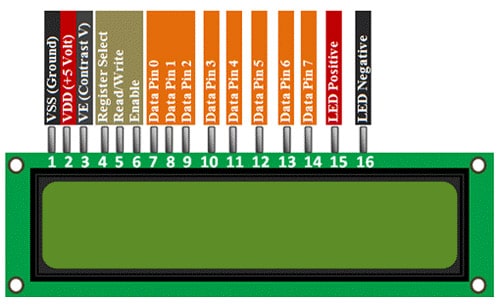
| Pin # | Name | Description |
|---|---|---|
| 1 | Ground | Ground |
| 2 | VDD | +5 Volts |
| 3 | VCC | +5 Volts |
| 4 | RS | Register Select |
| 5 | R/W | Selects reading mode or writing mode |
| 6 | E | Enables writing to the registers |
| 7 | D0 | |
| 8 | D1 | |
| 9 | D2 | |
| 10 | D3 | |
| 11 | D4 | |
| 12 | D5 | |
| 13 | D6 | |
| 14 | D7 | |
| 15 | LED+ | |
| 16 | LED- |
The states of the 8 data pins (high or low) are the bits that you’re writing to a register when you write, or the values you’re reading when you read.
LED pins are used to power the LCD, control the display contrast, and turn on and off the LED backlight, respectively.
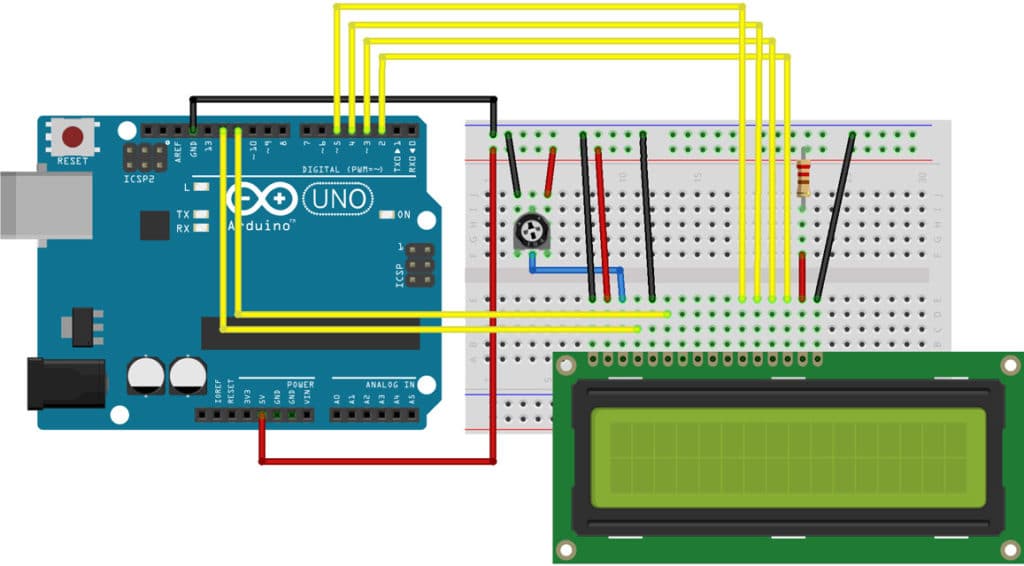
Circuit Diagram
The Code
For the code, we will be using the liquid crystal library of the Arduino, as it has a lot of pre-written codes and also to avoid complex low-level stuff.
Navigate to File > Examples > LiquidCrystal > HelloWorld
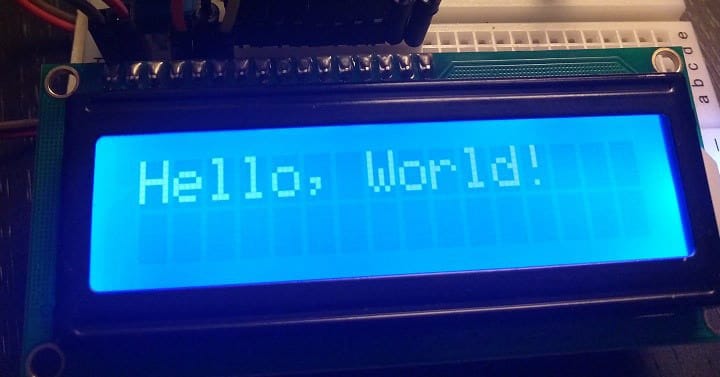
This is a little piece of code to display “Hello World” at your LCD.
HelloWorld:
					#include

// initialize the library by associating any needed LCD interface pin
// with the arduino pin number it is connected to

const int rs = 12, en = 11, d4 = 5, d5 = 4, d6 = 3, d7 = 2;

LiquidCrystal lcd(rs, en, d4, d5, d6, d7);

void setup() {

// set up the LCD's number of columns and rows:
lcd.begin(16, 2);

// Print a message to the LCD.
lcd.print("hello, world!");

}


void loop() {
// set the cursor to column 0, line 1
// (note: line 1 is the second row, since counting begins with 0):
lcd.setCursor(0, 1);

// print the number of seconds since reset:
lcd.print(millis() / 1000);

}