Have you tried to send MIDI messages from your Feather? Are controller change messages a challenge for you to accomplish? Read the rest of the article to find out.
Introduction
The previous blog talked about MIDI using the 32u4 Feather Bluefruit LE in general. This Feather is very useful, especially for simple MIDI Bluetooth Low Energy projects. The last example showed you how note messages can be sent through this device using the Adafruit BLE and BLE MIDI libraries. Now, this article focuses on how to send MIDI control change messages.
What are Control Change Messages in MIDI
A MIDI control message can enhance your musical output by controlling your instruments through various control elements such as knobs, sliders, wheels, pedals, and the like. Control messages have the form:
| Status | Data Byte1 | Data Byte2 |
| 0xBX | Controller Number | Controller Value |
Where:
Status – Indicates the Controller Change type and Channel destination. B signifies a message of Controller Change type while X is the MIDI Channel number.
Controller Number – is a number ranging from 0 – 127 indicating the Controller type. Common Controller types include:
1 – Modulation Wheel
2 – Breath Controller
4 – Foot Controller
7 – Channel Volume
64 – Sustain Pedal On/Off
67 – Soft Pedal On/Off
Controller Value – Controller values usually range from 0 – 127 and this indicates the current position of your knobs, wheels, sliders, etc. Note that there are controllers which are “switch types”. They get an OFF value if the Controller value falls in the range of 0-63 while they get an ON value if the range is 64 – 127. There are also control values that require more granularity so they need multiple data bytes to function.
How to Use Controller Change Messages in your 32u4 BlueFruit LE Feather

It’s almost like doing simple Note On and Off messages based on the previous blog. However, there are more varied functions with each type of controller you use and you may have to experiment with this according to your synthesizer. For example, you’ll find wind instruments use the breath controller efficiently. The sustain pedal can be very useful for pianos or keyboards. The sample code in the next part demonstrates 2 potentiometers used as controller change elements.
Example Code
					#include <Arduino.h>
#include <SPI.h>
#include "Adafruit_BLE.h"
#include "Adafruit_BluefruitLE_SPI.h"
#include "Adafruit_BluefruitLE_UART.h"
#include "Adafruit_BLEMIDI.h"
#if SOFTWARE_SERIAL_AVAILABLE
  #include <SoftwareSerial.h>
#endif

#include "BluefruitConfig.h"

#define FACTORYRESET_ENABLE         1
#define MINIMUM_FIRMWARE_VERSION    "0.7.0"

// define buttons
#define button1 A3
#define button2 A4
#define control_change1 A0
#define control_change2 A1

// define control change functions
#define modulation_wheel  1
#define channel_volume    7
#define pan_controller    10
#define reverb            91

// This app was tested on iOS with the following apps:
//
// https://itunes.apple.com/us/app/midimittr/id925495245?mt=8
// https://itunes.apple.com/us/app/igrand-piano-free-for-ipad/id562914032?mt=8
//
// To test:
// - Run this sketch and open the Serial Monitor
// - Open the iGrand Piano Free app
// - Open the midimittr app on your phone and under Clients select "Adafruit Bluefruit LE"
// - When you see the 'Connected' label switch to the Routing panel
// - Set the Destination to 'iGrand Piano'
// - Switch to the iGrand Piano Free app and you should see notes playing one by one

// Create the bluefruit object, either software serial...uncomment these lines
/*
SoftwareSerial bluefruitSS = SoftwareSerial(BLUEFRUIT_SWUART_TXD_PIN, BLUEFRUIT_SWUART_RXD_PIN);

Adafruit_BluefruitLE_UART ble(bluefruitSS, BLUEFRUIT_UART_MODE_PIN,
                              BLUEFRUIT_UART_CTS_PIN, BLUEFRUIT_UART_RTS_PIN);
*/

/* ...or hardware serial, which does not need the RTS/CTS pins. Uncomment this line */
// Adafruit_BluefruitLE_UART ble(BLUEFRUIT_HWSERIAL_NAME, BLUEFRUIT_UART_MODE_PIN);

/* ...hardware SPI, using SCK/MOSI/MISO hardware SPI pins and then user selected CS/IRQ/RST */
Adafruit_BluefruitLE_SPI ble(BLUEFRUIT_SPI_CS, BLUEFRUIT_SPI_IRQ, BLUEFRUIT_SPI_RST);

/* ...software SPI, using SCK/MOSI/MISO user-defined SPI pins and then user selected CS/IRQ/RST */
//Adafruit_BluefruitLE_SPI ble(BLUEFRUIT_SPI_SCK, BLUEFRUIT_SPI_MISO,
//                             BLUEFRUIT_SPI_MOSI, BLUEFRUIT_SPI_CS,
//                             BLUEFRUIT_SPI_IRQ, BLUEFRUIT_SPI_RST);

Adafruit_BLEMIDI midi(ble);

bool isConnected = false;

int current_note1 = 60;
int current_note2 = 72;

int current_control1, last_control1;
int current_control2, last_control2;

// A small helper
void error(const __FlashStringHelper*err) {
  Serial.println(err);
  while (1);
}

// callback
void connected(void)
{
  isConnected = true;

  Serial.println(F(" CONNECTED!"));
  delay(1000);

}

void disconnected(void)
{
  Serial.println("disconnected");
  isConnected = false;
}

void BleMidiRX(uint16_t timestamp, uint8_t status, uint8_t byte1, uint8_t byte2)
{
  Serial.print("[MIDI ");
  Serial.print(timestamp);
  Serial.print(" ] ");

  Serial.print(status, HEX); Serial.print(" ");
  Serial.print(byte1 , HEX); Serial.print(" ");
  Serial.print(byte2 , HEX); Serial.print(" ");

  Serial.println();
}

void setup(void)
{
  while (!Serial);  // required for Flora & Micro
  delay(500);

  // prepare button inputs
  pinMode(button1, INPUT_PULLUP);
  pinMode(button2, INPUT_PULLUP);

  Serial.begin(115200);
  Serial.println(F("Adafruit Bluefruit MIDI Example"));
  Serial.println(F("---------------------------------------"));

  /* Initialise the module */
  Serial.print(F("Initialising the Bluefruit LE module: "));

  if ( !ble.begin(VERBOSE_MODE) )
  {
    error(F("Couldn't find Bluefruit, make sure it's in CoMmanD mode & check wiring?"));
  }
  Serial.println( F("OK!") );

  if ( FACTORYRESET_ENABLE )
  {
    /* Perform a factory reset to make sure everything is in a known state */
    Serial.println(F("Performing a factory reset: "));
    if ( ! ble.factoryReset() ) {
      error(F("Couldn't factory reset"));
    }
  }

  //ble.sendCommandCheckOK(F("AT+uartflow=off"));
  ble.echo(false);

  Serial.println("Requesting Bluefruit info:");
  /* Print Bluefruit information */
  ble.info();

  /* Set BLE callbacks */
  ble.setConnectCallback(connected);
  ble.setDisconnectCallback(disconnected);

  // Set MIDI RX callback
  midi.setRxCallback(BleMidiRX);

  Serial.println(F("Enable MIDI: "));
  if ( ! midi.begin(true) )
  {
    error(F("Could not enable MIDI"));
  }

  ble.verbose(false);
  Serial.print(F("Waiting for a connection..."));
}

void loop(void)
{
  // interval for each scanning ~ 500ms (non blocking)
  ble.update(500);

  // bail if not connected
  if (! isConnected)
    return;

  // Get analog control readings
  current_control1 = (analogRead(control_change1) >> 3);
  current_control2 = (analogRead(control_change2) >> 3);


  if(abs(current_control1-last_control1) > 4)
  {
    Serial.println(current_control1);
    midi.send(0xB0, modulation_wheel, current_control1);
    last_control1 = current_control1;
  }

  if(abs(current_control2-last_control2) > 4)
  {
    Serial.println(current_control2);
    midi.send(0xB0, channel_volume, current_control2);
    last_control2 = current_control2;
  }


  if(digitalRead(button1) == 0)
  {

    // send note on
    midi.send(0x90, current_note1, 0x64);
    delay(500);

    // send note off
    midi.send(0x80, current_note1, 0x64);
    delay(500);

  }

  if(digitalRead(button2) == 0)
  {

    // send note on
    midi.send(0x90, current_note2, 0x64);
    delay(500);

    // send note off
    midi.send(0x80, current_note2, 0x64);
    delay(500);

  }

}
Here is the whole code.
					// define buttons
#define button1 A3
#define button2 A4
#define control_change1 A0
#define control_change2 A1

// define control change functions
#define modulation_wheel  1
#define channel_volume    7
#define pan_controller    10
#define reverb            91
Here are the defines used
					int current_note1 = 60;
int current_note2 = 72;

int current_control1, last_control1;
int current_control2, last_control2;
Here are some of the additional declared variables.
Current_note1 and 2 are constant note values that will be sent as Note ON and OF messages. You’ll be able to apply controller change values on these notes and hear distinct changes in the way they sound.
Current_control1 and 2 hold the current controller values that change while you turn the potentiometer. last _control1 and 2 hold the previous controller values so that you’ll know if there was a specific change that happened. When the values change significantly, a controller change message will be sent. This is illustrated in the code segment below:
					  // Get analog control readings
  current_control1 = (analogRead(control_change1) >> 3);
  current_control2 = (analogRead(control_change2) >> 3);


  if(abs(current_control1-last_control1) > 4)
  {
    Serial.println(current_control1);
    midi.send(0xB0, modulation_wheel, current_control1);
    last_control1 = current_control1;
  }

  if(abs(current_control2-last_control2) > 4)
  {
    Serial.println(current_control2);
    midi.send(0xB0, channel_volume, current_control2);
    last_control2 = current_control2;
  }
The current_control1 value changes the modulation wheel while current_control2 changes the channel volume.
The note messages are simply relayed when you press the 2 digital buttons as seen below:
					  if(digitalRead(button1) == 0)
  {

    // send note on
    midi.send(0x90, current_note1, 0x64);
    delay(500);

    // send note off
    midi.send(0x80, current_note1, 0x64);
    delay(500);

  }

  if(digitalRead(button2) == 0)
  {

    // send note on
    midi.send(0x90, current_note2, 0x64);
    delay(500);

    // send note off
    midi.send(0x80, current_note2, 0x64);
    delay(500);

  }
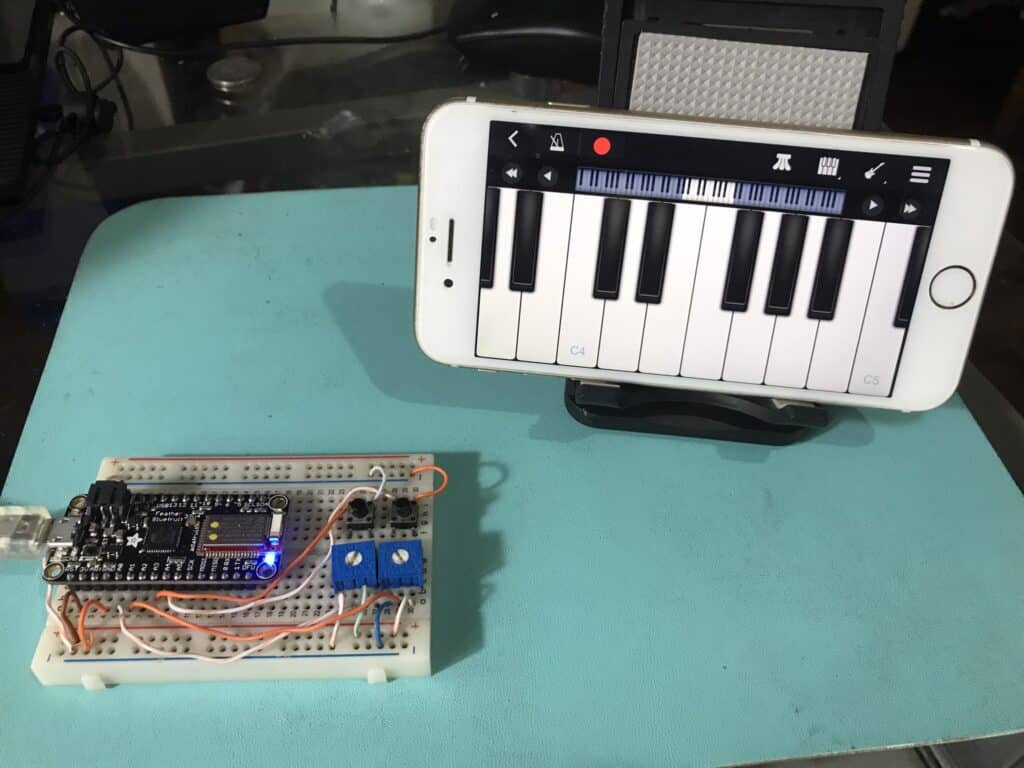
Upload the source code to your Bluefruit Feather.
Next, download the midimittr and the Perfect Piano app from the Appstrore to your iPhone. On midimittr, go to Device and connect to Adafruit Bluefruit LE. After that, open Perfect Piano. You should now be able to play your Feather as a musical instrument.