These days almost every smartphone has Bluetooth. How awesome would it be if you could control the world by using just your phone’s Bluetooth feature? Well, it’s possible and simply, and it is precisely what we will learn right now!
Introduction
Multi-media remote controllers have a niche market. They’re sold in different electronics shops online. They’re a favourable accessory, especially for the coach potato who likes to control things with his electronic remote wand. Consequently, didn’t you know that you can build a remote media controller out of a Feather board? Continue reading the next parts of this article to find out.
The Human Interface Device (HID)
HID stands for Human Interface Device. It’s an interface designed for PCs that allows devices to interact with humans to extract valuable data. Examples of such devices are the mouse and keyboard. All of these devices’ inputs usually come from the person using them. These inputs are then used by your PC to process some operations. This HID Class was born out of the USB (Universal Serial Bus) specification.
The Bluethooth HID Profile
Since Bluetooth is a wireless protocol and HID is usually wired to USB specifications, Bluetooth HID acts like a wrapper for the HID class of devices using Bluetooth. Your Feather board, the 32u4 Bluefruit LE, can provide the BLE HID profile and many other pre-defined Bluetooth profiles. Consequently, the HID Class includes the Consumer Control Keys. These keys can be used for multimedia functions, system control, application launchers, and browser-specific keys.
Creating a Media Controller From The Adafruit Feather
The 32u4 Adafruit Bluefruit LE Feather board perfectly matches this job. You can define the Feather’s BLE module profile with an HID Consumer Control Keys class. This class allows you to control several multimedia functions on your PC and even on your smartphones or smart TVs if they support it.
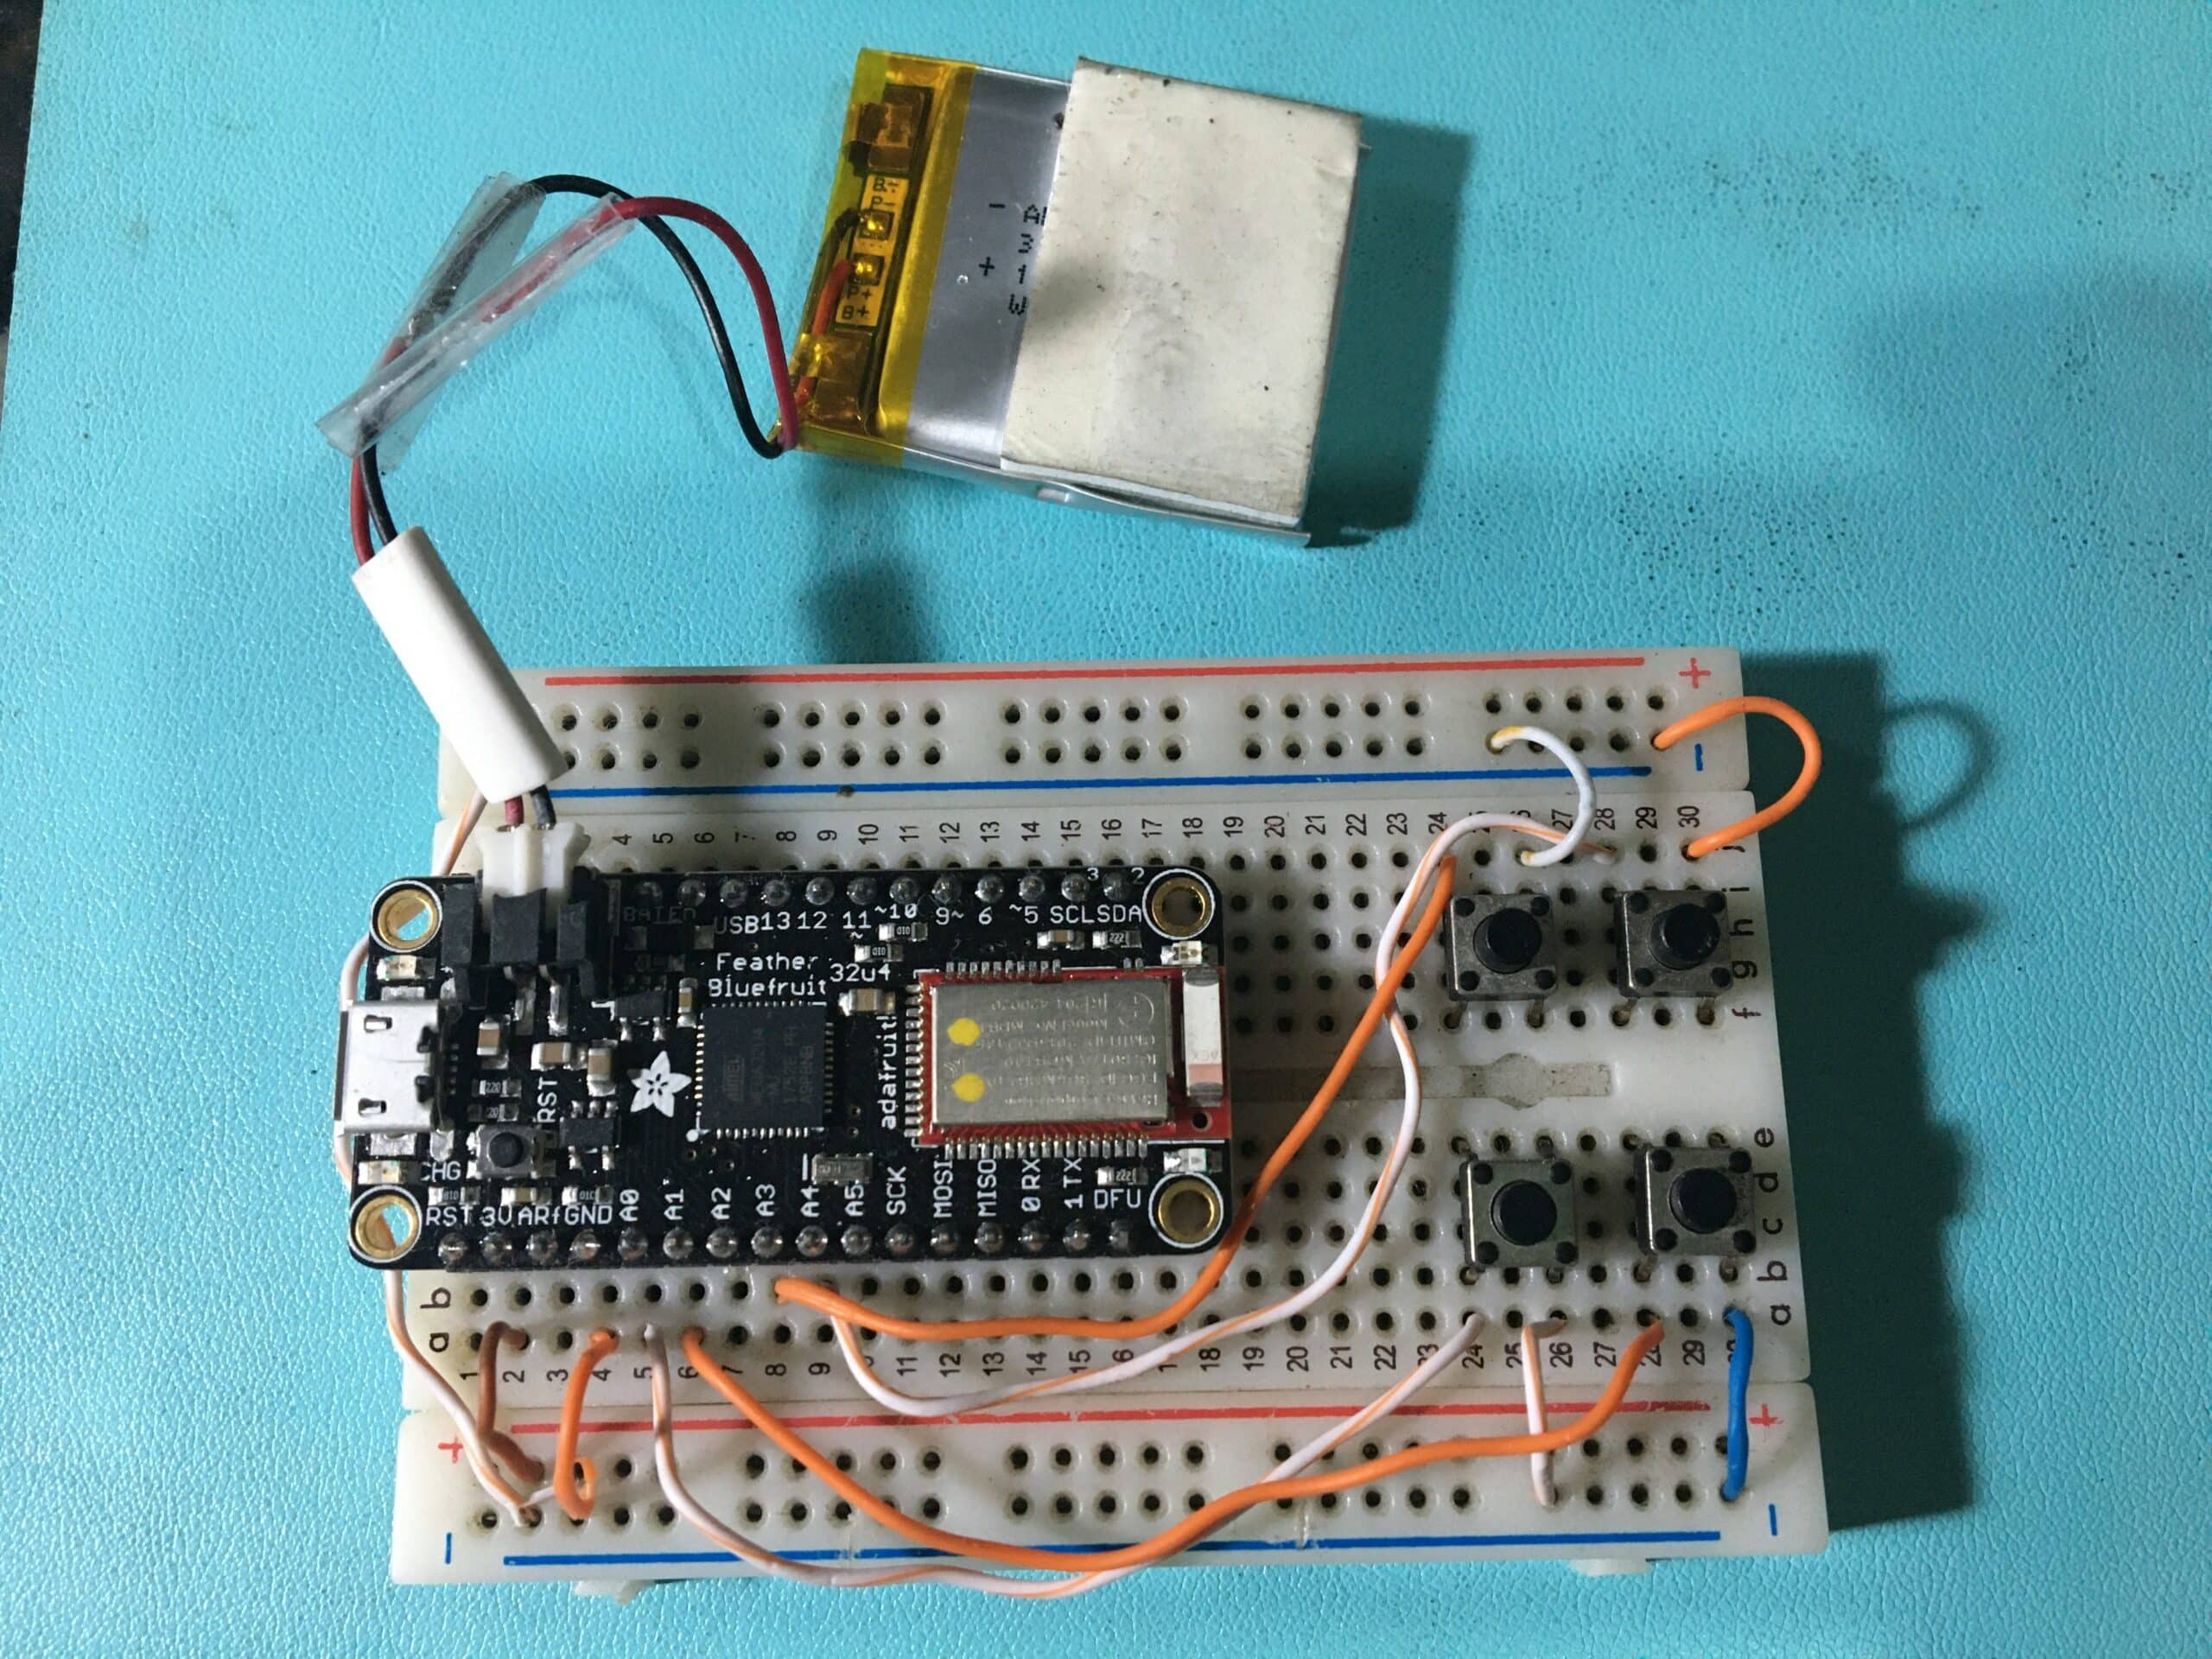
First, insert tactile buttons on a breadboard to connect to your Feather’s digital I/Os pins. Define the buttons as:
- Button1 – Play/Pause
- Button2 – Home
- Button3 – Volume+
- Button4 – Volume-
Several more HID Control Keys can be added. Listed below are some other functions you try:
- BRIGHTNESS+
- BRIGHTNESS
- PLAYPAUSE
- MEDIANEXT
- MEDIAPREVIOUS
- MEDIASTOP
- VOLUME
- MUTE
- BASS
- TREBLE
- BASS_BOOST
- VOLUME+
- VOLUME-
- BASS+
- BASS-
- TREBLE+
- TREBLE-
- EMAILREADER
- CALCULATOR
- FILEBROWSER
- SEARCH
- HOME
- BACK
- FORWARD
- STOP
- REFRESH
- BOOKMARKS
Code
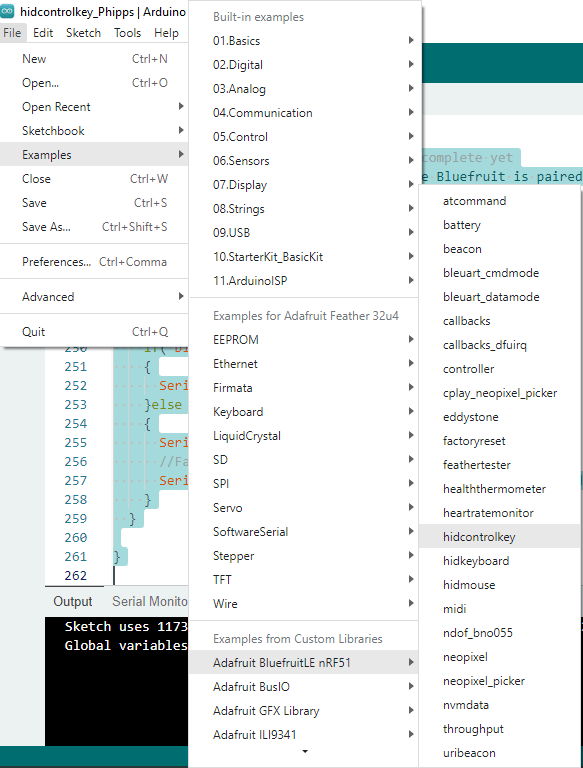
You can use the example code provided under the “Adafruit BluefruitLE nRF51” > “hidcontrolkey” as a base for getting started.
Here the code will be edited to take in 4 presses from buttons which relates to the defined HID consumer keys Play/Paus, Home, Volume Up, and Volume Down.
The whole code is found here:
					/*********************************************************************
 This is an example for our nRF51822 based Bluefruit LE modules

 Pick one up today in the adafruit shop!

 Adafruit invests time and resources providing this open source code,
 please support Adafruit and open-source hardware by purchasing
 products from Adafruit!

 MIT license, check LICENSE for more information
 All text above, and the splash screen below must be included in
 any redistribution
*********************************************************************/

/*
  This example shows how to send HID Consumer Control Keys,
  ncluding the following control key definitions:

  System Control (works on most systems: Windows/OS X/Android/iOS)
    - Sound Mute
    - Brightness Increase, decrease
  Media Control (works on most systems)
    - PlayPause
    - MediaNext
  Application Launchers (works mainly on Windows 8/10)
    - EmailReader
    - Calculator
  Browser Specific (Firefox, file explorer: mainly on Windows 8/10)
    - Back
    - Forward
    - Refresh
    - Search
*/

#include <Arduino.h>
#include <SPI.h>
#include "Adafruit_BLE.h"
#include "Adafruit_BluefruitLE_SPI.h"
#include "Adafruit_BluefruitLE_UART.h"

#include "BluefruitConfig.h"

#if SOFTWARE_SERIAL_AVAILABLE
  #include <SoftwareSerial.h>
#endif

// define buttons
#define button1 A3
#define button2 A4
#define button3 A0
#define button4 A1


/*=========================================================================
    APPLICATION SETTINGS

    FACTORYRESET_ENABLE       Perform a factory reset when running this sketch

                              Enabling this will put your Bluefruit LE module
                              in a 'known good' state and clear any config
                              data set in previous sketches or projects, so
                              running this at least once is a good idea.

                              When deploying your project, however, you will
                              want to disable factory reset by setting this
                              value to 0.  If you are making changes to your
                              Bluefruit LE device via AT commands, and those
                              changes aren't persisting across resets, this
                              is the reason why.  Factory reset will erase
                              the non-volatile memory where config data is
                              stored, setting it back to factory default
                              values.

                              Some sketches that require you to bond to a
                              central device (HID mouse, keyboard, etc.)
                              won't work at all with this feature enabled
                              since the factory reset will clear all of the
                              bonding data stored on the chip, meaning the
                              central device won't be able to reconnect.
    MINIMUM_FIRMWARE_VERSION  Minimum firmware version to have some new features
    -----------------------------------------------------------------------*/
    #define FACTORYRESET_ENABLE         0
    #define MINIMUM_FIRMWARE_VERSION    "0.6.6"
/*=========================================================================*/


// Create the bluefruit object, either software serial...uncomment these lines
/*
SoftwareSerial bluefruitSS = SoftwareSerial(BLUEFRUIT_SWUART_TXD_PIN, BLUEFRUIT_SWUART_RXD_PIN);

Adafruit_BluefruitLE_UART ble(bluefruitSS, BLUEFRUIT_UART_MODE_PIN,
                      BLUEFRUIT_UART_CTS_PIN, BLUEFRUIT_UART_RTS_PIN);
*/

/* ...or hardware serial, which does not need the RTS/CTS pins. Uncomment this line */
// Adafruit_BluefruitLE_UART ble(BLUEFRUIT_HWSERIAL_NAME, BLUEFRUIT_UART_MODE_PIN);

/* ...hardware SPI, using SCK/MOSI/MISO hardware SPI pins and then user selected CS/IRQ/RST */
Adafruit_BluefruitLE_SPI ble(BLUEFRUIT_SPI_CS, BLUEFRUIT_SPI_IRQ, BLUEFRUIT_SPI_RST);

/* ...software SPI, using SCK/MOSI/MISO user-defined SPI pins and then user selected CS/IRQ/RST */
//Adafruit_BluefruitLE_SPI ble(BLUEFRUIT_SPI_SCK, BLUEFRUIT_SPI_MISO,
//                             BLUEFRUIT_SPI_MOSI, BLUEFRUIT_SPI_CS,
//                             BLUEFRUIT_SPI_IRQ, BLUEFRUIT_SPI_RST);

// A small helper
void error(const __FlashStringHelper*err) {
  Serial.println(err);
  while (1);
}

/**************************************************************************/
/*!
    @brief  Sets up the HW an the BLE module (this function is called
            automatically on startup)
*/
/**************************************************************************/
void setup(void)
{
  while (!Serial);  // Required for Flora & Micro
  delay(500);

  // prepare button inputs
  pinMode(button1, INPUT_PULLUP);
  pinMode(button2, INPUT_PULLUP);
  pinMode(button3, INPUT_PULLUP);
  pinMode(button4, INPUT_PULLUP);


  Serial.begin(115200);
  Serial.println(F("Adafruit Bluefruit HID Control Key Example"));
  Serial.println(F("---------------------------------------"));

  /* Initialise the module */
  //Serial.print(F("Initialising the Bluefruit LE module: "));

  if ( !ble.begin(VERBOSE_MODE) )
  {
    error(F("Couldn't find Bluefruit, make sure it's in CoMmanD mode & check wiring?"));
  }
  Serial.println( F("OK!") );

  if ( FACTORYRESET_ENABLE )
  {
    /* Perform a factory reset to make sure everything is in a known state */
    //Serial.println(F("Performing a factory reset: "));
    if ( ! ble.factoryReset() ){
      error(F("Factory reset failed!"));
    }
  }

  /* Disable command echo from Bluefruit */
  ble.echo(false);

  //Serial.println("Requesting Bluefruit info:");
  /* Print Bluefruit information */
  ble.info();

  // This demo only works with firmware 0.6.6 and higher!
  // Request the Bluefruit firmware rev and check if it is valid
  if ( !ble.isVersionAtLeast(MINIMUM_FIRMWARE_VERSION) )
  {
    error(F("This sketch requires firmware version " MINIMUM_FIRMWARE_VERSION " or higher!"));
  }

  /* Enable HID Service */
  //Serial.println(F("Enable HID Services (including Control Key): "));
  if (! ble.sendCommandCheckOK(F( "AT+BLEHIDEN=On"  ))) {
    error(F("Failed to enable HID (firmware >=0.6.6?)"));
  }

  /* Adding or removing services requires a reset */
  //Serial.println(F("Performing a SW reset (service changes require a reset): "));
  if (! ble.reset() ) {
    error(F("Couldn't reset??"));
  }

  Serial.println();
  Serial.println(F("**********************************************************"));
  Serial.println(F("Go to your phone's Bluetooth settings to pair your device"));
  Serial.println(F("Some Control Key works system-wide: mute, brightness ..."));
  Serial.println(F("Some are application specific: Media play/pause"));
  Serial.println(F("**********************************************************"));


  Serial.println();
}

/**************************************************************************/
/*!
    @brief  Constantly poll for new command or response data
*/
/**************************************************************************/
void loop(void)
{
  if(digitalRead(button1) == 0)
  {
    delay(500);
    ble.print("AT+BleHidControlKey=");
    ble.println("PLAYPAUSE");
    if( ble.waitForOK() )
    {
      Serial.println( F("OK!") );
    }else
    {
      Serial.println( F("FAILED!") );
      //Failed, probably pairing is not complete yet
      Serial.println( F("Please make sure Bluefruit is paired and try again") );
    }
  }

  if(digitalRead(button2) == 0)
  {
    delay(500);
    ble.print("AT+BleHidControlKey=");
    ble.println("HOME");
    if( ble.waitForOK() )
    {
      Serial.println( F("OK!") );
    }else
    {
      Serial.println( F("FAILED!") );
      //Failed, probably pairing is not complete yet
      Serial.println( F("Please make sure Bluefruit is paired and try again") );
    }

  }

  if(digitalRead(button3) == 0)
  {
    delay(500);
    ble.print("AT+BleHidControlKey=");
    ble.println("VOLUME+");
    if( ble.waitForOK() )
    {
      Serial.println( F("OK!") );
    }else
    {
      Serial.println( F("FAILED!") );
      //Failed, probably pairing is not complete yet
      Serial.println( F("Please make sure Bluefruit is paired and try again") );
    }
  }

  if(digitalRead(button4) == 0)
  {
    delay(500);
    ble.print("AT+BleHidControlKey=");
    ble.println("VOLUME-");
    if( ble.waitForOK() )
    {
      Serial.println( F("OK!") );
    }else
    {
      Serial.println( F("FAILED!") );
      //Failed, probably pairing is not complete yet
      Serial.println( F("Please make sure Bluefruit is paired and try again") );
    }
  }

}
Code Explanation
To start, a declaration of the buttons used is defined as:
					// define buttons
#define button1 A3
#define button2 A4
#define button3 A0
#define button4 A1
Next, these keys are assigned as digital inputs with pull-ups:
					  // prepare button inputs
  pinMode(button1, INPUT_PULLUP);
  pinMode(button2, INPUT_PULLUP);
  pinMode(button3, INPUT_PULLUP);
  pinMode(button4, INPUT_PULLUP);
The next pieces of code are the usual setup processes to prepare the 32u4 and the Bluetooth module of your Bluefruit LE. You can find info on this in our previous blog.
Of particular interest here is the statement to enable the BLE-HID service:
					  /* Enable HID Service */
  //Serial.println(F("Enable HID Services (including Control Key): "));
  if (! ble.sendCommandCheckOK(F( "AT+BLEHIDEN=On"  ))) {
    error(F("Failed to enable HID (firmware >=0.6.6?)"));
  }
Next, the loop code is given as:
					void loop(void)
{
  if(digitalRead(button1) == 0)
  {
    delay(500);
    ble.print("AT+BleHidControlKey=");
    ble.println("PLAYPAUSE");
    if( ble.waitForOK() )
    {
      Serial.println( F("OK!") );
    }else
    {
      Serial.println( F("FAILED!") );
      //Failed, probably pairing is not complete yet
      Serial.println( F("Please make sure Bluefruit is paired and try again") );
    }
  }

  if(digitalRead(button2) == 0)
  {
    delay(500);
    ble.print("AT+BleHidControlKey=");
    ble.println("HOME");
    if( ble.waitForOK() )
    {
      Serial.println( F("OK!") );
    }else
    {
      Serial.println( F("FAILED!") );
      //Failed, probably pairing is not complete yet
      Serial.println( F("Please make sure Bluefruit is paired and try again") );
    }

  }

  if(digitalRead(button3) == 0)
  {
    delay(500);
    ble.print("AT+BleHidControlKey=");
    ble.println("VOLUME+");
    if( ble.waitForOK() )
    {
      Serial.println( F("OK!") );
    }else
    {
      Serial.println( F("FAILED!") );
      //Failed, probably pairing is not complete yet
      Serial.println( F("Please make sure Bluefruit is paired and try again") );
    }
  }

  if(digitalRead(button4) == 0)
  {
    delay(500);
    ble.print("AT+BleHidControlKey=");
    ble.println("VOLUME-");
    if( ble.waitForOK() )
    {
      Serial.println( F("OK!") );
    }else
    {
      Serial.println( F("FAILED!") );
      //Failed, probably pairing is not complete yet
      Serial.println( F("Please make sure Bluefruit is paired and try again") );
    }
  }

}
Each button is checked for a press and then debounced with a 500ms delay. Every time a button is pressed, the corresponding BLE AT HID Control Key command is sent to your phone’s Bluetooth module. A failure notice is displayed on the serial port if a “wait for OK check” is not received.
Below is a video of the code in action.


