Explore the capabilities of the Adafruit Feather 32u4 Bluefruit LE by turning it into a working Bluetooth mouse.
Introduction
The previous blog introduced the Adafruit Feather 32u4 Bluefruit LE along with making a simple Bluetooth HID keyboard with it. Now, this blog will demonstrate how to make a simple Bluetooth HID mouse out of this dev board. The components of the Feather 32u4 BlueFruit LE namely, the ATMega32u4 and the nRF51822 are a perfect fit for this job. Factor in the small form factor and ease of use of the Feather boards and you’ll get a satisfactorily made Bluetooth LE development system, just right for its price.
What You'll Need
You don’t need a lot of complex components to turn your BlueFruit Feather into a simple HID mouse. See the list below:
-
- Your Feather 32u4 Bluefruit LE from Adafruit
-
- A small breadboard
-
- An analog-stick accessory board
-
- some jumper wires
-
- Bluetooth enabled android phone or PC
Wiring The Parts
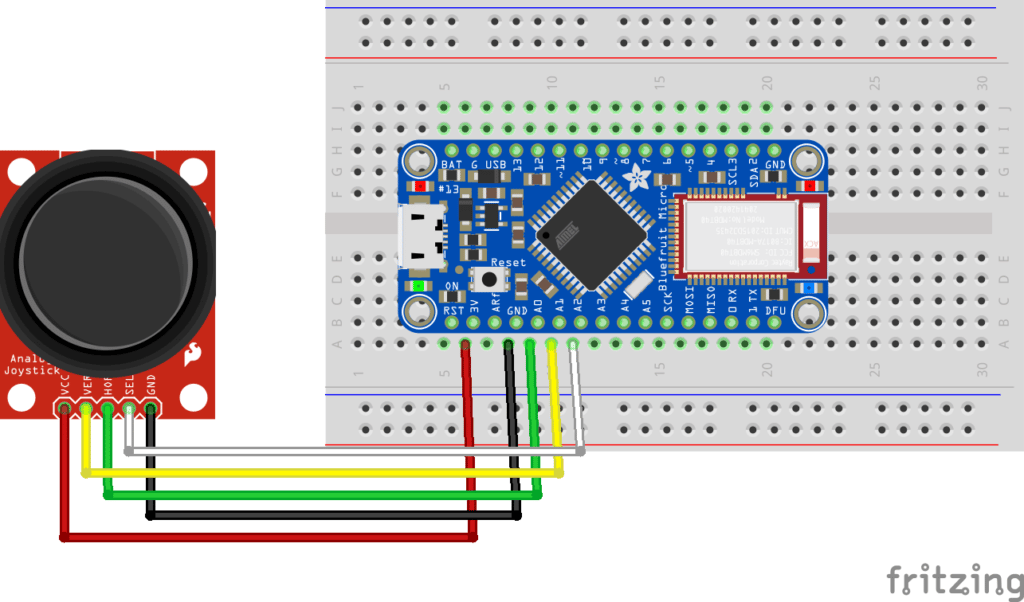
Simply wire the analog stick’s x and y axis to available ADC ports on your Feather. Additionally, wire the push button of the stick to a digital I/O port. See the Fritzing diagram below:
Creating Code for your Bluetooth HID Mouse
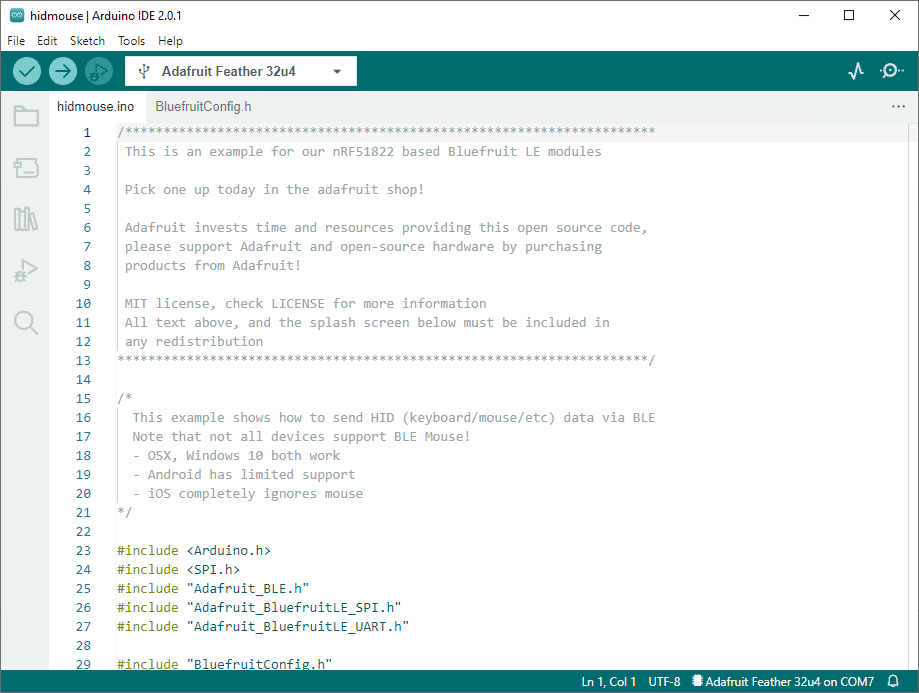
Open up your Arduino IDE. You should have gone through preparing your Arduino IDE for the 32u4 Bluetooth LE in this previous blog. Now open the Examples library in your IDE by going to File-> Examples->Adafruit BluefruitLE nRF51->hidmouse.

You’ll simply use this project as a reference. This project is so simple, it just asks the user to input mouse coordinate values and then plots the points or lines on your device. This library has both the BluefruitConfig.h and the hidmouse.ino files. It’s the hidmouse.ino file that we’ll edit.
We’ll add in some analog stick and mouse variables, as well as move an array variable in this part of the code as seen below:

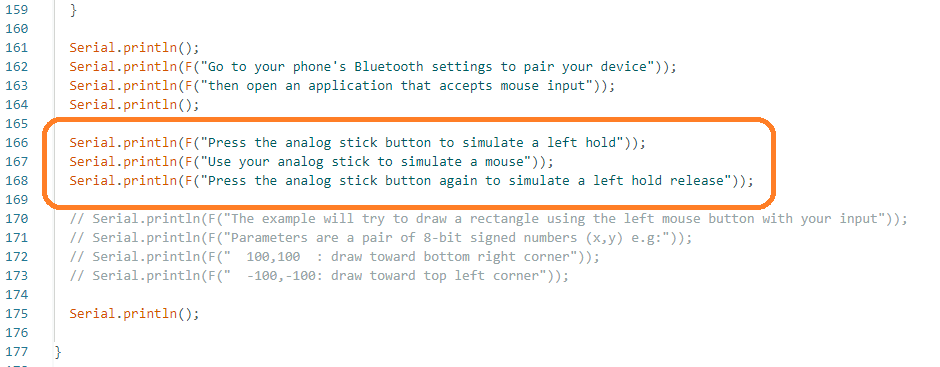
Consequently, some screen messages must be modified to match our intention:
On setup, Bluetooth HID functionality is brought up easily through the statement:
(ble.sendCommandCheckOK(F("AT+BleHidMouseButton=0")
After that, the loop code will also be modified to be able to respond to the analog stick’s push button and potentiometer controls.
					void loop(void)
{

  // Check analog stick button
  if(digitalRead(Left_Click) == 0)
  {
    delay(250);
    left_click_latch ^= 1;
    if(left_click_latch == 1)
    {
      if ( ble.sendCommandCheckOK(F("AT+BleHidMouseButton=L,press")) )
      {
        // Press (and hold) the Left mouse's button
      }else{
        Serial.println( F("Please make sure Bluefruit is paired and try again") );
      }
    }else{
      if (ble.sendCommandCheckOK(F("AT+BleHidMouseButton=0")))
      {
        // Release the Left mouse's button
      }else{
        Serial.println( F("Please make sure Bluefruit is paired and try again") );
      }
    }
  }

  if(left_click_latch)
  {
    // difference of analog inputs
    x_mouse = x_mouse2 - x_mouse1;
    y_mouse = y_mouse1 - y_mouse2;

    sprintf(input, "%i,%i", x_mouse, y_mouse);

    // Mouse moves according to the user's input
    ble.print(F("AT+BleHidMouseMove="));
    ble.println(input);

    // fetch analog inputs 1
    x_mouse1 = (analogRead(X_Mouse)/4);
    y_mouse1 = (analogRead(Y_Mouse)/4);


    if( ble.waitForOK() )
    {
      Serial.println( F("OK!") );
    }else
    {
      Serial.println( F("FAILED!") );
    }

    // fetch analog inputs 2
    x_mouse2 = analogRead(X_Mouse)/4;
    y_mouse2 = analogRead(Y_Mouse)/4;


  }else{

  }
}
As you see we are first checking the push button if it was clicked. If it is, a variable will latch its value simulating a left mouse click. This will be relayed to the BLE through the
ble.sendCommandCheckOK(F("AT+BleHidMouseButton=L,press")
statement. After that, mouse movements can be picked up. The x_mouse and y_mouse as well as the input array variables take care of these values. The statements
					    ble.print(F("AT+BleHidMouseMove="));
    ble.println(input);
will actually take care of making the mouse move through BLE.
This program takes advantage of the serial nature of operating the BLE module. It’s so easy to operate it through serial text commands. It’s using something similar to the once popular Hayes AT style commands set. The communication is done through the hardware SPI interfaces of the modules.
Once the user wants to exit drawing mode, he can click the analog stick button once again. This simulates releasing the mouse button.
(ble.sendCommandCheckOK(F("AT+BleHidMouseButton=0")
Trying It Out
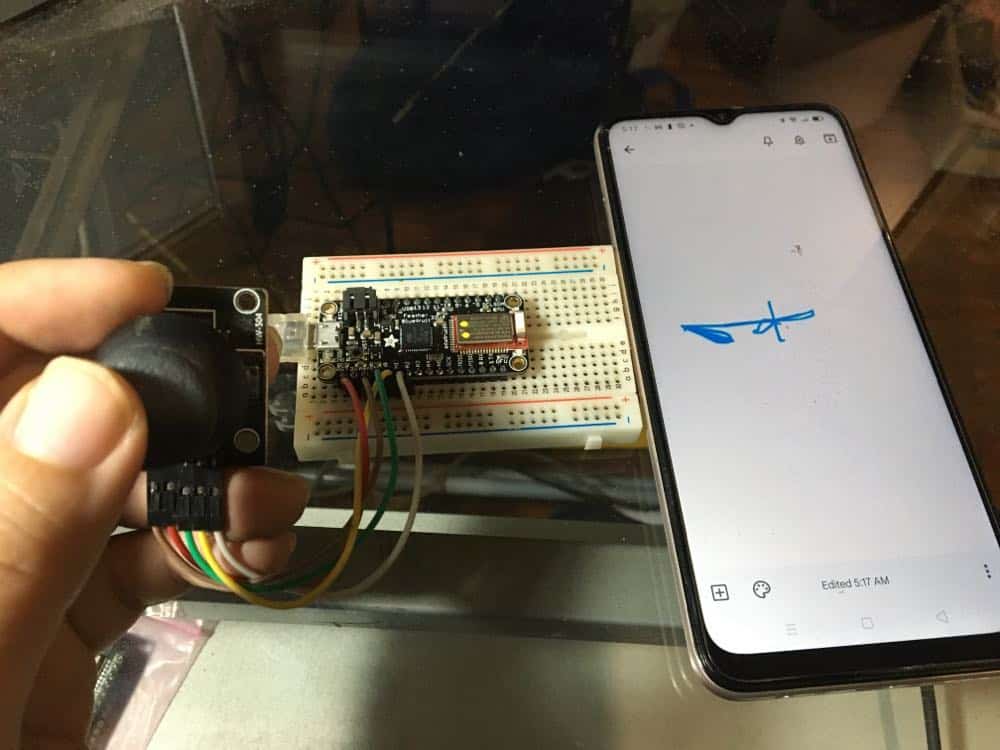
After programming the code into your Feather make sure you go through your Serial Monitor. After that, go through Bluetooth pairing mode on your device. After it’s paired, you can continue clicking the analog stick and then move the analog control. You should see it drawing lines or graphics on a drawing app. The app used here is Google Keep Notes which runs on an Android-based smartphone. (See below)
The entire modified code:
					/*********************************************************************
 This is an example for our nRF51822 based Bluefruit LE modules

 Pick one up today in the adafruit shop!

 Adafruit invests time and resources providing this open source code,
 please support Adafruit and open-source hardware by purchasing
 products from Adafruit!

 MIT license, check LICENSE for more information
 All text above, and the splash screen below must be included in
 any redistribution
*********************************************************************/

/*
  This example shows how to send HID (keyboard/mouse/etc) data via BLE
  Note that not all devices support BLE Mouse!
  - OSX, Windows 10 both work
  - Android has limited support
  - iOS completely ignores mouse
*/

#include <Arduino.h>
#include <SPI.h>
#include "Adafruit_BLE.h"
#include "Adafruit_BluefruitLE_SPI.h"
#include "Adafruit_BluefruitLE_UART.h"

#include "BluefruitConfig.h"

#if SOFTWARE_SERIAL_AVAILABLE
  #include <SoftwareSerial.h>
#endif

/*=========================================================================
    APPLICATION SETTINGS

    FACTORYRESET_ENABLE       Perform a factory reset when running this sketch

                              Enabling this will put your Bluefruit LE module
                              in a 'known good' state and clear any config
                              data set in previous sketches or projects, so
                              running this at least once is a good idea.

                              When deploying your project, however, you will
                              want to disable factory reset by setting this
                              value to 0.  If you are making changes to your
                              Bluefruit LE device via AT commands, and those
                              changes aren't persisting across resets, this
                              is the reason why.  Factory reset will erase
                              the non-volatile memory where config data is
                              stored, setting it back to factory default
                              values.

                              Some sketches that require you to bond to a
                              central device (HID mouse, keyboard, etc.)
                              won't work at all with this feature enabled
                              since the factory reset will clear all of the
                              bonding data stored on the chip, meaning the
                              central device won't be able to reconnect.
    MINIMUM_FIRMWARE_VERSION  Minimum firmware version to have some new features
    -----------------------------------------------------------------------*/
    #define FACTORYRESET_ENABLE         0
    #define MINIMUM_FIRMWARE_VERSION    "0.6.6"
/*=========================================================================*/

#define Y_Mouse A0
#define X_Mouse A1
#define Left_Click  A2

uint8_t left_click_latch = 0;
int8_t x_mouse, y_mouse, x_mouse1, y_mouse1, x_mouse2, y_mouse2;

char input[BUFSIZE+1];

// Create the bluefruit object, either software serial...uncomment these lines
/*
SoftwareSerial bluefruitSS = SoftwareSerial(BLUEFRUIT_SWUART_TXD_PIN, BLUEFRUIT_SWUART_RXD_PIN);

Adafruit_BluefruitLE_UART ble(bluefruitSS, BLUEFRUIT_UART_MODE_PIN,
                      BLUEFRUIT_UART_CTS_PIN, BLUEFRUIT_UART_RTS_PIN);
*/

/* ...or hardware serial, which does not need the RTS/CTS pins. Uncomment this line */
// Adafruit_BluefruitLE_UART ble(BLUEFRUIT_HWSERIAL_NAME, BLUEFRUIT_UART_MODE_PIN);

/* ...hardware SPI, using SCK/MOSI/MISO hardware SPI pins and then user selected CS/IRQ/RST */
Adafruit_BluefruitLE_SPI ble(BLUEFRUIT_SPI_CS, BLUEFRUIT_SPI_IRQ, BLUEFRUIT_SPI_RST);

/* ...software SPI, using SCK/MOSI/MISO user-defined SPI pins and then user selected CS/IRQ/RST */
//Adafruit_BluefruitLE_SPI ble(BLUEFRUIT_SPI_SCK, BLUEFRUIT_SPI_MISO,
//                             BLUEFRUIT_SPI_MOSI, BLUEFRUIT_SPI_CS,
//                             BLUEFRUIT_SPI_IRQ, BLUEFRUIT_SPI_RST);

// A small helper
void error(const __FlashStringHelper*err) {
  Serial.println(err);
  while (1);
}

/**************************************************************************/
/*!
    @brief  Sets up the HW an the BLE module (this function is called
            automatically on startup)
*/
/**************************************************************************/
void setup(void)
{
  while (!Serial);  // required for Flora & Micro
  delay(500);

  pinMode(Left_Click, INPUT_PULLUP);

  Serial.begin(115200);
  Serial.println(F("Adafruit Bluefruit HID Mouse Example"));
  Serial.println(F("---------------------------------------"));

  /* Initialise the module */
  Serial.print(F("Initialising the Bluefruit LE module: "));

  if ( !ble.begin(VERBOSE_MODE) )
  {
    error(F("Couldn't find Bluefruit, make sure it's in CoMmanD mode & check wiring?"));
  }
  Serial.println( F("OK!") );

  if ( FACTORYRESET_ENABLE )
  {
    /* Perform a factory reset to make sure everything is in a known state */
    Serial.println(F("Performing a factory reset: "));
    if ( ! ble.factoryReset() ){
      error(F("Couldn't factory reset"));
    }
  }

  /* Disable command echo from Bluefruit */
  ble.echo(false);

  Serial.println("Requesting Bluefruit info:");
  /* Print Bluefruit information */
  ble.info();

  // This demo only available for firmware from 0.6.6
  if ( !ble.isVersionAtLeast(MINIMUM_FIRMWARE_VERSION) )
  {
    error(F("This sketch requires firmware version " MINIMUM_FIRMWARE_VERSION " or higher!"));
  }

  /* Enable HID Service (including Mouse) */
  Serial.println(F("Enable HID Service (including Mouse): "));
  if (! ble.sendCommandCheckOK(F( "AT+BleHIDEn=On"  ))) {
    error(F("Failed to enable HID (firmware >=0.6.6?)"));
  }

  /* Add or remove service requires a reset */
  Serial.println(F("Performing a SW reset (service changes require a reset): "));
  if (! ble.reset() ) {
    error(F("Could not reset??"));
  }

  Serial.println();
  Serial.println(F("Go to your phone's Bluetooth settings to pair your device"));
  Serial.println(F("then open an application that accepts mouse input"));
  Serial.println();

  Serial.println(F("Press the analog stick button to simulate a left hold"));
  Serial.println(F("Use your analog stick to simulate a mouse"));
  Serial.println(F("Press the analog stick button again to simulate a left hold release"));

  // Serial.println(F("The example will try to draw a rectangle using the left mouse button with your input"));
  // Serial.println(F("Parameters are a pair of 8-bit signed numbers (x,y) e.g:"));
  // Serial.println(F("  100,100  : draw toward bottom right corner"));
  // Serial.println(F("  -100,-100: draw toward top left corner"));

  Serial.println();

}

/**************************************************************************/
/*!
    @brief  Constantly poll for new command or response data
*/
/**************************************************************************/
void loop(void)
{

  // Check analog stick button
  if(digitalRead(Left_Click) == 0)
  {
    delay(250);
    left_click_latch ^= 1;
    if(left_click_latch == 1)
    {
      if ( ble.sendCommandCheckOK(F("AT+BleHidMouseButton=L,press")) )
      {
        // Press (and hold) the Left mouse's button
      }else{
        Serial.println( F("Please make sure Bluefruit is paired and try again") );
      }
    }else{
      if (ble.sendCommandCheckOK(F("AT+BleHidMouseButton=0")))
      {
        // Release the Left mouse's button
      }else{
        Serial.println( F("Please make sure Bluefruit is paired and try again") );
      }
    }
  }

  if(left_click_latch)
  {
    // difference of analog inputs
    x_mouse = x_mouse2 - x_mouse1;
    y_mouse = y_mouse1 - y_mouse2;

    sprintf(input, "%i,%i", x_mouse, y_mouse);

    // Mouse moves according to the user's input
    ble.print(F("AT+BleHidMouseMove="));
    ble.println(input);

    // fetch analog inputs 1
    x_mouse1 = (analogRead(X_Mouse)/4);
    y_mouse1 = (analogRead(Y_Mouse)/4);


    if( ble.waitForOK() )
    {
      Serial.println( F("OK!") );
    }else
    {
      Serial.println( F("FAILED!") );
    }

    // fetch analog inputs 2
    x_mouse2 = analogRead(X_Mouse)/4;
    y_mouse2 = analogRead(Y_Mouse)/4;


  }else{

  }
}


/**************************************************************************/
/*!
    @brief  Checks for user input (via the Serial Monitor)
*/
/**************************************************************************/
void getUserInput(char buffer[], uint8_t maxSize)
{
  memset(buffer, 0, maxSize);
  while( Serial.available() == 0 ) {
    delay(1);
  }

  uint8_t count=0;

  do
  {
    count += Serial.readBytes(buffer+count, maxSize);
    delay(2);
  } while( (count < maxSize) && !(Serial.available() == 0) );
}