Introduction
The pins from an Arduino board can output a maximum of 5 volts and 40mA of current. But, what if you need more power to drive a larger load from your Arduino? For example, What if you had to control a device that requires 220 volts to operate? Trying to do this from only your Arduino board is a quick way to run into problems and cause potential damage to your Arduino.
Therefore, to accomplish this in a safe and efficient manner we will use relays.
What is a Relay?
A Relay is a special kind of mechanical switch which be turned on or off through electrical signals via a coil located inside the housing. Let us consider that, normally the switch remains open and when a voltage is applied, the electromagnetic effects cause the switch to close the circuit and turn the switch on.
Why Choose a Relay Over Other Components?
Transistors or MOSFET’s can achieve the same result, but relays are definitely a better and safer choice. A simple and cheap 5V relay can handle 220volts and 10A of AC current, 30Volts and 10A of DC current which is HUGE!
The Arduino is only used for switching through the electromagnetic effects caused by the power supplied by Arduino. Your Arduino stays completely safe and isolated from the HIGH voltage or current.
How Does a Relay Work?
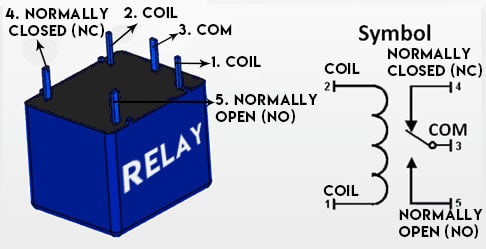
A Realy has 5 pins in total. The COM pin is connected to one end of the incoming HIGH voltage load. The other end should be attached to the NC or NO pin. NC stands for Normally Closed and NO stands for Normally Open.
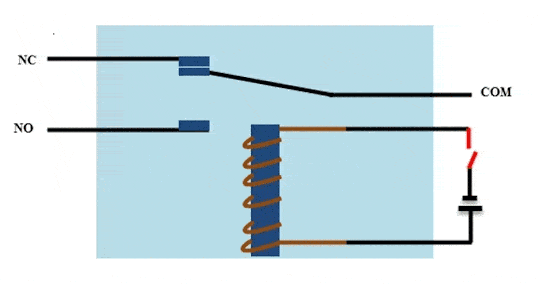
If you want the device to normally stay turned ON, but you only want it to turn it off for a limited amount of time when the relay is triggered by Arduino, you need to attach the other end with NO.
Otherwise, you will attach to the NC.
Relay Pinout
| Pin | Description |
|---|---|
| C1 | Coil 1 |
| C2 | Coil 2 |
| COM | Common |
| NC | Normally Closed |
| NO | Normally Open |
Circuit Diagram

Sample Code
					void setup() {
pinMode(13, OUTPUT);
}
void loop() {
digitalWrite(13, HIGH);
delay(5000);
digitalWrite(13, LOW);
delay(2000);
}
Code Explanation
We are operating the Realy in NO mode, which means normally the device will stay turned on. When pin 13 goes HIGH, the relays magnetic switch is energized, which disconnects the motor, thus turned off! It stays off for 5 seconds, then pin 13 goes to a LOW state for 2 seconds, turning the motor on again.


