Introduction
A servo motor a special type of motor that has added complexities compared to a regular motor. A servo motor contains, potentiometer, a control circuit board, gears and a DC motor all contained together.

Servo motors are heavily used in industrial applications all the way through to hobbyists, being used for automation and robotics purposes. They provide a smooth & precise -90 to +90 degree control which is essential for proper movements of robots or industrial automation machines.
In this tutorial, we will learn how to use servo motors, so as you can implement them in your projects and applications!
How Does a Servo Motor Work?
A servo motor has potentiometer inside its enclosure. When the motor rotates, the shaft supplies the power or torque to the gears which make the wheel turn.
As the motor rotates the potentiometer also rotates which causes the resistance to change. By the change of resistance, the motor is aware of its position. Through this mechanism, the circuit knows how much to turn and in which direction. When the motor shaft is in the desired position, the power supplied to the motor is stopped.

The direction and control of the servo are achieved by sending varied pulses/PWM to the motor. The duration or duty cycle of these pulses allow the motor to determine which position to move to. The PWM signals must be sent every 20mS to hold the desired position.
A pulse width of 1mS keeps the motor in its 0-degree position. 1.5mS pulse takes it to 90 degrees position and 2mS pulse moves it to 180 degrees position.
Equipment
- Arduino / Compatible Development Board
- DC Servo Motor

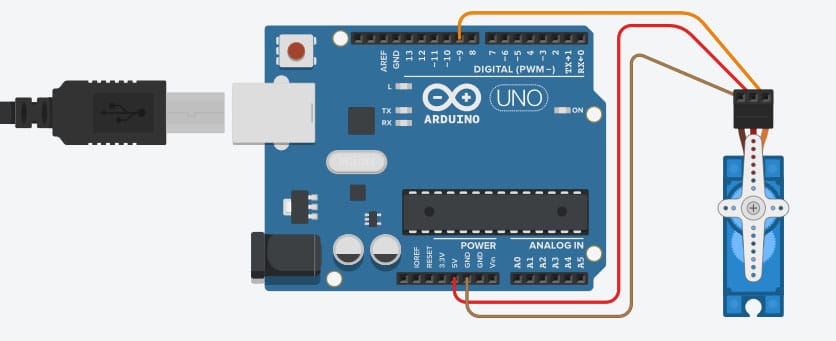
Schematic Diagram
Servo Library
Arduino provides a built-in library to cover up the complexities of the working process of a servo motor and enable users to use it with ease using very simplistic and straight forward codes.
The Code
					#include <Servo.h>
int pos = 0;
Servo servo_9;
void setup() {
     servo_9.attach(9); // The PWM pin that accounts Arduino with Servo
}
void loop() {
for (pos = 0; pos <= 180; pos += 1) {
     // tell servo to go to position in variable 'pos'
     servo_9.write(pos);
     // wait 15 ms for servo to reach the position
     delay(15); // Wait for 15 millisecond(s)
}
for (pos = 180; pos >= 0; pos -= 1) {
     // tell servo to go to position in variable 'pos'
     servo_9.write(pos);
     // wait 15 ms for servo to reach the position
     delay(15); // Wait for 15 millisecond(s)
     }
}
After implementing the circuit and uploading the code, you should see the servo moving one half-circle back and forth!