As we all know, the Arduino has 2 basic functions. The setup function and the loop function. In a practical sense, we usually go with the expensive microcontrollers instead of analog components when want to read values and take decisions based on the data coming from sensors and such. In the setup function, we commend the chip to do the initial works at once and then in the loop the chip repeats checking for events and act as coded.
What is the Problem?
The complexity! One specific line of the loop function keeps on checking inputs over and over again right when that line is being executed (We call it “polling”). But, as the program gets bigger, more libraries are used, the run time exceeds and becomes quite noticeable. At that point, when a certain occurs, the microcontroller might miss it because of the complexity.
What is the Solution?
Interrupts! As the name suggests, interrupts simply interrupt your loop function. When a certain event occurs, it stops the function from whatever it is doing to act against that specific certain event. The interrupt makes sure that you do not miss any important events and helps you get your job done more accurately than ever. Note that, this is a hardware side feature. There is a limited number of interrupt pins and not all pins of the Arduino support this feature. Below is a table with interrupt information of few available Arduino boards.
| Development Board | Digital Pins Usable For Interrupts |
|---|---|
| UNO, Nano, Mini, Other 328-based | 2, 3 |
| UNO WiFi Rev. 2 | All digital pins |
| Mega, Mega2560, MegaADK | 2, 3, 18, 19, 20, 21 |
| Micro, Leonardo, Other 32u4-based | 0, 1, 2, 3, 7 |
| Zero | All digital pins, except 4 |
| MKR family boards | 0, 1, 4, 5, 6, 7, 8, 9, A1, A2 |
| Due | All digital pins |
| 101 | All digital pins (Only pins 2, 5, 7, 8, 10, 11, 12, 13 work with Change) |
As we can see from this table, Arduino UNO has only 2 interrupt pins, and they are 2and 3! ( Ever wondered why some of the libraries only warn you to wire using pin 2 or 3? )
How to use this Feature?
It’s easy! We use the attachInterrupt function.
attachInterrupt( digitalPinToInterrupt(pin), ISR function, Mode );
This function will almost always go in the setup function. It was 3 parameters.
- The interrupt pin number: The First parameter takes the pin number of the interrupt you want to use. The Arduino official documentation recommends us to use the digitalPinToInterrupt() function along with it. You just put the pin number inside the digitalPinToInterrupt function.
- ISRFunction: ISR stands for“Interrupt Service Route”. Here we need to pass the name of a function which should contain what the chip will do when your desired interrupt pin receives the kind you event/trigger than you mention in the next parameter (Mode).
- Mode: This tells the microcontroller when to triggers the interrupt. There are 4 defined modes. They are:
- LOW – Whenever the pin is in a low stare, ISR will be executed.
- RISING – Whenever the pin gets HIGH from LOW, ISR will be executed.
- FALLING – Whenever the pin gets LOW from HIGH, ISR will be executed.
- CHANGE – Whenever the pin changes state, ISR will be executed.
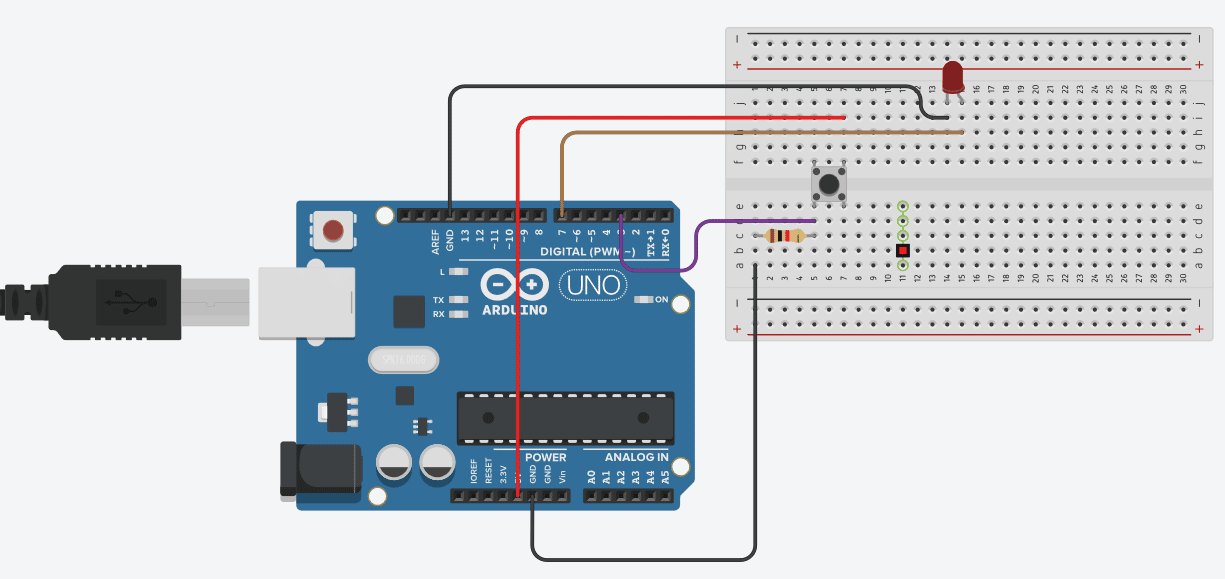
With this knowledge, let up implement a circuit and program it using interrupt which lights up and led when a pushbutton is pushed.
Components
- Arduino Uno
- Pushbutton
- 220 ohm resistor
- LED
The Circuit
The Code
					void setup() {
  pinMode(7, OUTPUT);
  attachInterrupt(digitalPinToInterrupt(2), intpt , RISING);
}

void loop() {
  // put your main code here, to run repeatedly:
}

void intpt(){
       digitalWrite(7, HIGH);
}
Code Explanation
We declare the pin 7 as output. Then we call the attachInterrupt function. In the first parameter, we call the digitalPinToInterrupt and indicate that we want to use the digital pin 2 as our interrupt. The 2nd parameter is where the ISR(interrupt service routine) fits in. The 3rd parameter is the “Mode” that we want to be using for it. In the “intpt” function we define what is to be done when the interrupt is triggered.


