What is ESP32?
Anyone who works with Electronics & IoT knows how powerful the ESP32 boards are! ESP32 boards are the successor of ESP8266. It is just like an Arduino board, but with built-in Wifi, Bluetooth, temperature sensor, touch sensor and much much more! After the ESP8266, the ESP32 has again been a killer product by the manufacturer “Espressif Systems”. This low-cost board has everything you needed to get started with most of it being built-in as a feature.
ESP32 Features and Specifications
The ESP32 has a lot of built-in features. For example Wifi connectivity, Bluetooth connectivity, Temperature sensors, Hall effect sensors, Touch sensors and many more. Below are some key features and specification which makes it an exclusive choice for the IoT developers:
- CPU: Xtensa dual-core (or single-core) 32-bit LX6 microprocessor
- Memory: 520 KiB SRAM
- Wi-Fi: 11 b/g/n
- Bluetooth: v4.2 BR/EDR and BLE
- GPIO: 36
- Software PWM: 16 channels
- SPI/I2C/I2S/UART – 4/2/2/2
- ADC – 12-bit
- Touch Sensor
- Temperature Sensor
- Hall effect sensor
ESP32 vs ESP8266 vs Arduino UNO
ESP32 | ESP8266 | Arduino Uno R3 | |
---|---|---|---|
CORES | 2 | 1 | 1 |
ARCHITECTURE | 32 bits | 32 bits | 8 bit |
CLOCK SPEED | 160MHz | 80MHz | 16MHz |
WiFi | Yes | Yes | No |
BLUETOOTH | Yes | No | No |
RAM | 512KB | 160KB | 2KB |
FLASH | 16Mb | 16Mb | 32Kb |
GPIO | 36 | 17 | 14 |
INTERFACES | SPI / I2C / UART / I2S / CAN | SPI / I2C / UART / I2S | SPI / I2C / UART |
ADC | 18 | 1 | 6 |
DAC | 2 | 0 | 0 |
Clearly, the ESP32 is much faster than both Arduino UNO and ESP8266. It comes with a dual-core processor and much higher clock speed than most of the other boards within the price range. It has a lot of GPIO pins. It has additional Bluetooth connectivity built-in. The one thing where both ESP boards lack on was the number of ADC pins, but ESP32 overcomes that shortcoming with 18 ADC pins, which is even more than the Arduino Uno board.
Programming the ESP32 Board
- Download and install the latest Arduino IDE Windows Installer from Arduino.cc
- Download and install Git from git-scm.com
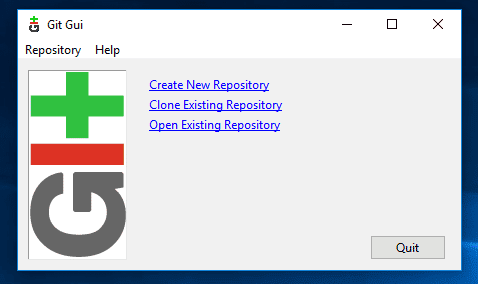
- Open Git Gui and select “Clone Existing Repository”
- Select source and destination.
Sketchbook Directory: Usually “C:/Users/[YOUR_USER_NAME]/Documents/Arduino” and is listed underneath the “Sketchbook location” in Arduino preferences.
Source Location: https://github.com/espressif/arduino-esp32.git
Target Directory: C:/Users/[YOUR_USER_NAME]/Documents/Arduino/hardware/espressif/esp32
- Click Clone to start cloning the repository
- Open a Git Bash session pointing to – [ARDUINO_SKETCHBOOK_DIR]/hardware/espressif/esp32
Then, type:git submodule update –init –recursive - Open [ARDUINO_SKETCHBOOK_DIR]/hardware/espressif/esp32/tools and double-click get.exe
- When installation finishes, you should see the following files in the directory.
- Plug your ESP32 board and wait for the drivers to install (or install manually any that might be required)
- Start Arduino IDE
- Select your board in Tools > Board menu & select your board.
- Select the COM port that the board is attached to.
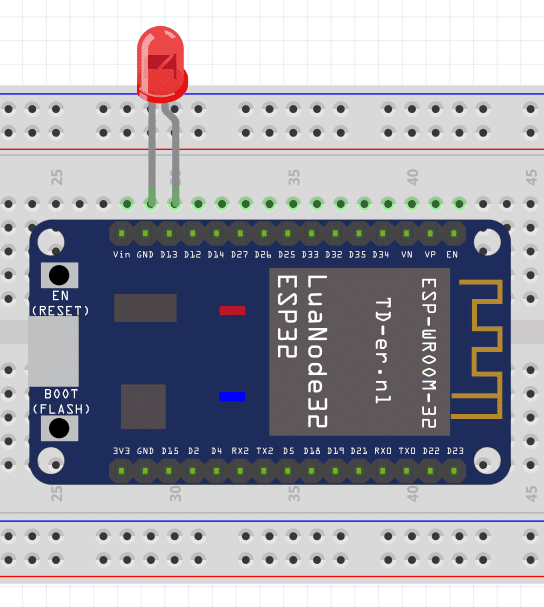
- Setup the following Circuit.
- Now Compile the following code at your Arduino ID
void setup() {
pinMode(13, OUTPUT);
digitalWrite(13, HIGH);
}
void loop() {
// Put your code here to run repeatedly:
}
Now you can upload the code, you may need to hold down the boot button while uploading.