Introduction
The NodeMCU server or ESP8266 is an MCU with Wi-Fi and Web Server functionality. It has 2 Web Server modes, namely, station mode (STA) and soft-access point mode (AP). Before going on further with the modes, let’s get into the details of a Web Server.
What is a Webserver
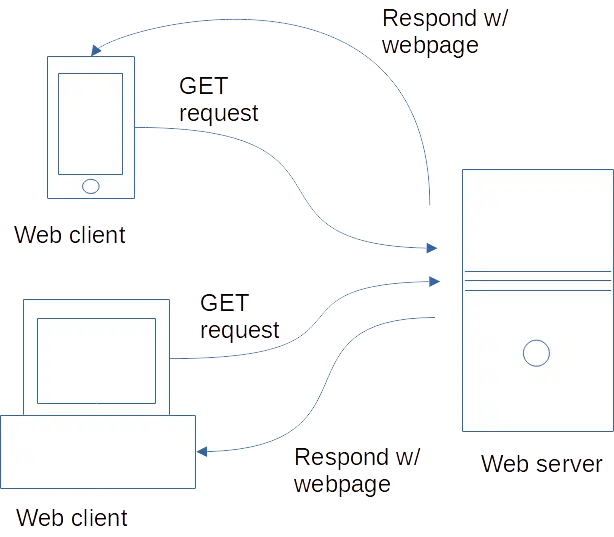
Typically, a web server’s main function is to let web clients access web pages stored in physical media storage. With this setup, most of the transactions are GET requests from the clients accessing a particular web address. They are done through HTTP (or Hyper Text Transfer Protocol). We’ll see this happening when we go to the code section of this article.
Operating Modes
STA Mode
STA or station mode operates together with a wireless network or router. This mode makes it possible for the ESP8266 to have several clients as many as the wireless router can handle.
Soft-AP Mode
In soft access point (soft-AP) mode, the NodeMCU establishes its own limited WiFi network. This enables web clients to connect with it directly with limitations on the number of connections (usually 5 clients only).
Mixed Mode
Finally, ESP8266 also operates in both station and soft access point mode at the same time.
Outcomes
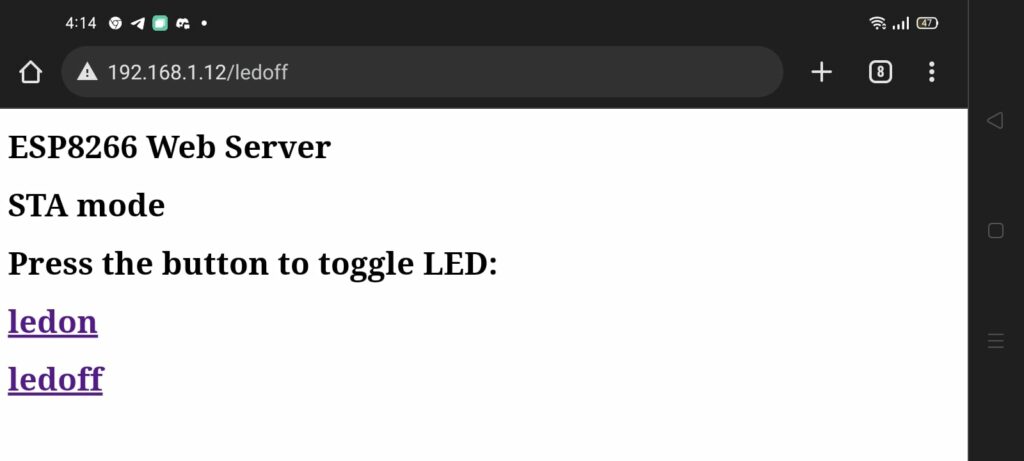
We will be covering how to work in station (STA) mode using NodeMCU and how to connect with a wireless network. We’ll be creating a web server inside our Wi-Fi network. Our clients will be entering through this server, accessing the web pages stored in the NodeMCU. Through this access, we’ll be able to determine the client’s intention and create some action, such as controlling LEDs.
Creating The Webpages
The web page we’d like to create inside our NodeMCU is about controlling LEDs. One link turns ON an LED while another link turns it OFF.
Preparing the Arduino Environment
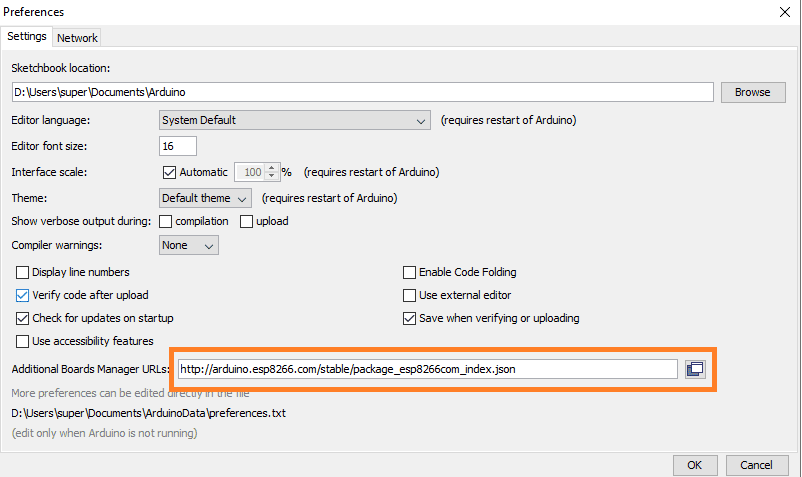
First, provide the URL: http://arduino.esp8266.com/stable/package_esp8266com_index.json in the Additional Boards Manager section so that the Arduino IDE can use ESP8266 boards. You can do this by going to File->Preferences in the Arduino menu.
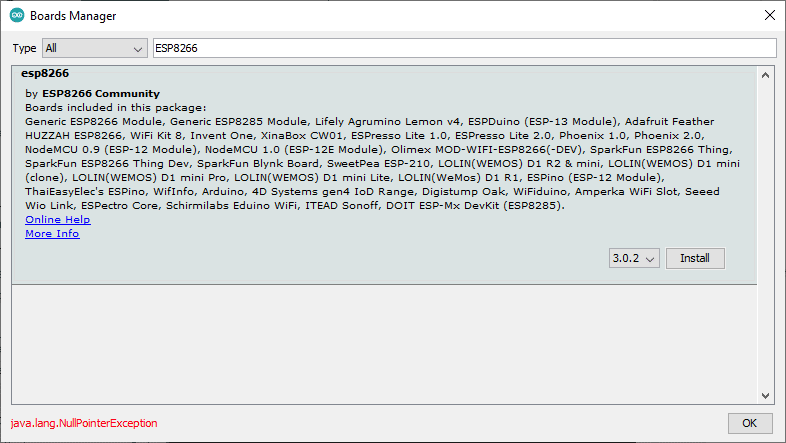
Next, go to Tools->Boards->Boards Manager, then search and install boards for ESP8266.
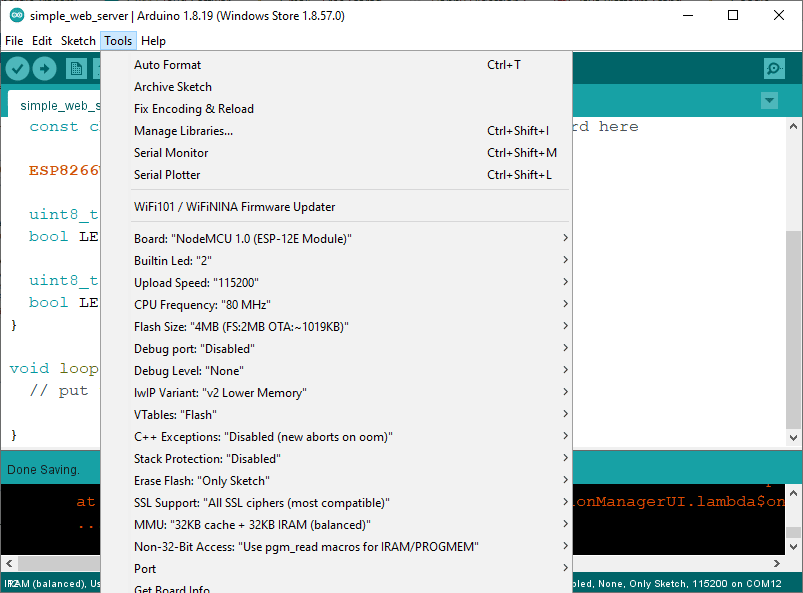
Choose your board from Tools->Board. Be sure to select your correct ESP8266 dev board. Your board properties should be a bit similar to this.
Code
					// put your setup code here, to run once:
#include <ESP8266WiFi.h>
#include <ESP8266WebServer.h>

/*SSID & Password*/
const char* ssid = "YOUR_SSID";  // Enter SSID here
const char* password = "YOUR_PASSWORD";  //Enter Password here

ESP8266WebServer server(80);

uint8_t LEDpin = D3;
bool LEDstatus = false;

void setup() {

  pinMode(LEDpin, OUTPUT);

  Serial.begin(115200);
  Serial.println(" ");
  Serial.println("Connecting: ");
  Serial.println(ssid);

  WiFi.begin(ssid, password);

  while(WiFi.status() != WL_CONNECTED)
  {
    delay(500);
    Serial.println(".");
  }
  Serial.println(" ");
  Serial.print("Connected at: ");
  Serial.println(WiFi.localIP());

  server.on("/", Connect_handler);
  server.on("/ledon", LED_ON_handler);
  server.on("/ledoff", LED_OFF_handler);
  server.onNotFound(Not_found_handler);

  server.begin();
  Serial.println("Web server has began");
}

void loop() {
  // put your main code here, to run repeatedly:
  server.handleClient();

  if(LEDstatus){
    digitalWrite(LEDpin, HIGH);
  }else{
    digitalWrite(LEDpin, LOW);
  }
}

void Connect_handler()
{
  LEDstatus = false;
  Serial.println("LED has been turned OFF");
  server.send(200, "text/html", SendClient());
}

void LED_ON_handler()
{
  LEDstatus = true;
  Serial.println("LED has been turned ON");
  server.send(200, "text/html", SendClient());
}

void LED_OFF_handler()
{
  LEDstatus = false;
  Serial.println("LED has been turned OFF");
  server.send(200, "text/html", SendClient());
}

void Not_found_handler()
{
  server.send(404, "text/plain", "address not found");
}

String SendClient()
{

  String html ="<!doctype html>\n";
  html += "<html> <head> <title>HTML Editor - Full Version</title> <style id="wpr-lazyload-bg-container"></style><style id="wpr-lazyload-bg-exclusion">.elementor-397637 .elementor-element.elementor-element-39d2aed:not(.elementor-motion-effects-element-type-background), .elementor-397637 .elementor-element.elementor-element-39d2aed > .elementor-motion-effects-container > .elementor-motion-effects-layer{--wpr-bg-d593058b-39d8-4202-a916-699e382319b6: url('https://www.phippselectronics.com/wp-content/uploads/2022/08/Setting-up-a-NodeMCU-Server.jpg');}</style>
<noscript>
<style id="wpr-lazyload-bg-nostyle">#wcs-debug #wcs-debug-contents .wcs-debug-tip{--wpr-bg-2d7d0cf3-3fa5-4e63-a5ca-03a919b6d0b1: url('https://www.phippselectronics.com/wp-content/cache/../plugins/woo-conditional-shipping-pro/frontend/img/tip2.svg');}#wcs-debug #wcs-debug-header .wcs-debug-toggle{--wpr-bg-e2a1054f-3e5b-4097-b96f-87a6ac1facd6: url('https://www.phippselectronics.com/wp-content/cache/../plugins/woo-conditional-shipping-pro/frontend/img/arrow.svg');}#wcs-notices .conditional-shipping-notice.conditional-shipping-notice-style-success.conditional-shipping-notice-style-warning, #wcs-notices .conditional-shipping-notice.conditional-shipping-notice-style-warning.conditional-shipping-notice-style-warning, #wcs-notices .conditional-shipping-notice.conditional-shipping-notice-style-error.conditional-shipping-notice-style-warning,
.wcs-shipping-notices .conditional-shipping-notice.conditional-shipping-notice-style-success.conditional-shipping-notice-style-warning,
.wcs-shipping-notices .conditional-shipping-notice.conditional-shipping-notice-style-warning.conditional-shipping-notice-style-warning,
.wcs-shipping-notices .conditional-shipping-notice.conditional-shipping-notice-style-error.conditional-shipping-notice-style-warning{--wpr-bg-96ca079f-a228-4783-baa5-9c71723a7b5b: url('https://www.phippselectronics.com/wp-content/cache/../plugins/woo-conditional-shipping-pro/frontend/img/notices/warning.svg');}#wcs-notices .conditional-shipping-notice.conditional-shipping-notice-style-success.conditional-shipping-notice-style-success, #wcs-notices .conditional-shipping-notice.conditional-shipping-notice-style-warning.conditional-shipping-notice-style-success, #wcs-notices .conditional-shipping-notice.conditional-shipping-notice-style-error.conditional-shipping-notice-style-success,
.wcs-shipping-notices .conditional-shipping-notice.conditional-shipping-notice-style-success.conditional-shipping-notice-style-success,
.wcs-shipping-notices .conditional-shipping-notice.conditional-shipping-notice-style-warning.conditional-shipping-notice-style-success,
.wcs-shipping-notices .conditional-shipping-notice.conditional-shipping-notice-style-error.conditional-shipping-notice-style-success{--wpr-bg-d1902f5a-ea6c-499b-a3ec-f9594cfc8231: url('https://www.phippselectronics.com/wp-content/cache/../plugins/woo-conditional-shipping-pro/frontend/img/notices/yes-alt.svg');}#wcs-notices .conditional-shipping-notice.conditional-shipping-notice-style-success.conditional-shipping-notice-style-error, #wcs-notices .conditional-shipping-notice.conditional-shipping-notice-style-warning.conditional-shipping-notice-style-error, #wcs-notices .conditional-shipping-notice.conditional-shipping-notice-style-error.conditional-shipping-notice-style-error,
.wcs-shipping-notices .conditional-shipping-notice.conditional-shipping-notice-style-success.conditional-shipping-notice-style-error,
.wcs-shipping-notices .conditional-shipping-notice.conditional-shipping-notice-style-warning.conditional-shipping-notice-style-error,
.wcs-shipping-notices .conditional-shipping-notice.conditional-shipping-notice-style-error.conditional-shipping-notice-style-error{--wpr-bg-a8f8162d-9607-4942-b4bd-cb78d0062346: url('https://www.phippselectronics.com/wp-content/cache/../plugins/woo-conditional-shipping-pro/frontend/img/notices/dismiss.svg');}.mejs-overlay-button{--wpr-bg-f9f2e990-2bb1-4ee2-aa35-aa7301ab3ebe: url('https://www.phippselectronics.com/wp-includes/js/mediaelement/mejs-controls.svg');}.mejs-overlay-loading-bg-img{--wpr-bg-50bcf0ca-c281-4d41-b1a9-d4921c3046cf: url('https://www.phippselectronics.com/wp-includes/js/mediaelement/mejs-controls.svg');}.mejs-button>button{--wpr-bg-4357da67-3e00-4fa7-8a90-f0a2eb859c8f: url('https://www.phippselectronics.com/wp-includes/js/mediaelement/mejs-controls.svg');}.yith-wcan-filters .yith-wcan-filter .filter-title.collapsable.closed:after, .yith-wcan-filters .yith-wcan-filter .filter-title.collapsable:not(.opened):after, .yith-wcan-filters .yith-wcan-filter .filter-title.collapsable:not(.open):after{--wpr-bg-90066b07-ff6b-419c-b975-4553bb9c9109: url('https://www.phippselectronics.com/wp-content/plugins/yith-woocommerce-ajax-product-filter-premium/assets/images/arrow-down.svg');}.yith-wcan-filters .yith-wcan-filter .filter-title.collapsable.open:after, .yith-wcan-filters .yith-wcan-filter .filter-title.collapsable.opened:after{--wpr-bg-71f6b62f-71ff-4751-858c-c00db31cac55: url('https://www.phippselectronics.com/wp-content/plugins/yith-woocommerce-ajax-product-filter-premium/assets/images/arrow-up.svg');}.yith-wcan-filters .yith-wcan-filter .filter-items .filter-item.active.color:not(.no-color):not(.no-image):not(.label-right) > a:after{--wpr-bg-7b2d2835-3d60-4a90-8b8f-62459421fcfe: url('https://www.phippselectronics.com/wp-content/plugins/yith-woocommerce-ajax-product-filter-premium/assets/images/close.svg');}.yith-wcan-filters .yith-wcan-filter .filter-items .filter-item.label.active.with-image:not(.label-right) > a:after{--wpr-bg-c30f3b0a-5c8c-4f1c-9be6-49066fb20752: url('https://www.phippselectronics.com/wp-content/plugins/yith-woocommerce-ajax-product-filter-premium/assets/images/close.svg');}.yith-wcan-filters .yith-wcan-filter .filter-items .filter-item.hierarchy-collapsable.closed > .toggle-handle{--wpr-bg-edf15c0c-1674-4674-b2f7-540075d226ea: url('https://www.phippselectronics.com/wp-content/plugins/yith-woocommerce-ajax-product-filter-premium/assets/images/arrow-down.svg');}.yith-wcan-filters .yith-wcan-filter .filter-items .filter-item.hierarchy-collapsable.opened > .toggle-handle{--wpr-bg-9f98d42a-2937-49fb-9115-d0281114792a: url('https://www.phippselectronics.com/wp-content/plugins/yith-woocommerce-ajax-product-filter-premium/assets/images/arrow-up.svg');}.yith-wcan-filters .yith-wcan-filter .yith-wcan-dropdown.closed:after, .yith-wcan-filters .yith-wcan-filter .yith-wcan-dropdown:not(.opened):after, .yith-wcan-filters .yith-wcan-filter .yith-wcan-dropdown:not(.open):after{--wpr-bg-92ecdafe-ae3b-46e1-9ce3-3b9d668e5b83: url('https://www.phippselectronics.com/wp-content/plugins/yith-woocommerce-ajax-product-filter-premium/assets/images/arrow-down.svg');}.yith-wcan-filters .yith-wcan-filter .yith-wcan-dropdown.open:after, .yith-wcan-filters .yith-wcan-filter .yith-wcan-dropdown.opened:after{--wpr-bg-69ad3b7d-79f9-45cf-a145-8171480b2466: url('https://www.phippselectronics.com/wp-content/plugins/yith-woocommerce-ajax-product-filter-premium/assets/images/arrow-up.svg');}.yith-wcan-filters .yith-wcan-filter .yith-wcan-dropdown .dropdown-wrapper .search-field-container:after{--wpr-bg-17655136-1365-4119-b5cf-1065bd36eaeb: url('https://www.phippselectronics.com/wp-content/plugins/yith-woocommerce-ajax-product-filter-premium/assets/images/search.svg');}.yith-wcan-filters .yith-wcan-filter.filter-placeholder .select-placeholder.closed:after, .yith-wcan-filters .yith-wcan-filter.filter-placeholder .select-placeholder:not(.opened):after, .yith-wcan-filters .yith-wcan-filter.filter-placeholder .select-placeholder:not(.open):after{--wpr-bg-0a44a53f-5721-49aa-b79c-0afaee6e038d: url('https://www.phippselectronics.com/wp-content/plugins/yith-woocommerce-ajax-product-filter-premium/assets/images/arrow-down.svg');}.yith-wcan-filters .yith-wcan-filter.filter-placeholder .select-placeholder.open:after, .yith-wcan-filters .yith-wcan-filter.filter-placeholder .select-placeholder.opened:after{--wpr-bg-811cf39e-7221-4c22-aebd-2f821dad2361: url('https://www.phippselectronics.com/wp-content/plugins/yith-woocommerce-ajax-product-filter-premium/assets/images/arrow-up.svg');}.yith-wcan-filters.custom-style span.checkboxbutton.checked:before{--wpr-bg-fc1bcd1b-63e1-428a-8c8f-11ca6ddb21b1: url('https://www.phippselectronics.com/wp-content/plugins/yith-woocommerce-ajax-product-filter-premium/assets/images/check.svg');}.yith-wcan-filters.horizontal:not(.filters-modal) .yith-wcan-filter.filter-placeholder .filter-content.closed:after, .yith-wcan-filters.horizontal:not(.filters-modal) .yith-wcan-filter.filter-placeholder .filter-content:not(.opened):after, .yith-wcan-filters.horizontal:not(.filters-modal) .yith-wcan-filter.filter-placeholder .filter-content:not(.open):after{--wpr-bg-bfe2d25d-1bb7-471d-980d-85874d744aac: url('https://www.phippselectronics.com/wp-content/plugins/yith-woocommerce-ajax-product-filter-premium/assets/images/arrow-down.svg');}.yith-wcan-filters.horizontal:not(.filters-modal) .yith-wcan-filter.filter-placeholder .filter-content.open:after, .yith-wcan-filters.horizontal:not(.filters-modal) .yith-wcan-filter.filter-placeholder .filter-content.opened:after{--wpr-bg-6461f983-33de-44ae-87e3-3099001990f6: url('https://www.phippselectronics.com/wp-content/plugins/yith-woocommerce-ajax-product-filter-premium/assets/images/arrow-up.svg');}.yith-wcan-active-filters .active-filter .active-filter-label:after{--wpr-bg-5fee3d76-ee4b-4b77-be8a-28d0555a4d6f: url('https://www.phippselectronics.com/wp-content/plugins/yith-woocommerce-ajax-product-filter-premium/assets/images/close.svg');}.yith-wcan-filters-opener i.filter-icon{--wpr-bg-d77bded7-8e2d-493f-b5b8-1e13cf458879: url('https://www.phippselectronics.com/wp-content/plugins/yith-woocommerce-ajax-product-filter-premium/assets/images/filters.svg');}.selectBox-dropdown .selectBox-arrow{--wpr-bg-143300b1-f393-4e59-9718-f37fdf241b45: url('https://www.phippselectronics.com/wp-content/plugins/yith-woocommerce-wishlist-premium/assets/images/jquery.selectBox-arrow.gif');}div.pp_woocommerce .pp_loaderIcon::before{--wpr-bg-bd69f014-1b72-43c9-a63f-bcf966c06198: url('https://www.phippselectronics.com/wp-content/plugins/woocommerce/assets/images/icons/loader.svg');}.selectBox-dropdown .selectBox-arrow{--wpr-bg-d4999d35-1c5e-41e4-8c71-e9a4e0cfec0d: url('https://www.phippselectronics.com/wp-content/plugins/yith-woocommerce-wishlist-premium/assets/images/jquery.selectBox-arrow.png');}.selectBox-dropdown.selectBox-menuShowing .selectBox-arrow{--wpr-bg-10b35172-12ae-4868-a4d8-c9d14b919fb2: url('https://www.phippselectronics.com/wp-content/plugins/yith-woocommerce-wishlist-premium/assets/images/jquery.selectBox-arrow.png');}.woocommerce-js .blockUI.blockOverlay::before{--wpr-bg-0846e3fe-142d-4964-84b9-ad44168a8889: url('https://www.phippselectronics.com/wp-content/plugins/woocommerce/assets/images/icons/loader.svg');}.woocommerce-js .loader::before{--wpr-bg-a40b777b-9582-4df2-b9de-dd6fa8742a49: url('https://www.phippselectronics.com/wp-content/plugins/woocommerce/assets/images/icons/loader.svg');}button.pswp__button{--wpr-bg-826f914a-0298-4e82-90d7-75981c931569: url('https://www.phippselectronics.com/wp-content/plugins/woocommerce/assets/css/photoswipe/default-skin/default-skin.png');}#add_payment_method #payment div.payment_box .wc-credit-card-form-card-cvc.visa,#add_payment_method #payment div.payment_box .wc-credit-card-form-card-expiry.visa,#add_payment_method #payment div.payment_box .wc-credit-card-form-card-number.visa,.woocommerce-cart #payment div.payment_box .wc-credit-card-form-card-cvc.visa,.woocommerce-cart #payment div.payment_box .wc-credit-card-form-card-expiry.visa,.woocommerce-cart #payment div.payment_box .wc-credit-card-form-card-number.visa,.woocommerce-checkout #payment div.payment_box .wc-credit-card-form-card-cvc.visa,.woocommerce-checkout #payment div.payment_box .wc-credit-card-form-card-expiry.visa,.woocommerce-checkout #payment div.payment_box .wc-credit-card-form-card-number.visa{--wpr-bg-382fc6fa-4c57-4131-992b-842fdbcb0daf: url('https://www.phippselectronics.com/wp-content/plugins/woocommerce/assets/images/icons/credit-cards/visa.svg');}#add_payment_method #payment div.payment_box .wc-credit-card-form-card-cvc.mastercard,#add_payment_method #payment div.payment_box .wc-credit-card-form-card-expiry.mastercard,#add_payment_method #payment div.payment_box .wc-credit-card-form-card-number.mastercard,.woocommerce-cart #payment div.payment_box .wc-credit-card-form-card-cvc.mastercard,.woocommerce-cart #payment div.payment_box .wc-credit-card-form-card-expiry.mastercard,.woocommerce-cart #payment div.payment_box .wc-credit-card-form-card-number.mastercard,.woocommerce-checkout #payment div.payment_box .wc-credit-card-form-card-cvc.mastercard,.woocommerce-checkout #payment div.payment_box .wc-credit-card-form-card-expiry.mastercard,.woocommerce-checkout #payment div.payment_box .wc-credit-card-form-card-number.mastercard{--wpr-bg-41c7723d-fab7-4354-bb73-f47bcd317aea: url('https://www.phippselectronics.com/wp-content/plugins/woocommerce/assets/images/icons/credit-cards/mastercard.svg');}#add_payment_method #payment div.payment_box .wc-credit-card-form-card-cvc.laser,#add_payment_method #payment div.payment_box .wc-credit-card-form-card-expiry.laser,#add_payment_method #payment div.payment_box .wc-credit-card-form-card-number.laser,.woocommerce-cart #payment div.payment_box .wc-credit-card-form-card-cvc.laser,.woocommerce-cart #payment div.payment_box .wc-credit-card-form-card-expiry.laser,.woocommerce-cart #payment div.payment_box .wc-credit-card-form-card-number.laser,.woocommerce-checkout #payment div.payment_box .wc-credit-card-form-card-cvc.laser,.woocommerce-checkout #payment div.payment_box .wc-credit-card-form-card-expiry.laser,.woocommerce-checkout #payment div.payment_box .wc-credit-card-form-card-number.laser{--wpr-bg-a669b83a-b77a-4f78-a1eb-b98c3b419717: url('https://www.phippselectronics.com/wp-content/plugins/woocommerce/assets/images/icons/credit-cards/laser.svg');}#add_payment_method #payment div.payment_box .wc-credit-card-form-card-cvc.dinersclub,#add_payment_method #payment div.payment_box .wc-credit-card-form-card-expiry.dinersclub,#add_payment_method #payment div.payment_box .wc-credit-card-form-card-number.dinersclub,.woocommerce-cart #payment div.payment_box .wc-credit-card-form-card-cvc.dinersclub,.woocommerce-cart #payment div.payment_box .wc-credit-card-form-card-expiry.dinersclub,.woocommerce-cart #payment div.payment_box .wc-credit-card-form-card-number.dinersclub,.woocommerce-checkout #payment div.payment_box .wc-credit-card-form-card-cvc.dinersclub,.woocommerce-checkout #payment div.payment_box .wc-credit-card-form-card-expiry.dinersclub,.woocommerce-checkout #payment div.payment_box .wc-credit-card-form-card-number.dinersclub{--wpr-bg-70d52f51-b6dc-4d78-a0de-5c9165e4edc3: url('https://www.phippselectronics.com/wp-content/plugins/woocommerce/assets/images/icons/credit-cards/diners.svg');}#add_payment_method #payment div.payment_box .wc-credit-card-form-card-cvc.maestro,#add_payment_method #payment div.payment_box .wc-credit-card-form-card-expiry.maestro,#add_payment_method #payment div.payment_box .wc-credit-card-form-card-number.maestro,.woocommerce-cart #payment div.payment_box .wc-credit-card-form-card-cvc.maestro,.woocommerce-cart #payment div.payment_box .wc-credit-card-form-card-expiry.maestro,.woocommerce-cart #payment div.payment_box .wc-credit-card-form-card-number.maestro,.woocommerce-checkout #payment div.payment_box .wc-credit-card-form-card-cvc.maestro,.woocommerce-checkout #payment div.payment_box .wc-credit-card-form-card-expiry.maestro,.woocommerce-checkout #payment div.payment_box .wc-credit-card-form-card-number.maestro{--wpr-bg-9168df8f-eda5-4990-9ceb-e2f5a70afa03: url('https://www.phippselectronics.com/wp-content/plugins/woocommerce/assets/images/icons/credit-cards/maestro.svg');}#add_payment_method #payment div.payment_box .wc-credit-card-form-card-cvc.jcb,#add_payment_method #payment div.payment_box .wc-credit-card-form-card-expiry.jcb,#add_payment_method #payment div.payment_box .wc-credit-card-form-card-number.jcb,.woocommerce-cart #payment div.payment_box .wc-credit-card-form-card-cvc.jcb,.woocommerce-cart #payment div.payment_box .wc-credit-card-form-card-expiry.jcb,.woocommerce-cart #payment div.payment_box .wc-credit-card-form-card-number.jcb,.woocommerce-checkout #payment div.payment_box .wc-credit-card-form-card-cvc.jcb,.woocommerce-checkout #payment div.payment_box .wc-credit-card-form-card-expiry.jcb,.woocommerce-checkout #payment div.payment_box .wc-credit-card-form-card-number.jcb{--wpr-bg-4281cfe1-ca05-4438-8019-0838280c05fc: url('https://www.phippselectronics.com/wp-content/plugins/woocommerce/assets/images/icons/credit-cards/jcb.svg');}#add_payment_method #payment div.payment_box .wc-credit-card-form-card-cvc.amex,#add_payment_method #payment div.payment_box .wc-credit-card-form-card-expiry.amex,#add_payment_method #payment div.payment_box .wc-credit-card-form-card-number.amex,.woocommerce-cart #payment div.payment_box .wc-credit-card-form-card-cvc.amex,.woocommerce-cart #payment div.payment_box .wc-credit-card-form-card-expiry.amex,.woocommerce-cart #payment div.payment_box .wc-credit-card-form-card-number.amex,.woocommerce-checkout #payment div.payment_box .wc-credit-card-form-card-cvc.amex,.woocommerce-checkout #payment div.payment_box .wc-credit-card-form-card-expiry.amex,.woocommerce-checkout #payment div.payment_box .wc-credit-card-form-card-number.amex{--wpr-bg-8d9bacb0-df34-4b30-9967-055299bd6d5f: url('https://www.phippselectronics.com/wp-content/plugins/woocommerce/assets/images/icons/credit-cards/amex.svg');}#add_payment_method #payment div.payment_box .wc-credit-card-form-card-cvc.discover,#add_payment_method #payment div.payment_box .wc-credit-card-form-card-expiry.discover,#add_payment_method #payment div.payment_box .wc-credit-card-form-card-number.discover,.woocommerce-cart #payment div.payment_box .wc-credit-card-form-card-cvc.discover,.woocommerce-cart #payment div.payment_box .wc-credit-card-form-card-expiry.discover,.woocommerce-cart #payment div.payment_box .wc-credit-card-form-card-number.discover,.woocommerce-checkout #payment div.payment_box .wc-credit-card-form-card-cvc.discover,.woocommerce-checkout #payment div.payment_box .wc-credit-card-form-card-expiry.discover,.woocommerce-checkout #payment div.payment_box .wc-credit-card-form-card-number.discover{--wpr-bg-28227cd9-5477-493b-955f-2d8154853ab3: url('https://www.phippselectronics.com/wp-content/plugins/woocommerce/assets/images/icons/credit-cards/discover.svg');}.zm-loader:before{--wpr-bg-739f8cab-d401-4f8b-9172-888af181354d: url('https://www.phippselectronics.com/wp-content/plugins/woocommerce/assets/images/icons/loader.svg');}.yith-ywot-empty-state-container{--wpr-bg-80d8f5b9-8fba-498b-90b1-8c37c2fff516: url('https://www.phippselectronics.com/wp-content/plugins/yith-woocommerce-order-tracking-premium/assets/images/carriers.jpg');}.dgwt-wcas-inner-preloader{--wpr-bg-9153d084-f338-443a-9211-b42ab9490c5f: url('https://www.phippselectronics.com/wp-content/plugins/ajax-search-for-woocommerce-premium/assets/img/preloader.gif');}.woocommerce-checkout #payment div.payment_box input.js-sv-wc-payment-gateway-credit-card-form-account-number,#add_payment_method input.js-sv-wc-payment-gateway-credit-card-form-account-number{--wpr-bg-ff6834e3-2e70-43d3-9966-081711d8a33e: url('https://www.phippselectronics.com/wp-content/plugins/woocommerce-gateway-paypal-powered-by-braintree/vendor/skyverge/wc-plugin-framework/woocommerce/payment-gateway/assets/images/card-cc-plain.svg');}.woocommerce-checkout #payment div.payment_box input.js-sv-wc-payment-gateway-credit-card-form-account-number.visa,#add_payment_method input.js-sv-wc-payment-gateway-credit-card-form-account-number.visa{--wpr-bg-0a28889a-f8bc-4ac4-aaf5-a4d56958a2be: url('https://www.phippselectronics.com/wp-content/plugins/woocommerce-gateway-paypal-powered-by-braintree/vendor/skyverge/wc-plugin-framework/woocommerce/payment-gateway/assets/images/card-visa.svg');}.woocommerce-checkout #payment div.payment_box input.js-sv-wc-payment-gateway-credit-card-form-account-number.mastercard,#add_payment_method input.js-sv-wc-payment-gateway-credit-card-form-account-number.mastercard{--wpr-bg-db8206fe-cf22-4600-bd27-90d7cdee2ac9: url('https://www.phippselectronics.com/wp-content/plugins/woocommerce-gateway-paypal-powered-by-braintree/vendor/skyverge/wc-plugin-framework/woocommerce/payment-gateway/assets/images/card-mastercard.svg');}.woocommerce-checkout #payment div.payment_box input.js-sv-wc-payment-gateway-credit-card-form-account-number.dinersclub,#add_payment_method input.js-sv-wc-payment-gateway-credit-card-form-account-number.dinersclub{--wpr-bg-06d19fd1-66d8-47cf-a01f-b54c64d7dcb0: url('https://www.phippselectronics.com/wp-content/plugins/woocommerce-gateway-paypal-powered-by-braintree/vendor/skyverge/wc-plugin-framework/woocommerce/payment-gateway/assets/images/card-dinersclub.svg');}.woocommerce-checkout #payment div.payment_box input.js-sv-wc-payment-gateway-credit-card-form-account-number.maestro,#add_payment_method input.js-sv-wc-payment-gateway-credit-card-form-account-number.maestro{--wpr-bg-ed0c82e3-65f5-474d-8fb1-19869ff926cf: url('https://www.phippselectronics.com/wp-content/plugins/woocommerce-gateway-paypal-powered-by-braintree/vendor/skyverge/wc-plugin-framework/woocommerce/payment-gateway/assets/images/card-maestro.svg');}.woocommerce-checkout #payment div.payment_box input.js-sv-wc-payment-gateway-credit-card-form-account-number.jcb,#add_payment_method input.js-sv-wc-payment-gateway-credit-card-form-account-number.jcb{--wpr-bg-413f72a8-4e18-486e-81af-928ff8103642: url('https://www.phippselectronics.com/wp-content/plugins/woocommerce-gateway-paypal-powered-by-braintree/vendor/skyverge/wc-plugin-framework/woocommerce/payment-gateway/assets/images/card-jcb.svg');}.woocommerce-checkout #payment div.payment_box input.js-sv-wc-payment-gateway-credit-card-form-account-number.amex,#add_payment_method input.js-sv-wc-payment-gateway-credit-card-form-account-number.amex{--wpr-bg-58828694-3b45-4441-b7b9-7cd1e8dbf519: url('https://www.phippselectronics.com/wp-content/plugins/woocommerce-gateway-paypal-powered-by-braintree/vendor/skyverge/wc-plugin-framework/woocommerce/payment-gateway/assets/images/card-amex.svg');}.woocommerce-checkout #payment div.payment_box input.js-sv-wc-payment-gateway-credit-card-form-account-number.discover,#add_payment_method input.js-sv-wc-payment-gateway-credit-card-form-account-number.discover{--wpr-bg-36378bdf-91a8-44cd-b58e-e75894742dfd: url('https://www.phippselectronics.com/wp-content/plugins/woocommerce-gateway-paypal-powered-by-braintree/vendor/skyverge/wc-plugin-framework/woocommerce/payment-gateway/assets/images/card-discover.svg');}.woocommerce-checkout #payment div.payment_box input.js-sv-wc-payment-gateway-credit-card-form-account-number.visaelectron,#add_payment_method input.js-sv-wc-payment-gateway-credit-card-form-account-number.visaelectron{--wpr-bg-a21db38c-4270-4651-ba9d-33360a979c42: url('https://www.phippselectronics.com/wp-content/plugins/woocommerce-gateway-paypal-powered-by-braintree/vendor/skyverge/wc-plugin-framework/woocommerce/payment-gateway/assets/images/card-visa-electron.svg');}.woocommerce-checkout #payment div.payment_box input.js-sv-wc-payment-gateway-credit-card-form-account-number.invalid-card-type,#add_payment_method input.js-sv-wc-payment-gateway-credit-card-form-account-number.invalid-card-type{--wpr-bg-0608c577-9088-4a69-901f-9fcc868ae446: url('https://www.phippselectronics.com/wp-content/plugins/woocommerce-gateway-paypal-powered-by-braintree/vendor/skyverge/wc-plugin-framework/woocommerce/payment-gateway/assets/images/card-cc-invalid.svg');}.yith-ywar-main-wrapper .yith-ywar-filter-data .filter-buttons .filter-button.rating-label:after{--wpr-bg-82ef3a2e-3275-43cf-ba93-12935c4a04c5: url('https://www.phippselectronics.com/wp-content/plugins/yith-woocommerce-advanced-reviews-premium/assets/images/close.svg');}.gform_wrapper.gravity-theme .chosen-container-single .chosen-single abbr{--wpr-bg-429cc130-f4b7-4cdf-8a0f-30a6fd233323: url('https://www.phippselectronics.com/wp-content/plugins/gravityforms/legacy/css/chosen-sprite.png');}.gform_wrapper.gravity-theme .chosen-container-single .chosen-single div b{--wpr-bg-68685c63-b760-462b-9c52-ea46e23b0daa: url('https://www.phippselectronics.com/wp-content/plugins/gravityforms/legacy/css/chosen-sprite.png');}.gform_wrapper.gravity-theme .chosen-container-single .chosen-search input[type=text]{--wpr-bg-5fc81c24-9e6a-4a94-9b5c-224eb37db6ac: url('https://www.phippselectronics.com/wp-content/plugins/gravityforms/legacy/css/chosen-sprite.png');}.gform_wrapper.gravity-theme .chosen-container-multi .chosen-choices li.search-choice .search-choice-close{--wpr-bg-7b3b29a6-04aa-46b7-ac45-87c35763de19: url('https://www.phippselectronics.com/wp-content/plugins/gravityforms/legacy/css/chosen-sprite.png');}.gform_wrapper.gravity-theme .chosen-rtl .chosen-search input[type=text]{--wpr-bg-7986b95a-6b53-4382-8132-d77ca3ab9e5a: url('https://www.phippselectronics.com/wp-content/plugins/gravityforms/legacy/css/chosen-sprite.png');}.gform_wrapper.gravity-theme .gform_card_icon_container div.gform_card_icon.gform_card_icon_selected::after{--wpr-bg-623e26b8-868b-48f7-81aa-75bac107972f: url('https://www.phippselectronics.com/wp-content/plugins/gravityforms/images/gf-creditcards-check.svg');}.gform_wrapper.gravity-theme .gfield_list_icons button{--wpr-bg-13d75d6f-3b7f-4218-b583-edac635adb6f: url('https://www.phippselectronics.com/wp-content/plugins/gravityforms/images/list-add.svg');}.gform_wrapper.gravity-theme .chosen-container .chosen-results-scroll-down span,.gform_wrapper.gravity-theme .chosen-container .chosen-results-scroll-up span,.gform_wrapper.gravity-theme .chosen-container-multi .chosen-choices .search-choice .search-choice-close,.gform_wrapper.gravity-theme .chosen-container-single .chosen-search input[type=text],.gform_wrapper.gravity-theme .chosen-container-single .chosen-single abbr,.gform_wrapper.gravity-theme .chosen-container-single .chosen-single div b,.gform_wrapper.gravity-theme .chosen-rtl .chosen-search input[type=text]{--wpr-bg-d575ff09-5983-499d-b93e-d149ebfcc1bb: url('https://www.phippselectronics.com/wp-content/plugins/gravityforms/legacy/css/chosen-sprite@2x.png');}.gform_wrapper.gravity-theme .gform_card_icon_container div.gform_card_icon{--wpr-bg-c8396f5e-dcce-4dfb-9c8e-1180218de6a2: url('https://www.phippselectronics.com/wp-content/plugins/gravityforms/images/gf-creditcards.svg');}.gform_wrapper.gravity-theme .ginput_container_creditcard .ginput_card_security_code_icon{--wpr-bg-f2b298b3-b2d6-41d5-b2a7-dd69449cc457: url('https://www.phippselectronics.com/wp-content/plugins/gravityforms/images/gf-creditcards.svg');}.gform_wrapper.gravity-theme .gfield_list_icons button.delete_list_item{--wpr-bg-d53d75d6-210a-44bf-a26b-cee6d3093ee6: url('https://www.phippselectronics.com/wp-content/plugins/gravityforms/images/list-remove.svg');}.gravity-theme.ui-datepicker .ui-datepicker-header select{--wpr-bg-2372b264-8f30-4984-b0fc-a2060ca0d8e7: url('https://www.phippselectronics.com/wp-content/plugins/gravityforms/images/theme/down-arrow.svg');}button.pswp__button{--wpr-bg-ee178150-fc6b-4257-b299-1db82914cc2e: url('https://www.phippselectronics.com/wp-content/plugins/woocommerce/assets/css/photoswipe/default-skin/default-skin.png');}.pswp__button,.pswp__button--arrow--left:before,.pswp__button--arrow--right:before{--wpr-bg-98b43960-e18a-4de4-ace3-e8d8fcf217a7: url('https://www.phippselectronics.com/wp-content/plugins/woocommerce/assets/css/photoswipe/default-skin/default-skin.png');}.pswp__preloader--active .pswp__preloader__icn{--wpr-bg-eb35da31-3acb-400a-a52c-10b4e8bf1897: url('https://www.phippselectronics.com/wp-content/plugins/woocommerce/assets/css/photoswipe/default-skin/preloader.gif');}.pswp--svg .pswp__button,.pswp--svg .pswp__button--arrow--left:before,.pswp--svg .pswp__button--arrow--right:before{--wpr-bg-8b4e5892-ae51-4972-b848-71d5f65b16ba: url('https://www.phippselectronics.com/wp-content/plugins/woocommerce/assets/css/photoswipe/default-skin/default-skin.svg');}.rll-youtube-player .play{--wpr-bg-f12cc713-75b3-4606-9a4e-139715ec2c4c: url('https://www.phippselectronics.com/wp-content/plugins/wp-rocket/assets/img/youtube.png');}.css-sprite-motor_icon{--wpr-bg-bf383cc8-11eb-4142-9b31-bcfd5c62d160: url('https://www.phippselectronics.com/wp-content/uploads/2023/10/css-sprite-combined.png');}.css-sprite-breadboard_icon{--wpr-bg-5a14e0eb-5f2a-4f4f-abfa-69c81e765279: url('https://www.phippselectronics.com/wp-content/uploads/2023/10/css-sprite-combined.png');}.css-sprite-led_icon{--wpr-bg-8dd59c05-e831-4966-9bde-8d1a9bb7f424: url('https://www.phippselectronics.com/wp-content/uploads/2023/10/css-sprite-combined.png');}.css-sprite-power_icon{--wpr-bg-b9f197b1-a681-4e1c-ac71-b53b85a5a0ea: url('https://www.phippselectronics.com/wp-content/uploads/2023/10/css-sprite-combined.png');}.css-sprite-fuse_icon{--wpr-bg-07f8d258-121e-434b-9d7d-ac4a187a70ea: url('https://www.phippselectronics.com/wp-content/uploads/2023/10/css-sprite-combined.png');}.css-sprite-resistor_icon_2{--wpr-bg-86bc1af9-1e15-4fe9-a376-8bbc00c30109: url('https://www.phippselectronics.com/wp-content/uploads/2023/10/css-sprite-combined.png');}.css-sprite-transistor_icon{--wpr-bg-66196a66-6604-4f8e-a87c-da88f5ae663f: url('https://www.phippselectronics.com/wp-content/uploads/2023/10/css-sprite-combined.png');}.css-sprite-sensor_icon{--wpr-bg-d931abc4-e2ea-43de-80fe-4f31ec553e36: url('https://www.phippselectronics.com/wp-content/uploads/2023/10/css-sprite-combined.png');}.css-sprite-capacitor_icon{--wpr-bg-da6198ad-e847-4260-ac41-453777ffdecc: url('https://www.phippselectronics.com/wp-content/uploads/2023/10/css-sprite-combined.png');}.css-sprite-diode_icon{--wpr-bg-e99de59c-b049-47f3-8753-17811c11a726: url('https://www.phippselectronics.com/wp-content/uploads/2023/10/css-sprite-combined.png');}.css-sprite-logo-phipps-signature-black{--wpr-bg-38c58bef-72e5-4166-aec0-90e28516af65: url('https://www.phippselectronics.com/wp-content/uploads/2023/10/css-sprite-combined.png');}</style>
</noscript>
<script type="application/javascript">const rocket_pairs = [{"selector":"#wcs-debug #wcs-debug-contents .wcs-debug-tip","style":"#wcs-debug #wcs-debug-contents .wcs-debug-tip{--wpr-bg-2d7d0cf3-3fa5-4e63-a5ca-03a919b6d0b1: url('https:\/\/www.phippselectronics.com\/wp-content\/cache\/..\/plugins\/woo-conditional-shipping-pro\/frontend\/img\/tip2.svg');}","hash":"2d7d0cf3-3fa5-4e63-a5ca-03a919b6d0b1","url":"https:\/\/www.phippselectronics.com\/wp-content\/cache\/..\/plugins\/woo-conditional-shipping-pro\/frontend\/img\/tip2.svg"},{"selector":"#wcs-debug #wcs-debug-header .wcs-debug-toggle","style":"#wcs-debug #wcs-debug-header .wcs-debug-toggle{--wpr-bg-e2a1054f-3e5b-4097-b96f-87a6ac1facd6: url('https:\/\/www.phippselectronics.com\/wp-content\/cache\/..\/plugins\/woo-conditional-shipping-pro\/frontend\/img\/arrow.svg');}","hash":"e2a1054f-3e5b-4097-b96f-87a6ac1facd6","url":"https:\/\/www.phippselectronics.com\/wp-content\/cache\/..\/plugins\/woo-conditional-shipping-pro\/frontend\/img\/arrow.svg"},{"selector":"#wcs-notices .conditional-shipping-notice.conditional-shipping-notice-style-success.conditional-shipping-notice-style-warning, #wcs-notices .conditional-shipping-notice.conditional-shipping-notice-style-warning.conditional-shipping-notice-style-warning, #wcs-notices .conditional-shipping-notice.conditional-shipping-notice-style-error.conditional-shipping-notice-style-warning,\n.wcs-shipping-notices .conditional-shipping-notice.conditional-shipping-notice-style-success.conditional-shipping-notice-style-warning,\n.wcs-shipping-notices .conditional-shipping-notice.conditional-shipping-notice-style-warning.conditional-shipping-notice-style-warning,\n.wcs-shipping-notices .conditional-shipping-notice.conditional-shipping-notice-style-error.conditional-shipping-notice-style-warning","style":"#wcs-notices .conditional-shipping-notice.conditional-shipping-notice-style-success.conditional-shipping-notice-style-warning, #wcs-notices .conditional-shipping-notice.conditional-shipping-notice-style-warning.conditional-shipping-notice-style-warning, #wcs-notices .conditional-shipping-notice.conditional-shipping-notice-style-error.conditional-shipping-notice-style-warning,\n.wcs-shipping-notices .conditional-shipping-notice.conditional-shipping-notice-style-success.conditional-shipping-notice-style-warning,\n.wcs-shipping-notices .conditional-shipping-notice.conditional-shipping-notice-style-warning.conditional-shipping-notice-style-warning,\n.wcs-shipping-notices .conditional-shipping-notice.conditional-shipping-notice-style-error.conditional-shipping-notice-style-warning{--wpr-bg-96ca079f-a228-4783-baa5-9c71723a7b5b: url('https:\/\/www.phippselectronics.com\/wp-content\/cache\/..\/plugins\/woo-conditional-shipping-pro\/frontend\/img\/notices\/warning.svg');}","hash":"96ca079f-a228-4783-baa5-9c71723a7b5b","url":"https:\/\/www.phippselectronics.com\/wp-content\/cache\/..\/plugins\/woo-conditional-shipping-pro\/frontend\/img\/notices\/warning.svg"},{"selector":"#wcs-notices .conditional-shipping-notice.conditional-shipping-notice-style-success.conditional-shipping-notice-style-success, #wcs-notices .conditional-shipping-notice.conditional-shipping-notice-style-warning.conditional-shipping-notice-style-success, #wcs-notices .conditional-shipping-notice.conditional-shipping-notice-style-error.conditional-shipping-notice-style-success,\n.wcs-shipping-notices .conditional-shipping-notice.conditional-shipping-notice-style-success.conditional-shipping-notice-style-success,\n.wcs-shipping-notices .conditional-shipping-notice.conditional-shipping-notice-style-warning.conditional-shipping-notice-style-success,\n.wcs-shipping-notices .conditional-shipping-notice.conditional-shipping-notice-style-error.conditional-shipping-notice-style-success","style":"#wcs-notices .conditional-shipping-notice.conditional-shipping-notice-style-success.conditional-shipping-notice-style-success, #wcs-notices .conditional-shipping-notice.conditional-shipping-notice-style-warning.conditional-shipping-notice-style-success, #wcs-notices .conditional-shipping-notice.conditional-shipping-notice-style-error.conditional-shipping-notice-style-success,\n.wcs-shipping-notices .conditional-shipping-notice.conditional-shipping-notice-style-success.conditional-shipping-notice-style-success,\n.wcs-shipping-notices .conditional-shipping-notice.conditional-shipping-notice-style-warning.conditional-shipping-notice-style-success,\n.wcs-shipping-notices .conditional-shipping-notice.conditional-shipping-notice-style-error.conditional-shipping-notice-style-success{--wpr-bg-d1902f5a-ea6c-499b-a3ec-f9594cfc8231: url('https:\/\/www.phippselectronics.com\/wp-content\/cache\/..\/plugins\/woo-conditional-shipping-pro\/frontend\/img\/notices\/yes-alt.svg');}","hash":"d1902f5a-ea6c-499b-a3ec-f9594cfc8231","url":"https:\/\/www.phippselectronics.com\/wp-content\/cache\/..\/plugins\/woo-conditional-shipping-pro\/frontend\/img\/notices\/yes-alt.svg"},{"selector":"#wcs-notices .conditional-shipping-notice.conditional-shipping-notice-style-success.conditional-shipping-notice-style-error, #wcs-notices .conditional-shipping-notice.conditional-shipping-notice-style-warning.conditional-shipping-notice-style-error, #wcs-notices .conditional-shipping-notice.conditional-shipping-notice-style-error.conditional-shipping-notice-style-error,\n.wcs-shipping-notices .conditional-shipping-notice.conditional-shipping-notice-style-success.conditional-shipping-notice-style-error,\n.wcs-shipping-notices .conditional-shipping-notice.conditional-shipping-notice-style-warning.conditional-shipping-notice-style-error,\n.wcs-shipping-notices .conditional-shipping-notice.conditional-shipping-notice-style-error.conditional-shipping-notice-style-error","style":"#wcs-notices .conditional-shipping-notice.conditional-shipping-notice-style-success.conditional-shipping-notice-style-error, #wcs-notices .conditional-shipping-notice.conditional-shipping-notice-style-warning.conditional-shipping-notice-style-error, #wcs-notices .conditional-shipping-notice.conditional-shipping-notice-style-error.conditional-shipping-notice-style-error,\n.wcs-shipping-notices .conditional-shipping-notice.conditional-shipping-notice-style-success.conditional-shipping-notice-style-error,\n.wcs-shipping-notices .conditional-shipping-notice.conditional-shipping-notice-style-warning.conditional-shipping-notice-style-error,\n.wcs-shipping-notices .conditional-shipping-notice.conditional-shipping-notice-style-error.conditional-shipping-notice-style-error{--wpr-bg-a8f8162d-9607-4942-b4bd-cb78d0062346: url('https:\/\/www.phippselectronics.com\/wp-content\/cache\/..\/plugins\/woo-conditional-shipping-pro\/frontend\/img\/notices\/dismiss.svg');}","hash":"a8f8162d-9607-4942-b4bd-cb78d0062346","url":"https:\/\/www.phippselectronics.com\/wp-content\/cache\/..\/plugins\/woo-conditional-shipping-pro\/frontend\/img\/notices\/dismiss.svg"},{"selector":".mejs-overlay-button","style":".mejs-overlay-button{--wpr-bg-f9f2e990-2bb1-4ee2-aa35-aa7301ab3ebe: url('https:\/\/www.phippselectronics.com\/wp-includes\/js\/mediaelement\/mejs-controls.svg');}","hash":"f9f2e990-2bb1-4ee2-aa35-aa7301ab3ebe","url":"https:\/\/www.phippselectronics.com\/wp-includes\/js\/mediaelement\/mejs-controls.svg"},{"selector":".mejs-overlay-loading-bg-img","style":".mejs-overlay-loading-bg-img{--wpr-bg-50bcf0ca-c281-4d41-b1a9-d4921c3046cf: url('https:\/\/www.phippselectronics.com\/wp-includes\/js\/mediaelement\/mejs-controls.svg');}","hash":"50bcf0ca-c281-4d41-b1a9-d4921c3046cf","url":"https:\/\/www.phippselectronics.com\/wp-includes\/js\/mediaelement\/mejs-controls.svg"},{"selector":".mejs-button>button","style":".mejs-button>button{--wpr-bg-4357da67-3e00-4fa7-8a90-f0a2eb859c8f: url('https:\/\/www.phippselectronics.com\/wp-includes\/js\/mediaelement\/mejs-controls.svg');}","hash":"4357da67-3e00-4fa7-8a90-f0a2eb859c8f","url":"https:\/\/www.phippselectronics.com\/wp-includes\/js\/mediaelement\/mejs-controls.svg"},{"selector":".yith-wcan-filters .yith-wcan-filter .filter-title.collapsable.closed, .yith-wcan-filters .yith-wcan-filter .filter-title.collapsable:not(.opened), .yith-wcan-filters .yith-wcan-filter .filter-title.collapsable:not(.open)","style":".yith-wcan-filters .yith-wcan-filter .filter-title.collapsable.closed:after, .yith-wcan-filters .yith-wcan-filter .filter-title.collapsable:not(.opened):after, .yith-wcan-filters .yith-wcan-filter .filter-title.collapsable:not(.open):after{--wpr-bg-90066b07-ff6b-419c-b975-4553bb9c9109: url('https:\/\/www.phippselectronics.com\/wp-content\/plugins\/yith-woocommerce-ajax-product-filter-premium\/assets\/images\/arrow-down.svg');}","hash":"90066b07-ff6b-419c-b975-4553bb9c9109","url":"https:\/\/www.phippselectronics.com\/wp-content\/plugins\/yith-woocommerce-ajax-product-filter-premium\/assets\/images\/arrow-down.svg"},{"selector":".yith-wcan-filters .yith-wcan-filter .filter-title.collapsable.open, .yith-wcan-filters .yith-wcan-filter .filter-title.collapsable.opened","style":".yith-wcan-filters .yith-wcan-filter .filter-title.collapsable.open:after, .yith-wcan-filters .yith-wcan-filter .filter-title.collapsable.opened:after{--wpr-bg-71f6b62f-71ff-4751-858c-c00db31cac55: url('https:\/\/www.phippselectronics.com\/wp-content\/plugins\/yith-woocommerce-ajax-product-filter-premium\/assets\/images\/arrow-up.svg');}","hash":"71f6b62f-71ff-4751-858c-c00db31cac55","url":"https:\/\/www.phippselectronics.com\/wp-content\/plugins\/yith-woocommerce-ajax-product-filter-premium\/assets\/images\/arrow-up.svg"},{"selector":".yith-wcan-filters .yith-wcan-filter .filter-items .filter-item.active.color:not(.no-color):not(.no-image):not(.label-right) > a","style":".yith-wcan-filters .yith-wcan-filter .filter-items .filter-item.active.color:not(.no-color):not(.no-image):not(.label-right) > a:after{--wpr-bg-7b2d2835-3d60-4a90-8b8f-62459421fcfe: url('https:\/\/www.phippselectronics.com\/wp-content\/plugins\/yith-woocommerce-ajax-product-filter-premium\/assets\/images\/close.svg');}","hash":"7b2d2835-3d60-4a90-8b8f-62459421fcfe","url":"https:\/\/www.phippselectronics.com\/wp-content\/plugins\/yith-woocommerce-ajax-product-filter-premium\/assets\/images\/close.svg"},{"selector":".yith-wcan-filters .yith-wcan-filter .filter-items .filter-item.label.active.with-image:not(.label-right) > a","style":".yith-wcan-filters .yith-wcan-filter .filter-items .filter-item.label.active.with-image:not(.label-right) > a:after{--wpr-bg-c30f3b0a-5c8c-4f1c-9be6-49066fb20752: url('https:\/\/www.phippselectronics.com\/wp-content\/plugins\/yith-woocommerce-ajax-product-filter-premium\/assets\/images\/close.svg');}","hash":"c30f3b0a-5c8c-4f1c-9be6-49066fb20752","url":"https:\/\/www.phippselectronics.com\/wp-content\/plugins\/yith-woocommerce-ajax-product-filter-premium\/assets\/images\/close.svg"},{"selector":".yith-wcan-filters .yith-wcan-filter .filter-items .filter-item.hierarchy-collapsable.closed > .toggle-handle","style":".yith-wcan-filters .yith-wcan-filter .filter-items .filter-item.hierarchy-collapsable.closed > .toggle-handle{--wpr-bg-edf15c0c-1674-4674-b2f7-540075d226ea: url('https:\/\/www.phippselectronics.com\/wp-content\/plugins\/yith-woocommerce-ajax-product-filter-premium\/assets\/images\/arrow-down.svg');}","hash":"edf15c0c-1674-4674-b2f7-540075d226ea","url":"https:\/\/www.phippselectronics.com\/wp-content\/plugins\/yith-woocommerce-ajax-product-filter-premium\/assets\/images\/arrow-down.svg"},{"selector":".yith-wcan-filters .yith-wcan-filter .filter-items .filter-item.hierarchy-collapsable.opened > .toggle-handle","style":".yith-wcan-filters .yith-wcan-filter .filter-items .filter-item.hierarchy-collapsable.opened > .toggle-handle{--wpr-bg-9f98d42a-2937-49fb-9115-d0281114792a: url('https:\/\/www.phippselectronics.com\/wp-content\/plugins\/yith-woocommerce-ajax-product-filter-premium\/assets\/images\/arrow-up.svg');}","hash":"9f98d42a-2937-49fb-9115-d0281114792a","url":"https:\/\/www.phippselectronics.com\/wp-content\/plugins\/yith-woocommerce-ajax-product-filter-premium\/assets\/images\/arrow-up.svg"},{"selector":".yith-wcan-filters .yith-wcan-filter .yith-wcan-dropdown.closed, .yith-wcan-filters .yith-wcan-filter .yith-wcan-dropdown:not(.opened), .yith-wcan-filters .yith-wcan-filter .yith-wcan-dropdown:not(.open)","style":".yith-wcan-filters .yith-wcan-filter .yith-wcan-dropdown.closed:after, .yith-wcan-filters .yith-wcan-filter .yith-wcan-dropdown:not(.opened):after, .yith-wcan-filters .yith-wcan-filter .yith-wcan-dropdown:not(.open):after{--wpr-bg-92ecdafe-ae3b-46e1-9ce3-3b9d668e5b83: url('https:\/\/www.phippselectronics.com\/wp-content\/plugins\/yith-woocommerce-ajax-product-filter-premium\/assets\/images\/arrow-down.svg');}","hash":"92ecdafe-ae3b-46e1-9ce3-3b9d668e5b83","url":"https:\/\/www.phippselectronics.com\/wp-content\/plugins\/yith-woocommerce-ajax-product-filter-premium\/assets\/images\/arrow-down.svg"},{"selector":".yith-wcan-filters .yith-wcan-filter .yith-wcan-dropdown.open, .yith-wcan-filters .yith-wcan-filter .yith-wcan-dropdown.opened","style":".yith-wcan-filters .yith-wcan-filter .yith-wcan-dropdown.open:after, .yith-wcan-filters .yith-wcan-filter .yith-wcan-dropdown.opened:after{--wpr-bg-69ad3b7d-79f9-45cf-a145-8171480b2466: url('https:\/\/www.phippselectronics.com\/wp-content\/plugins\/yith-woocommerce-ajax-product-filter-premium\/assets\/images\/arrow-up.svg');}","hash":"69ad3b7d-79f9-45cf-a145-8171480b2466","url":"https:\/\/www.phippselectronics.com\/wp-content\/plugins\/yith-woocommerce-ajax-product-filter-premium\/assets\/images\/arrow-up.svg"},{"selector":".yith-wcan-filters .yith-wcan-filter .yith-wcan-dropdown .dropdown-wrapper .search-field-container","style":".yith-wcan-filters .yith-wcan-filter .yith-wcan-dropdown .dropdown-wrapper .search-field-container:after{--wpr-bg-17655136-1365-4119-b5cf-1065bd36eaeb: url('https:\/\/www.phippselectronics.com\/wp-content\/plugins\/yith-woocommerce-ajax-product-filter-premium\/assets\/images\/search.svg');}","hash":"17655136-1365-4119-b5cf-1065bd36eaeb","url":"https:\/\/www.phippselectronics.com\/wp-content\/plugins\/yith-woocommerce-ajax-product-filter-premium\/assets\/images\/search.svg"},{"selector":".yith-wcan-filters .yith-wcan-filter.filter-placeholder .select-placeholder.closed, .yith-wcan-filters .yith-wcan-filter.filter-placeholder .select-placeholder:not(.opened), .yith-wcan-filters .yith-wcan-filter.filter-placeholder .select-placeholder:not(.open)","style":".yith-wcan-filters .yith-wcan-filter.filter-placeholder .select-placeholder.closed:after, .yith-wcan-filters .yith-wcan-filter.filter-placeholder .select-placeholder:not(.opened):after, .yith-wcan-filters .yith-wcan-filter.filter-placeholder .select-placeholder:not(.open):after{--wpr-bg-0a44a53f-5721-49aa-b79c-0afaee6e038d: url('https:\/\/www.phippselectronics.com\/wp-content\/plugins\/yith-woocommerce-ajax-product-filter-premium\/assets\/images\/arrow-down.svg');}","hash":"0a44a53f-5721-49aa-b79c-0afaee6e038d","url":"https:\/\/www.phippselectronics.com\/wp-content\/plugins\/yith-woocommerce-ajax-product-filter-premium\/assets\/images\/arrow-down.svg"},{"selector":".yith-wcan-filters .yith-wcan-filter.filter-placeholder .select-placeholder.open, .yith-wcan-filters .yith-wcan-filter.filter-placeholder .select-placeholder.opened","style":".yith-wcan-filters .yith-wcan-filter.filter-placeholder .select-placeholder.open:after, .yith-wcan-filters .yith-wcan-filter.filter-placeholder .select-placeholder.opened:after{--wpr-bg-811cf39e-7221-4c22-aebd-2f821dad2361: url('https:\/\/www.phippselectronics.com\/wp-content\/plugins\/yith-woocommerce-ajax-product-filter-premium\/assets\/images\/arrow-up.svg');}","hash":"811cf39e-7221-4c22-aebd-2f821dad2361","url":"https:\/\/www.phippselectronics.com\/wp-content\/plugins\/yith-woocommerce-ajax-product-filter-premium\/assets\/images\/arrow-up.svg"},{"selector":".yith-wcan-filters.custom-style span.checkboxbutton.checked","style":".yith-wcan-filters.custom-style span.checkboxbutton.checked:before{--wpr-bg-fc1bcd1b-63e1-428a-8c8f-11ca6ddb21b1: url('https:\/\/www.phippselectronics.com\/wp-content\/plugins\/yith-woocommerce-ajax-product-filter-premium\/assets\/images\/check.svg');}","hash":"fc1bcd1b-63e1-428a-8c8f-11ca6ddb21b1","url":"https:\/\/www.phippselectronics.com\/wp-content\/plugins\/yith-woocommerce-ajax-product-filter-premium\/assets\/images\/check.svg"},{"selector":".yith-wcan-filters.horizontal:not(.filters-modal) .yith-wcan-filter.filter-placeholder .filter-content.closed, .yith-wcan-filters.horizontal:not(.filters-modal) .yith-wcan-filter.filter-placeholder .filter-content:not(.opened), .yith-wcan-filters.horizontal:not(.filters-modal) .yith-wcan-filter.filter-placeholder .filter-content:not(.open)","style":".yith-wcan-filters.horizontal:not(.filters-modal) .yith-wcan-filter.filter-placeholder .filter-content.closed:after, .yith-wcan-filters.horizontal:not(.filters-modal) .yith-wcan-filter.filter-placeholder .filter-content:not(.opened):after, .yith-wcan-filters.horizontal:not(.filters-modal) .yith-wcan-filter.filter-placeholder .filter-content:not(.open):after{--wpr-bg-bfe2d25d-1bb7-471d-980d-85874d744aac: url('https:\/\/www.phippselectronics.com\/wp-content\/plugins\/yith-woocommerce-ajax-product-filter-premium\/assets\/images\/arrow-down.svg');}","hash":"bfe2d25d-1bb7-471d-980d-85874d744aac","url":"https:\/\/www.phippselectronics.com\/wp-content\/plugins\/yith-woocommerce-ajax-product-filter-premium\/assets\/images\/arrow-down.svg"},{"selector":".yith-wcan-filters.horizontal:not(.filters-modal) .yith-wcan-filter.filter-placeholder .filter-content.open, .yith-wcan-filters.horizontal:not(.filters-modal) .yith-wcan-filter.filter-placeholder .filter-content.opened","style":".yith-wcan-filters.horizontal:not(.filters-modal) .yith-wcan-filter.filter-placeholder .filter-content.open:after, .yith-wcan-filters.horizontal:not(.filters-modal) .yith-wcan-filter.filter-placeholder .filter-content.opened:after{--wpr-bg-6461f983-33de-44ae-87e3-3099001990f6: url('https:\/\/www.phippselectronics.com\/wp-content\/plugins\/yith-woocommerce-ajax-product-filter-premium\/assets\/images\/arrow-up.svg');}","hash":"6461f983-33de-44ae-87e3-3099001990f6","url":"https:\/\/www.phippselectronics.com\/wp-content\/plugins\/yith-woocommerce-ajax-product-filter-premium\/assets\/images\/arrow-up.svg"},{"selector":".yith-wcan-active-filters .active-filter .active-filter-label","style":".yith-wcan-active-filters .active-filter .active-filter-label:after{--wpr-bg-5fee3d76-ee4b-4b77-be8a-28d0555a4d6f: url('https:\/\/www.phippselectronics.com\/wp-content\/plugins\/yith-woocommerce-ajax-product-filter-premium\/assets\/images\/close.svg');}","hash":"5fee3d76-ee4b-4b77-be8a-28d0555a4d6f","url":"https:\/\/www.phippselectronics.com\/wp-content\/plugins\/yith-woocommerce-ajax-product-filter-premium\/assets\/images\/close.svg"},{"selector":".yith-wcan-filters-opener i.filter-icon","style":".yith-wcan-filters-opener i.filter-icon{--wpr-bg-d77bded7-8e2d-493f-b5b8-1e13cf458879: url('https:\/\/www.phippselectronics.com\/wp-content\/plugins\/yith-woocommerce-ajax-product-filter-premium\/assets\/images\/filters.svg');}","hash":"d77bded7-8e2d-493f-b5b8-1e13cf458879","url":"https:\/\/www.phippselectronics.com\/wp-content\/plugins\/yith-woocommerce-ajax-product-filter-premium\/assets\/images\/filters.svg"},{"selector":".selectBox-dropdown .selectBox-arrow","style":".selectBox-dropdown .selectBox-arrow{--wpr-bg-143300b1-f393-4e59-9718-f37fdf241b45: url('https:\/\/www.phippselectronics.com\/wp-content\/plugins\/yith-woocommerce-wishlist-premium\/assets\/images\/jquery.selectBox-arrow.gif');}","hash":"143300b1-f393-4e59-9718-f37fdf241b45","url":"https:\/\/www.phippselectronics.com\/wp-content\/plugins\/yith-woocommerce-wishlist-premium\/assets\/images\/jquery.selectBox-arrow.gif"},{"selector":"div.pp_woocommerce .pp_loaderIcon","style":"div.pp_woocommerce .pp_loaderIcon::before{--wpr-bg-bd69f014-1b72-43c9-a63f-bcf966c06198: url('https:\/\/www.phippselectronics.com\/wp-content\/plugins\/woocommerce\/assets\/images\/icons\/loader.svg');}","hash":"bd69f014-1b72-43c9-a63f-bcf966c06198","url":"https:\/\/www.phippselectronics.com\/wp-content\/plugins\/woocommerce\/assets\/images\/icons\/loader.svg"},{"selector":".selectBox-dropdown .selectBox-arrow","style":".selectBox-dropdown .selectBox-arrow{--wpr-bg-d4999d35-1c5e-41e4-8c71-e9a4e0cfec0d: url('https:\/\/www.phippselectronics.com\/wp-content\/plugins\/yith-woocommerce-wishlist-premium\/assets\/images\/jquery.selectBox-arrow.png');}","hash":"d4999d35-1c5e-41e4-8c71-e9a4e0cfec0d","url":"https:\/\/www.phippselectronics.com\/wp-content\/plugins\/yith-woocommerce-wishlist-premium\/assets\/images\/jquery.selectBox-arrow.png"},{"selector":".selectBox-dropdown.selectBox-menuShowing .selectBox-arrow","style":".selectBox-dropdown.selectBox-menuShowing .selectBox-arrow{--wpr-bg-10b35172-12ae-4868-a4d8-c9d14b919fb2: url('https:\/\/www.phippselectronics.com\/wp-content\/plugins\/yith-woocommerce-wishlist-premium\/assets\/images\/jquery.selectBox-arrow.png');}","hash":"10b35172-12ae-4868-a4d8-c9d14b919fb2","url":"https:\/\/www.phippselectronics.com\/wp-content\/plugins\/yith-woocommerce-wishlist-premium\/assets\/images\/jquery.selectBox-arrow.png"},{"selector":".woocommerce-js .blockUI.blockOverlay","style":".woocommerce-js .blockUI.blockOverlay::before{--wpr-bg-0846e3fe-142d-4964-84b9-ad44168a8889: url('https:\/\/www.phippselectronics.com\/wp-content\/plugins\/woocommerce\/assets\/images\/icons\/loader.svg');}","hash":"0846e3fe-142d-4964-84b9-ad44168a8889","url":"https:\/\/www.phippselectronics.com\/wp-content\/plugins\/woocommerce\/assets\/images\/icons\/loader.svg"},{"selector":".woocommerce-js .loader","style":".woocommerce-js .loader::before{--wpr-bg-a40b777b-9582-4df2-b9de-dd6fa8742a49: url('https:\/\/www.phippselectronics.com\/wp-content\/plugins\/woocommerce\/assets\/images\/icons\/loader.svg');}","hash":"a40b777b-9582-4df2-b9de-dd6fa8742a49","url":"https:\/\/www.phippselectronics.com\/wp-content\/plugins\/woocommerce\/assets\/images\/icons\/loader.svg"},{"selector":"button.pswp__button","style":"button.pswp__button{--wpr-bg-826f914a-0298-4e82-90d7-75981c931569: url('https:\/\/www.phippselectronics.com\/wp-content\/plugins\/woocommerce\/assets\/css\/photoswipe\/default-skin\/default-skin.png');}","hash":"826f914a-0298-4e82-90d7-75981c931569","url":"https:\/\/www.phippselectronics.com\/wp-content\/plugins\/woocommerce\/assets\/css\/photoswipe\/default-skin\/default-skin.png"},{"selector":"#add_payment_method #payment div.payment_box .wc-credit-card-form-card-cvc.visa,#add_payment_method #payment div.payment_box .wc-credit-card-form-card-expiry.visa,#add_payment_method #payment div.payment_box .wc-credit-card-form-card-number.visa,.woocommerce-cart #payment div.payment_box .wc-credit-card-form-card-cvc.visa,.woocommerce-cart #payment div.payment_box .wc-credit-card-form-card-expiry.visa,.woocommerce-cart #payment div.payment_box .wc-credit-card-form-card-number.visa,.woocommerce-checkout #payment div.payment_box .wc-credit-card-form-card-cvc.visa,.woocommerce-checkout #payment div.payment_box .wc-credit-card-form-card-expiry.visa,.woocommerce-checkout #payment div.payment_box .wc-credit-card-form-card-number.visa","style":"#add_payment_method #payment div.payment_box .wc-credit-card-form-card-cvc.visa,#add_payment_method #payment div.payment_box .wc-credit-card-form-card-expiry.visa,#add_payment_method #payment div.payment_box .wc-credit-card-form-card-number.visa,.woocommerce-cart #payment div.payment_box .wc-credit-card-form-card-cvc.visa,.woocommerce-cart #payment div.payment_box .wc-credit-card-form-card-expiry.visa,.woocommerce-cart #payment div.payment_box .wc-credit-card-form-card-number.visa,.woocommerce-checkout #payment div.payment_box .wc-credit-card-form-card-cvc.visa,.woocommerce-checkout #payment div.payment_box .wc-credit-card-form-card-expiry.visa,.woocommerce-checkout #payment div.payment_box .wc-credit-card-form-card-number.visa{--wpr-bg-382fc6fa-4c57-4131-992b-842fdbcb0daf: url('https:\/\/www.phippselectronics.com\/wp-content\/plugins\/woocommerce\/assets\/images\/icons\/credit-cards\/visa.svg');}","hash":"382fc6fa-4c57-4131-992b-842fdbcb0daf","url":"https:\/\/www.phippselectronics.com\/wp-content\/plugins\/woocommerce\/assets\/images\/icons\/credit-cards\/visa.svg"},{"selector":"#add_payment_method #payment div.payment_box .wc-credit-card-form-card-cvc.mastercard,#add_payment_method #payment div.payment_box .wc-credit-card-form-card-expiry.mastercard,#add_payment_method #payment div.payment_box .wc-credit-card-form-card-number.mastercard,.woocommerce-cart #payment div.payment_box .wc-credit-card-form-card-cvc.mastercard,.woocommerce-cart #payment div.payment_box .wc-credit-card-form-card-expiry.mastercard,.woocommerce-cart #payment div.payment_box .wc-credit-card-form-card-number.mastercard,.woocommerce-checkout #payment div.payment_box .wc-credit-card-form-card-cvc.mastercard,.woocommerce-checkout #payment div.payment_box .wc-credit-card-form-card-expiry.mastercard,.woocommerce-checkout #payment div.payment_box .wc-credit-card-form-card-number.mastercard","style":"#add_payment_method #payment div.payment_box .wc-credit-card-form-card-cvc.mastercard,#add_payment_method #payment div.payment_box .wc-credit-card-form-card-expiry.mastercard,#add_payment_method #payment div.payment_box .wc-credit-card-form-card-number.mastercard,.woocommerce-cart #payment div.payment_box .wc-credit-card-form-card-cvc.mastercard,.woocommerce-cart #payment div.payment_box .wc-credit-card-form-card-expiry.mastercard,.woocommerce-cart #payment div.payment_box .wc-credit-card-form-card-number.mastercard,.woocommerce-checkout #payment div.payment_box .wc-credit-card-form-card-cvc.mastercard,.woocommerce-checkout #payment div.payment_box .wc-credit-card-form-card-expiry.mastercard,.woocommerce-checkout #payment div.payment_box .wc-credit-card-form-card-number.mastercard{--wpr-bg-41c7723d-fab7-4354-bb73-f47bcd317aea: url('https:\/\/www.phippselectronics.com\/wp-content\/plugins\/woocommerce\/assets\/images\/icons\/credit-cards\/mastercard.svg');}","hash":"41c7723d-fab7-4354-bb73-f47bcd317aea","url":"https:\/\/www.phippselectronics.com\/wp-content\/plugins\/woocommerce\/assets\/images\/icons\/credit-cards\/mastercard.svg"},{"selector":"#add_payment_method #payment div.payment_box .wc-credit-card-form-card-cvc.laser,#add_payment_method #payment div.payment_box .wc-credit-card-form-card-expiry.laser,#add_payment_method #payment div.payment_box .wc-credit-card-form-card-number.laser,.woocommerce-cart #payment div.payment_box .wc-credit-card-form-card-cvc.laser,.woocommerce-cart #payment div.payment_box .wc-credit-card-form-card-expiry.laser,.woocommerce-cart #payment div.payment_box .wc-credit-card-form-card-number.laser,.woocommerce-checkout #payment div.payment_box .wc-credit-card-form-card-cvc.laser,.woocommerce-checkout #payment div.payment_box .wc-credit-card-form-card-expiry.laser,.woocommerce-checkout #payment div.payment_box .wc-credit-card-form-card-number.laser","style":"#add_payment_method #payment div.payment_box .wc-credit-card-form-card-cvc.laser,#add_payment_method #payment div.payment_box .wc-credit-card-form-card-expiry.laser,#add_payment_method #payment div.payment_box .wc-credit-card-form-card-number.laser,.woocommerce-cart #payment div.payment_box .wc-credit-card-form-card-cvc.laser,.woocommerce-cart #payment div.payment_box .wc-credit-card-form-card-expiry.laser,.woocommerce-cart #payment div.payment_box .wc-credit-card-form-card-number.laser,.woocommerce-checkout #payment div.payment_box .wc-credit-card-form-card-cvc.laser,.woocommerce-checkout #payment div.payment_box .wc-credit-card-form-card-expiry.laser,.woocommerce-checkout #payment div.payment_box .wc-credit-card-form-card-number.laser{--wpr-bg-a669b83a-b77a-4f78-a1eb-b98c3b419717: url('https:\/\/www.phippselectronics.com\/wp-content\/plugins\/woocommerce\/assets\/images\/icons\/credit-cards\/laser.svg');}","hash":"a669b83a-b77a-4f78-a1eb-b98c3b419717","url":"https:\/\/www.phippselectronics.com\/wp-content\/plugins\/woocommerce\/assets\/images\/icons\/credit-cards\/laser.svg"},{"selector":"#add_payment_method #payment div.payment_box .wc-credit-card-form-card-cvc.dinersclub,#add_payment_method #payment div.payment_box .wc-credit-card-form-card-expiry.dinersclub,#add_payment_method #payment div.payment_box .wc-credit-card-form-card-number.dinersclub,.woocommerce-cart #payment div.payment_box .wc-credit-card-form-card-cvc.dinersclub,.woocommerce-cart #payment div.payment_box .wc-credit-card-form-card-expiry.dinersclub,.woocommerce-cart #payment div.payment_box .wc-credit-card-form-card-number.dinersclub,.woocommerce-checkout #payment div.payment_box .wc-credit-card-form-card-cvc.dinersclub,.woocommerce-checkout #payment div.payment_box .wc-credit-card-form-card-expiry.dinersclub,.woocommerce-checkout #payment div.payment_box .wc-credit-card-form-card-number.dinersclub","style":"#add_payment_method #payment div.payment_box .wc-credit-card-form-card-cvc.dinersclub,#add_payment_method #payment div.payment_box .wc-credit-card-form-card-expiry.dinersclub,#add_payment_method #payment div.payment_box .wc-credit-card-form-card-number.dinersclub,.woocommerce-cart #payment div.payment_box .wc-credit-card-form-card-cvc.dinersclub,.woocommerce-cart #payment div.payment_box .wc-credit-card-form-card-expiry.dinersclub,.woocommerce-cart #payment div.payment_box .wc-credit-card-form-card-number.dinersclub,.woocommerce-checkout #payment div.payment_box .wc-credit-card-form-card-cvc.dinersclub,.woocommerce-checkout #payment div.payment_box .wc-credit-card-form-card-expiry.dinersclub,.woocommerce-checkout #payment div.payment_box .wc-credit-card-form-card-number.dinersclub{--wpr-bg-70d52f51-b6dc-4d78-a0de-5c9165e4edc3: url('https:\/\/www.phippselectronics.com\/wp-content\/plugins\/woocommerce\/assets\/images\/icons\/credit-cards\/diners.svg');}","hash":"70d52f51-b6dc-4d78-a0de-5c9165e4edc3","url":"https:\/\/www.phippselectronics.com\/wp-content\/plugins\/woocommerce\/assets\/images\/icons\/credit-cards\/diners.svg"},{"selector":"#add_payment_method #payment div.payment_box .wc-credit-card-form-card-cvc.maestro,#add_payment_method #payment div.payment_box .wc-credit-card-form-card-expiry.maestro,#add_payment_method #payment div.payment_box .wc-credit-card-form-card-number.maestro,.woocommerce-cart #payment div.payment_box .wc-credit-card-form-card-cvc.maestro,.woocommerce-cart #payment div.payment_box .wc-credit-card-form-card-expiry.maestro,.woocommerce-cart #payment div.payment_box .wc-credit-card-form-card-number.maestro,.woocommerce-checkout #payment div.payment_box .wc-credit-card-form-card-cvc.maestro,.woocommerce-checkout #payment div.payment_box .wc-credit-card-form-card-expiry.maestro,.woocommerce-checkout #payment div.payment_box .wc-credit-card-form-card-number.maestro","style":"#add_payment_method #payment div.payment_box .wc-credit-card-form-card-cvc.maestro,#add_payment_method #payment div.payment_box .wc-credit-card-form-card-expiry.maestro,#add_payment_method #payment div.payment_box .wc-credit-card-form-card-number.maestro,.woocommerce-cart #payment div.payment_box .wc-credit-card-form-card-cvc.maestro,.woocommerce-cart #payment div.payment_box .wc-credit-card-form-card-expiry.maestro,.woocommerce-cart #payment div.payment_box .wc-credit-card-form-card-number.maestro,.woocommerce-checkout #payment div.payment_box .wc-credit-card-form-card-cvc.maestro,.woocommerce-checkout #payment div.payment_box .wc-credit-card-form-card-expiry.maestro,.woocommerce-checkout #payment div.payment_box .wc-credit-card-form-card-number.maestro{--wpr-bg-9168df8f-eda5-4990-9ceb-e2f5a70afa03: url('https:\/\/www.phippselectronics.com\/wp-content\/plugins\/woocommerce\/assets\/images\/icons\/credit-cards\/maestro.svg');}","hash":"9168df8f-eda5-4990-9ceb-e2f5a70afa03","url":"https:\/\/www.phippselectronics.com\/wp-content\/plugins\/woocommerce\/assets\/images\/icons\/credit-cards\/maestro.svg"},{"selector":"#add_payment_method #payment div.payment_box .wc-credit-card-form-card-cvc.jcb,#add_payment_method #payment div.payment_box .wc-credit-card-form-card-expiry.jcb,#add_payment_method #payment div.payment_box .wc-credit-card-form-card-number.jcb,.woocommerce-cart #payment div.payment_box .wc-credit-card-form-card-cvc.jcb,.woocommerce-cart #payment div.payment_box .wc-credit-card-form-card-expiry.jcb,.woocommerce-cart #payment div.payment_box .wc-credit-card-form-card-number.jcb,.woocommerce-checkout #payment div.payment_box .wc-credit-card-form-card-cvc.jcb,.woocommerce-checkout #payment div.payment_box .wc-credit-card-form-card-expiry.jcb,.woocommerce-checkout #payment div.payment_box .wc-credit-card-form-card-number.jcb","style":"#add_payment_method #payment div.payment_box .wc-credit-card-form-card-cvc.jcb,#add_payment_method #payment div.payment_box .wc-credit-card-form-card-expiry.jcb,#add_payment_method #payment div.payment_box .wc-credit-card-form-card-number.jcb,.woocommerce-cart #payment div.payment_box .wc-credit-card-form-card-cvc.jcb,.woocommerce-cart #payment div.payment_box .wc-credit-card-form-card-expiry.jcb,.woocommerce-cart #payment div.payment_box .wc-credit-card-form-card-number.jcb,.woocommerce-checkout #payment div.payment_box .wc-credit-card-form-card-cvc.jcb,.woocommerce-checkout #payment div.payment_box .wc-credit-card-form-card-expiry.jcb,.woocommerce-checkout #payment div.payment_box .wc-credit-card-form-card-number.jcb{--wpr-bg-4281cfe1-ca05-4438-8019-0838280c05fc: url('https:\/\/www.phippselectronics.com\/wp-content\/plugins\/woocommerce\/assets\/images\/icons\/credit-cards\/jcb.svg');}","hash":"4281cfe1-ca05-4438-8019-0838280c05fc","url":"https:\/\/www.phippselectronics.com\/wp-content\/plugins\/woocommerce\/assets\/images\/icons\/credit-cards\/jcb.svg"},{"selector":"#add_payment_method #payment div.payment_box .wc-credit-card-form-card-cvc.amex,#add_payment_method #payment div.payment_box .wc-credit-card-form-card-expiry.amex,#add_payment_method #payment div.payment_box .wc-credit-card-form-card-number.amex,.woocommerce-cart #payment div.payment_box .wc-credit-card-form-card-cvc.amex,.woocommerce-cart #payment div.payment_box .wc-credit-card-form-card-expiry.amex,.woocommerce-cart #payment div.payment_box .wc-credit-card-form-card-number.amex,.woocommerce-checkout #payment div.payment_box .wc-credit-card-form-card-cvc.amex,.woocommerce-checkout #payment div.payment_box .wc-credit-card-form-card-expiry.amex,.woocommerce-checkout #payment div.payment_box .wc-credit-card-form-card-number.amex","style":"#add_payment_method #payment div.payment_box .wc-credit-card-form-card-cvc.amex,#add_payment_method #payment div.payment_box .wc-credit-card-form-card-expiry.amex,#add_payment_method #payment div.payment_box .wc-credit-card-form-card-number.amex,.woocommerce-cart #payment div.payment_box .wc-credit-card-form-card-cvc.amex,.woocommerce-cart #payment div.payment_box .wc-credit-card-form-card-expiry.amex,.woocommerce-cart #payment div.payment_box .wc-credit-card-form-card-number.amex,.woocommerce-checkout #payment div.payment_box .wc-credit-card-form-card-cvc.amex,.woocommerce-checkout #payment div.payment_box .wc-credit-card-form-card-expiry.amex,.woocommerce-checkout #payment div.payment_box .wc-credit-card-form-card-number.amex{--wpr-bg-8d9bacb0-df34-4b30-9967-055299bd6d5f: url('https:\/\/www.phippselectronics.com\/wp-content\/plugins\/woocommerce\/assets\/images\/icons\/credit-cards\/amex.svg');}","hash":"8d9bacb0-df34-4b30-9967-055299bd6d5f","url":"https:\/\/www.phippselectronics.com\/wp-content\/plugins\/woocommerce\/assets\/images\/icons\/credit-cards\/amex.svg"},{"selector":"#add_payment_method #payment div.payment_box .wc-credit-card-form-card-cvc.discover,#add_payment_method #payment div.payment_box .wc-credit-card-form-card-expiry.discover,#add_payment_method #payment div.payment_box .wc-credit-card-form-card-number.discover,.woocommerce-cart #payment div.payment_box .wc-credit-card-form-card-cvc.discover,.woocommerce-cart #payment div.payment_box .wc-credit-card-form-card-expiry.discover,.woocommerce-cart #payment div.payment_box .wc-credit-card-form-card-number.discover,.woocommerce-checkout #payment div.payment_box .wc-credit-card-form-card-cvc.discover,.woocommerce-checkout #payment div.payment_box .wc-credit-card-form-card-expiry.discover,.woocommerce-checkout #payment div.payment_box .wc-credit-card-form-card-number.discover","style":"#add_payment_method #payment div.payment_box .wc-credit-card-form-card-cvc.discover,#add_payment_method #payment div.payment_box .wc-credit-card-form-card-expiry.discover,#add_payment_method #payment div.payment_box .wc-credit-card-form-card-number.discover,.woocommerce-cart #payment div.payment_box .wc-credit-card-form-card-cvc.discover,.woocommerce-cart #payment div.payment_box .wc-credit-card-form-card-expiry.discover,.woocommerce-cart #payment div.payment_box .wc-credit-card-form-card-number.discover,.woocommerce-checkout #payment div.payment_box .wc-credit-card-form-card-cvc.discover,.woocommerce-checkout #payment div.payment_box .wc-credit-card-form-card-expiry.discover,.woocommerce-checkout #payment div.payment_box .wc-credit-card-form-card-number.discover{--wpr-bg-28227cd9-5477-493b-955f-2d8154853ab3: url('https:\/\/www.phippselectronics.com\/wp-content\/plugins\/woocommerce\/assets\/images\/icons\/credit-cards\/discover.svg');}","hash":"28227cd9-5477-493b-955f-2d8154853ab3","url":"https:\/\/www.phippselectronics.com\/wp-content\/plugins\/woocommerce\/assets\/images\/icons\/credit-cards\/discover.svg"},{"selector":".zm-loader","style":".zm-loader:before{--wpr-bg-739f8cab-d401-4f8b-9172-888af181354d: url('https:\/\/www.phippselectronics.com\/wp-content\/plugins\/woocommerce\/assets\/images\/icons\/loader.svg');}","hash":"739f8cab-d401-4f8b-9172-888af181354d","url":"https:\/\/www.phippselectronics.com\/wp-content\/plugins\/woocommerce\/assets\/images\/icons\/loader.svg"},{"selector":".yith-ywot-empty-state-container","style":".yith-ywot-empty-state-container{--wpr-bg-80d8f5b9-8fba-498b-90b1-8c37c2fff516: url('https:\/\/www.phippselectronics.com\/wp-content\/plugins\/yith-woocommerce-order-tracking-premium\/assets\/images\/carriers.jpg');}","hash":"80d8f5b9-8fba-498b-90b1-8c37c2fff516","url":"https:\/\/www.phippselectronics.com\/wp-content\/plugins\/yith-woocommerce-order-tracking-premium\/assets\/images\/carriers.jpg"},{"selector":".dgwt-wcas-inner-preloader","style":".dgwt-wcas-inner-preloader{--wpr-bg-9153d084-f338-443a-9211-b42ab9490c5f: url('https:\/\/www.phippselectronics.com\/wp-content\/plugins\/ajax-search-for-woocommerce-premium\/assets\/img\/preloader.gif');}","hash":"9153d084-f338-443a-9211-b42ab9490c5f","url":"https:\/\/www.phippselectronics.com\/wp-content\/plugins\/ajax-search-for-woocommerce-premium\/assets\/img\/preloader.gif"},{"selector":".woocommerce-checkout #payment div.payment_box input.js-sv-wc-payment-gateway-credit-card-form-account-number,#add_payment_method input.js-sv-wc-payment-gateway-credit-card-form-account-number","style":".woocommerce-checkout #payment div.payment_box input.js-sv-wc-payment-gateway-credit-card-form-account-number,#add_payment_method input.js-sv-wc-payment-gateway-credit-card-form-account-number{--wpr-bg-ff6834e3-2e70-43d3-9966-081711d8a33e: url('https:\/\/www.phippselectronics.com\/wp-content\/plugins\/woocommerce-gateway-paypal-powered-by-braintree\/vendor\/skyverge\/wc-plugin-framework\/woocommerce\/payment-gateway\/assets\/images\/card-cc-plain.svg');}","hash":"ff6834e3-2e70-43d3-9966-081711d8a33e","url":"https:\/\/www.phippselectronics.com\/wp-content\/plugins\/woocommerce-gateway-paypal-powered-by-braintree\/vendor\/skyverge\/wc-plugin-framework\/woocommerce\/payment-gateway\/assets\/images\/card-cc-plain.svg"},{"selector":".woocommerce-checkout #payment div.payment_box input.js-sv-wc-payment-gateway-credit-card-form-account-number.visa,#add_payment_method input.js-sv-wc-payment-gateway-credit-card-form-account-number.visa","style":".woocommerce-checkout #payment div.payment_box input.js-sv-wc-payment-gateway-credit-card-form-account-number.visa,#add_payment_method input.js-sv-wc-payment-gateway-credit-card-form-account-number.visa{--wpr-bg-0a28889a-f8bc-4ac4-aaf5-a4d56958a2be: url('https:\/\/www.phippselectronics.com\/wp-content\/plugins\/woocommerce-gateway-paypal-powered-by-braintree\/vendor\/skyverge\/wc-plugin-framework\/woocommerce\/payment-gateway\/assets\/images\/card-visa.svg');}","hash":"0a28889a-f8bc-4ac4-aaf5-a4d56958a2be","url":"https:\/\/www.phippselectronics.com\/wp-content\/plugins\/woocommerce-gateway-paypal-powered-by-braintree\/vendor\/skyverge\/wc-plugin-framework\/woocommerce\/payment-gateway\/assets\/images\/card-visa.svg"},{"selector":".woocommerce-checkout #payment div.payment_box input.js-sv-wc-payment-gateway-credit-card-form-account-number.mastercard,#add_payment_method input.js-sv-wc-payment-gateway-credit-card-form-account-number.mastercard","style":".woocommerce-checkout #payment div.payment_box input.js-sv-wc-payment-gateway-credit-card-form-account-number.mastercard,#add_payment_method input.js-sv-wc-payment-gateway-credit-card-form-account-number.mastercard{--wpr-bg-db8206fe-cf22-4600-bd27-90d7cdee2ac9: url('https:\/\/www.phippselectronics.com\/wp-content\/plugins\/woocommerce-gateway-paypal-powered-by-braintree\/vendor\/skyverge\/wc-plugin-framework\/woocommerce\/payment-gateway\/assets\/images\/card-mastercard.svg');}","hash":"db8206fe-cf22-4600-bd27-90d7cdee2ac9","url":"https:\/\/www.phippselectronics.com\/wp-content\/plugins\/woocommerce-gateway-paypal-powered-by-braintree\/vendor\/skyverge\/wc-plugin-framework\/woocommerce\/payment-gateway\/assets\/images\/card-mastercard.svg"},{"selector":".woocommerce-checkout #payment div.payment_box input.js-sv-wc-payment-gateway-credit-card-form-account-number.dinersclub,#add_payment_method input.js-sv-wc-payment-gateway-credit-card-form-account-number.dinersclub","style":".woocommerce-checkout #payment div.payment_box input.js-sv-wc-payment-gateway-credit-card-form-account-number.dinersclub,#add_payment_method input.js-sv-wc-payment-gateway-credit-card-form-account-number.dinersclub{--wpr-bg-06d19fd1-66d8-47cf-a01f-b54c64d7dcb0: url('https:\/\/www.phippselectronics.com\/wp-content\/plugins\/woocommerce-gateway-paypal-powered-by-braintree\/vendor\/skyverge\/wc-plugin-framework\/woocommerce\/payment-gateway\/assets\/images\/card-dinersclub.svg');}","hash":"06d19fd1-66d8-47cf-a01f-b54c64d7dcb0","url":"https:\/\/www.phippselectronics.com\/wp-content\/plugins\/woocommerce-gateway-paypal-powered-by-braintree\/vendor\/skyverge\/wc-plugin-framework\/woocommerce\/payment-gateway\/assets\/images\/card-dinersclub.svg"},{"selector":".woocommerce-checkout #payment div.payment_box input.js-sv-wc-payment-gateway-credit-card-form-account-number.maestro,#add_payment_method input.js-sv-wc-payment-gateway-credit-card-form-account-number.maestro","style":".woocommerce-checkout #payment div.payment_box input.js-sv-wc-payment-gateway-credit-card-form-account-number.maestro,#add_payment_method input.js-sv-wc-payment-gateway-credit-card-form-account-number.maestro{--wpr-bg-ed0c82e3-65f5-474d-8fb1-19869ff926cf: url('https:\/\/www.phippselectronics.com\/wp-content\/plugins\/woocommerce-gateway-paypal-powered-by-braintree\/vendor\/skyverge\/wc-plugin-framework\/woocommerce\/payment-gateway\/assets\/images\/card-maestro.svg');}","hash":"ed0c82e3-65f5-474d-8fb1-19869ff926cf","url":"https:\/\/www.phippselectronics.com\/wp-content\/plugins\/woocommerce-gateway-paypal-powered-by-braintree\/vendor\/skyverge\/wc-plugin-framework\/woocommerce\/payment-gateway\/assets\/images\/card-maestro.svg"},{"selector":".woocommerce-checkout #payment div.payment_box input.js-sv-wc-payment-gateway-credit-card-form-account-number.jcb,#add_payment_method input.js-sv-wc-payment-gateway-credit-card-form-account-number.jcb","style":".woocommerce-checkout #payment div.payment_box input.js-sv-wc-payment-gateway-credit-card-form-account-number.jcb,#add_payment_method input.js-sv-wc-payment-gateway-credit-card-form-account-number.jcb{--wpr-bg-413f72a8-4e18-486e-81af-928ff8103642: url('https:\/\/www.phippselectronics.com\/wp-content\/plugins\/woocommerce-gateway-paypal-powered-by-braintree\/vendor\/skyverge\/wc-plugin-framework\/woocommerce\/payment-gateway\/assets\/images\/card-jcb.svg');}","hash":"413f72a8-4e18-486e-81af-928ff8103642","url":"https:\/\/www.phippselectronics.com\/wp-content\/plugins\/woocommerce-gateway-paypal-powered-by-braintree\/vendor\/skyverge\/wc-plugin-framework\/woocommerce\/payment-gateway\/assets\/images\/card-jcb.svg"},{"selector":".woocommerce-checkout #payment div.payment_box input.js-sv-wc-payment-gateway-credit-card-form-account-number.amex,#add_payment_method input.js-sv-wc-payment-gateway-credit-card-form-account-number.amex","style":".woocommerce-checkout #payment div.payment_box input.js-sv-wc-payment-gateway-credit-card-form-account-number.amex,#add_payment_method input.js-sv-wc-payment-gateway-credit-card-form-account-number.amex{--wpr-bg-58828694-3b45-4441-b7b9-7cd1e8dbf519: url('https:\/\/www.phippselectronics.com\/wp-content\/plugins\/woocommerce-gateway-paypal-powered-by-braintree\/vendor\/skyverge\/wc-plugin-framework\/woocommerce\/payment-gateway\/assets\/images\/card-amex.svg');}","hash":"58828694-3b45-4441-b7b9-7cd1e8dbf519","url":"https:\/\/www.phippselectronics.com\/wp-content\/plugins\/woocommerce-gateway-paypal-powered-by-braintree\/vendor\/skyverge\/wc-plugin-framework\/woocommerce\/payment-gateway\/assets\/images\/card-amex.svg"},{"selector":".woocommerce-checkout #payment div.payment_box input.js-sv-wc-payment-gateway-credit-card-form-account-number.discover,#add_payment_method input.js-sv-wc-payment-gateway-credit-card-form-account-number.discover","style":".woocommerce-checkout #payment div.payment_box input.js-sv-wc-payment-gateway-credit-card-form-account-number.discover,#add_payment_method input.js-sv-wc-payment-gateway-credit-card-form-account-number.discover{--wpr-bg-36378bdf-91a8-44cd-b58e-e75894742dfd: url('https:\/\/www.phippselectronics.com\/wp-content\/plugins\/woocommerce-gateway-paypal-powered-by-braintree\/vendor\/skyverge\/wc-plugin-framework\/woocommerce\/payment-gateway\/assets\/images\/card-discover.svg');}","hash":"36378bdf-91a8-44cd-b58e-e75894742dfd","url":"https:\/\/www.phippselectronics.com\/wp-content\/plugins\/woocommerce-gateway-paypal-powered-by-braintree\/vendor\/skyverge\/wc-plugin-framework\/woocommerce\/payment-gateway\/assets\/images\/card-discover.svg"},{"selector":".woocommerce-checkout #payment div.payment_box input.js-sv-wc-payment-gateway-credit-card-form-account-number.visaelectron,#add_payment_method input.js-sv-wc-payment-gateway-credit-card-form-account-number.visaelectron","style":".woocommerce-checkout #payment div.payment_box input.js-sv-wc-payment-gateway-credit-card-form-account-number.visaelectron,#add_payment_method input.js-sv-wc-payment-gateway-credit-card-form-account-number.visaelectron{--wpr-bg-a21db38c-4270-4651-ba9d-33360a979c42: url('https:\/\/www.phippselectronics.com\/wp-content\/plugins\/woocommerce-gateway-paypal-powered-by-braintree\/vendor\/skyverge\/wc-plugin-framework\/woocommerce\/payment-gateway\/assets\/images\/card-visa-electron.svg');}","hash":"a21db38c-4270-4651-ba9d-33360a979c42","url":"https:\/\/www.phippselectronics.com\/wp-content\/plugins\/woocommerce-gateway-paypal-powered-by-braintree\/vendor\/skyverge\/wc-plugin-framework\/woocommerce\/payment-gateway\/assets\/images\/card-visa-electron.svg"},{"selector":".woocommerce-checkout #payment div.payment_box input.js-sv-wc-payment-gateway-credit-card-form-account-number.invalid-card-type,#add_payment_method input.js-sv-wc-payment-gateway-credit-card-form-account-number.invalid-card-type","style":".woocommerce-checkout #payment div.payment_box input.js-sv-wc-payment-gateway-credit-card-form-account-number.invalid-card-type,#add_payment_method input.js-sv-wc-payment-gateway-credit-card-form-account-number.invalid-card-type{--wpr-bg-0608c577-9088-4a69-901f-9fcc868ae446: url('https:\/\/www.phippselectronics.com\/wp-content\/plugins\/woocommerce-gateway-paypal-powered-by-braintree\/vendor\/skyverge\/wc-plugin-framework\/woocommerce\/payment-gateway\/assets\/images\/card-cc-invalid.svg');}","hash":"0608c577-9088-4a69-901f-9fcc868ae446","url":"https:\/\/www.phippselectronics.com\/wp-content\/plugins\/woocommerce-gateway-paypal-powered-by-braintree\/vendor\/skyverge\/wc-plugin-framework\/woocommerce\/payment-gateway\/assets\/images\/card-cc-invalid.svg"},{"selector":".yith-ywar-main-wrapper .yith-ywar-filter-data .filter-buttons .filter-button.rating-label","style":".yith-ywar-main-wrapper .yith-ywar-filter-data .filter-buttons .filter-button.rating-label:after{--wpr-bg-82ef3a2e-3275-43cf-ba93-12935c4a04c5: url('https:\/\/www.phippselectronics.com\/wp-content\/plugins\/yith-woocommerce-advanced-reviews-premium\/assets\/images\/close.svg');}","hash":"82ef3a2e-3275-43cf-ba93-12935c4a04c5","url":"https:\/\/www.phippselectronics.com\/wp-content\/plugins\/yith-woocommerce-advanced-reviews-premium\/assets\/images\/close.svg"},{"selector":".gform_wrapper.gravity-theme .chosen-container-single .chosen-single abbr","style":".gform_wrapper.gravity-theme .chosen-container-single .chosen-single abbr{--wpr-bg-429cc130-f4b7-4cdf-8a0f-30a6fd233323: url('https:\/\/www.phippselectronics.com\/wp-content\/plugins\/gravityforms\/legacy\/css\/chosen-sprite.png');}","hash":"429cc130-f4b7-4cdf-8a0f-30a6fd233323","url":"https:\/\/www.phippselectronics.com\/wp-content\/plugins\/gravityforms\/legacy\/css\/chosen-sprite.png"},{"selector":".gform_wrapper.gravity-theme .chosen-container-single .chosen-single div b","style":".gform_wrapper.gravity-theme .chosen-container-single .chosen-single div b{--wpr-bg-68685c63-b760-462b-9c52-ea46e23b0daa: url('https:\/\/www.phippselectronics.com\/wp-content\/plugins\/gravityforms\/legacy\/css\/chosen-sprite.png');}","hash":"68685c63-b760-462b-9c52-ea46e23b0daa","url":"https:\/\/www.phippselectronics.com\/wp-content\/plugins\/gravityforms\/legacy\/css\/chosen-sprite.png"},{"selector":".gform_wrapper.gravity-theme .chosen-container-single .chosen-search input[type=text]","style":".gform_wrapper.gravity-theme .chosen-container-single .chosen-search input[type=text]{--wpr-bg-5fc81c24-9e6a-4a94-9b5c-224eb37db6ac: url('https:\/\/www.phippselectronics.com\/wp-content\/plugins\/gravityforms\/legacy\/css\/chosen-sprite.png');}","hash":"5fc81c24-9e6a-4a94-9b5c-224eb37db6ac","url":"https:\/\/www.phippselectronics.com\/wp-content\/plugins\/gravityforms\/legacy\/css\/chosen-sprite.png"},{"selector":".gform_wrapper.gravity-theme .chosen-container-multi .chosen-choices li.search-choice .search-choice-close","style":".gform_wrapper.gravity-theme .chosen-container-multi .chosen-choices li.search-choice .search-choice-close{--wpr-bg-7b3b29a6-04aa-46b7-ac45-87c35763de19: url('https:\/\/www.phippselectronics.com\/wp-content\/plugins\/gravityforms\/legacy\/css\/chosen-sprite.png');}","hash":"7b3b29a6-04aa-46b7-ac45-87c35763de19","url":"https:\/\/www.phippselectronics.com\/wp-content\/plugins\/gravityforms\/legacy\/css\/chosen-sprite.png"},{"selector":".gform_wrapper.gravity-theme .chosen-rtl .chosen-search input[type=text]","style":".gform_wrapper.gravity-theme .chosen-rtl .chosen-search input[type=text]{--wpr-bg-7986b95a-6b53-4382-8132-d77ca3ab9e5a: url('https:\/\/www.phippselectronics.com\/wp-content\/plugins\/gravityforms\/legacy\/css\/chosen-sprite.png');}","hash":"7986b95a-6b53-4382-8132-d77ca3ab9e5a","url":"https:\/\/www.phippselectronics.com\/wp-content\/plugins\/gravityforms\/legacy\/css\/chosen-sprite.png"},{"selector":".gform_wrapper.gravity-theme .gform_card_icon_container div.gform_card_icon.gform_card_icon_selected","style":".gform_wrapper.gravity-theme .gform_card_icon_container div.gform_card_icon.gform_card_icon_selected::after{--wpr-bg-623e26b8-868b-48f7-81aa-75bac107972f: url('https:\/\/www.phippselectronics.com\/wp-content\/plugins\/gravityforms\/images\/gf-creditcards-check.svg');}","hash":"623e26b8-868b-48f7-81aa-75bac107972f","url":"https:\/\/www.phippselectronics.com\/wp-content\/plugins\/gravityforms\/images\/gf-creditcards-check.svg"},{"selector":".gform_wrapper.gravity-theme .gfield_list_icons button","style":".gform_wrapper.gravity-theme .gfield_list_icons button{--wpr-bg-13d75d6f-3b7f-4218-b583-edac635adb6f: url('https:\/\/www.phippselectronics.com\/wp-content\/plugins\/gravityforms\/images\/list-add.svg');}","hash":"13d75d6f-3b7f-4218-b583-edac635adb6f","url":"https:\/\/www.phippselectronics.com\/wp-content\/plugins\/gravityforms\/images\/list-add.svg"},{"selector":".gform_wrapper.gravity-theme .chosen-container .chosen-results-scroll-down span,.gform_wrapper.gravity-theme .chosen-container .chosen-results-scroll-up span,.gform_wrapper.gravity-theme .chosen-container-multi .chosen-choices .search-choice .search-choice-close,.gform_wrapper.gravity-theme .chosen-container-single .chosen-search input[type=text],.gform_wrapper.gravity-theme .chosen-container-single .chosen-single abbr,.gform_wrapper.gravity-theme .chosen-container-single .chosen-single div b,.gform_wrapper.gravity-theme .chosen-rtl .chosen-search input[type=text]","style":".gform_wrapper.gravity-theme .chosen-container .chosen-results-scroll-down span,.gform_wrapper.gravity-theme .chosen-container .chosen-results-scroll-up span,.gform_wrapper.gravity-theme .chosen-container-multi .chosen-choices .search-choice .search-choice-close,.gform_wrapper.gravity-theme .chosen-container-single .chosen-search input[type=text],.gform_wrapper.gravity-theme .chosen-container-single .chosen-single abbr,.gform_wrapper.gravity-theme .chosen-container-single .chosen-single div b,.gform_wrapper.gravity-theme .chosen-rtl .chosen-search input[type=text]{--wpr-bg-d575ff09-5983-499d-b93e-d149ebfcc1bb: url('https:\/\/www.phippselectronics.com\/wp-content\/plugins\/gravityforms\/legacy\/css\/chosen-sprite@2x.png');}","hash":"d575ff09-5983-499d-b93e-d149ebfcc1bb","url":"https:\/\/www.phippselectronics.com\/wp-content\/plugins\/gravityforms\/legacy\/css\/chosen-sprite@2x.png"},{"selector":".gform_wrapper.gravity-theme .gform_card_icon_container div.gform_card_icon","style":".gform_wrapper.gravity-theme .gform_card_icon_container div.gform_card_icon{--wpr-bg-c8396f5e-dcce-4dfb-9c8e-1180218de6a2: url('https:\/\/www.phippselectronics.com\/wp-content\/plugins\/gravityforms\/images\/gf-creditcards.svg');}","hash":"c8396f5e-dcce-4dfb-9c8e-1180218de6a2","url":"https:\/\/www.phippselectronics.com\/wp-content\/plugins\/gravityforms\/images\/gf-creditcards.svg"},{"selector":".gform_wrapper.gravity-theme .ginput_container_creditcard .ginput_card_security_code_icon","style":".gform_wrapper.gravity-theme .ginput_container_creditcard .ginput_card_security_code_icon{--wpr-bg-f2b298b3-b2d6-41d5-b2a7-dd69449cc457: url('https:\/\/www.phippselectronics.com\/wp-content\/plugins\/gravityforms\/images\/gf-creditcards.svg');}","hash":"f2b298b3-b2d6-41d5-b2a7-dd69449cc457","url":"https:\/\/www.phippselectronics.com\/wp-content\/plugins\/gravityforms\/images\/gf-creditcards.svg"},{"selector":".gform_wrapper.gravity-theme .gfield_list_icons button.delete_list_item","style":".gform_wrapper.gravity-theme .gfield_list_icons button.delete_list_item{--wpr-bg-d53d75d6-210a-44bf-a26b-cee6d3093ee6: url('https:\/\/www.phippselectronics.com\/wp-content\/plugins\/gravityforms\/images\/list-remove.svg');}","hash":"d53d75d6-210a-44bf-a26b-cee6d3093ee6","url":"https:\/\/www.phippselectronics.com\/wp-content\/plugins\/gravityforms\/images\/list-remove.svg"},{"selector":".gravity-theme.ui-datepicker .ui-datepicker-header select","style":".gravity-theme.ui-datepicker .ui-datepicker-header select{--wpr-bg-2372b264-8f30-4984-b0fc-a2060ca0d8e7: url('https:\/\/www.phippselectronics.com\/wp-content\/plugins\/gravityforms\/images\/theme\/down-arrow.svg');}","hash":"2372b264-8f30-4984-b0fc-a2060ca0d8e7","url":"https:\/\/www.phippselectronics.com\/wp-content\/plugins\/gravityforms\/images\/theme\/down-arrow.svg"},{"selector":"button.pswp__button","style":"button.pswp__button{--wpr-bg-ee178150-fc6b-4257-b299-1db82914cc2e: url('https:\/\/www.phippselectronics.com\/wp-content\/plugins\/woocommerce\/assets\/css\/photoswipe\/default-skin\/default-skin.png');}","hash":"ee178150-fc6b-4257-b299-1db82914cc2e","url":"https:\/\/www.phippselectronics.com\/wp-content\/plugins\/woocommerce\/assets\/css\/photoswipe\/default-skin\/default-skin.png"},{"selector":".pswp__button,.pswp__button--arrow--left,.pswp__button--arrow--right","style":".pswp__button,.pswp__button--arrow--left:before,.pswp__button--arrow--right:before{--wpr-bg-98b43960-e18a-4de4-ace3-e8d8fcf217a7: url('https:\/\/www.phippselectronics.com\/wp-content\/plugins\/woocommerce\/assets\/css\/photoswipe\/default-skin\/default-skin.png');}","hash":"98b43960-e18a-4de4-ace3-e8d8fcf217a7","url":"https:\/\/www.phippselectronics.com\/wp-content\/plugins\/woocommerce\/assets\/css\/photoswipe\/default-skin\/default-skin.png"},{"selector":".pswp__preloader--active .pswp__preloader__icn","style":".pswp__preloader--active .pswp__preloader__icn{--wpr-bg-eb35da31-3acb-400a-a52c-10b4e8bf1897: url('https:\/\/www.phippselectronics.com\/wp-content\/plugins\/woocommerce\/assets\/css\/photoswipe\/default-skin\/preloader.gif');}","hash":"eb35da31-3acb-400a-a52c-10b4e8bf1897","url":"https:\/\/www.phippselectronics.com\/wp-content\/plugins\/woocommerce\/assets\/css\/photoswipe\/default-skin\/preloader.gif"},{"selector":".pswp--svg .pswp__button,.pswp--svg .pswp__button--arrow--left,.pswp--svg .pswp__button--arrow--right","style":".pswp--svg .pswp__button,.pswp--svg .pswp__button--arrow--left:before,.pswp--svg .pswp__button--arrow--right:before{--wpr-bg-8b4e5892-ae51-4972-b848-71d5f65b16ba: url('https:\/\/www.phippselectronics.com\/wp-content\/plugins\/woocommerce\/assets\/css\/photoswipe\/default-skin\/default-skin.svg');}","hash":"8b4e5892-ae51-4972-b848-71d5f65b16ba","url":"https:\/\/www.phippselectronics.com\/wp-content\/plugins\/woocommerce\/assets\/css\/photoswipe\/default-skin\/default-skin.svg"},{"selector":".rll-youtube-player .play","style":".rll-youtube-player .play{--wpr-bg-f12cc713-75b3-4606-9a4e-139715ec2c4c: url('https:\/\/www.phippselectronics.com\/wp-content\/plugins\/wp-rocket\/assets\/img\/youtube.png');}","hash":"f12cc713-75b3-4606-9a4e-139715ec2c4c","url":"https:\/\/www.phippselectronics.com\/wp-content\/plugins\/wp-rocket\/assets\/img\/youtube.png"},{"selector":".css-sprite-motor_icon","style":".css-sprite-motor_icon{--wpr-bg-bf383cc8-11eb-4142-9b31-bcfd5c62d160: url('https:\/\/www.phippselectronics.com\/wp-content\/uploads\/2023\/10\/css-sprite-combined.png');}","hash":"bf383cc8-11eb-4142-9b31-bcfd5c62d160","url":"https:\/\/www.phippselectronics.com\/wp-content\/uploads\/2023\/10\/css-sprite-combined.png"},{"selector":".css-sprite-breadboard_icon","style":".css-sprite-breadboard_icon{--wpr-bg-5a14e0eb-5f2a-4f4f-abfa-69c81e765279: url('https:\/\/www.phippselectronics.com\/wp-content\/uploads\/2023\/10\/css-sprite-combined.png');}","hash":"5a14e0eb-5f2a-4f4f-abfa-69c81e765279","url":"https:\/\/www.phippselectronics.com\/wp-content\/uploads\/2023\/10\/css-sprite-combined.png"},{"selector":".css-sprite-led_icon","style":".css-sprite-led_icon{--wpr-bg-8dd59c05-e831-4966-9bde-8d1a9bb7f424: url('https:\/\/www.phippselectronics.com\/wp-content\/uploads\/2023\/10\/css-sprite-combined.png');}","hash":"8dd59c05-e831-4966-9bde-8d1a9bb7f424","url":"https:\/\/www.phippselectronics.com\/wp-content\/uploads\/2023\/10\/css-sprite-combined.png"},{"selector":".css-sprite-power_icon","style":".css-sprite-power_icon{--wpr-bg-b9f197b1-a681-4e1c-ac71-b53b85a5a0ea: url('https:\/\/www.phippselectronics.com\/wp-content\/uploads\/2023\/10\/css-sprite-combined.png');}","hash":"b9f197b1-a681-4e1c-ac71-b53b85a5a0ea","url":"https:\/\/www.phippselectronics.com\/wp-content\/uploads\/2023\/10\/css-sprite-combined.png"},{"selector":".css-sprite-fuse_icon","style":".css-sprite-fuse_icon{--wpr-bg-07f8d258-121e-434b-9d7d-ac4a187a70ea: url('https:\/\/www.phippselectronics.com\/wp-content\/uploads\/2023\/10\/css-sprite-combined.png');}","hash":"07f8d258-121e-434b-9d7d-ac4a187a70ea","url":"https:\/\/www.phippselectronics.com\/wp-content\/uploads\/2023\/10\/css-sprite-combined.png"},{"selector":".css-sprite-resistor_icon_2","style":".css-sprite-resistor_icon_2{--wpr-bg-86bc1af9-1e15-4fe9-a376-8bbc00c30109: url('https:\/\/www.phippselectronics.com\/wp-content\/uploads\/2023\/10\/css-sprite-combined.png');}","hash":"86bc1af9-1e15-4fe9-a376-8bbc00c30109","url":"https:\/\/www.phippselectronics.com\/wp-content\/uploads\/2023\/10\/css-sprite-combined.png"},{"selector":".css-sprite-transistor_icon","style":".css-sprite-transistor_icon{--wpr-bg-66196a66-6604-4f8e-a87c-da88f5ae663f: url('https:\/\/www.phippselectronics.com\/wp-content\/uploads\/2023\/10\/css-sprite-combined.png');}","hash":"66196a66-6604-4f8e-a87c-da88f5ae663f","url":"https:\/\/www.phippselectronics.com\/wp-content\/uploads\/2023\/10\/css-sprite-combined.png"},{"selector":".css-sprite-sensor_icon","style":".css-sprite-sensor_icon{--wpr-bg-d931abc4-e2ea-43de-80fe-4f31ec553e36: url('https:\/\/www.phippselectronics.com\/wp-content\/uploads\/2023\/10\/css-sprite-combined.png');}","hash":"d931abc4-e2ea-43de-80fe-4f31ec553e36","url":"https:\/\/www.phippselectronics.com\/wp-content\/uploads\/2023\/10\/css-sprite-combined.png"},{"selector":".css-sprite-capacitor_icon","style":".css-sprite-capacitor_icon{--wpr-bg-da6198ad-e847-4260-ac41-453777ffdecc: url('https:\/\/www.phippselectronics.com\/wp-content\/uploads\/2023\/10\/css-sprite-combined.png');}","hash":"da6198ad-e847-4260-ac41-453777ffdecc","url":"https:\/\/www.phippselectronics.com\/wp-content\/uploads\/2023\/10\/css-sprite-combined.png"},{"selector":".css-sprite-diode_icon","style":".css-sprite-diode_icon{--wpr-bg-e99de59c-b049-47f3-8753-17811c11a726: url('https:\/\/www.phippselectronics.com\/wp-content\/uploads\/2023\/10\/css-sprite-combined.png');}","hash":"e99de59c-b049-47f3-8753-17811c11a726","url":"https:\/\/www.phippselectronics.com\/wp-content\/uploads\/2023\/10\/css-sprite-combined.png"},{"selector":".css-sprite-logo-phipps-signature-black","style":".css-sprite-logo-phipps-signature-black{--wpr-bg-38c58bef-72e5-4166-aec0-90e28516af65: url('https:\/\/www.phippselectronics.com\/wp-content\/uploads\/2023\/10\/css-sprite-combined.png');}","hash":"38c58bef-72e5-4166-aec0-90e28516af65","url":"https:\/\/www.phippselectronics.com\/wp-content\/uploads\/2023\/10\/css-sprite-combined.png"}]; const rocket_excluded_pairs = [{"selector":".elementor-397637 .elementor-element.elementor-element-39d2aed:not(.elementor-motion-effects-element-type-background), .elementor-397637 .elementor-element.elementor-element-39d2aed > .elementor-motion-effects-container > .elementor-motion-effects-layer","style":".elementor-397637 .elementor-element.elementor-element-39d2aed:not(.elementor-motion-effects-element-type-background), .elementor-397637 .elementor-element.elementor-element-39d2aed > .elementor-motion-effects-container > .elementor-motion-effects-layer{--wpr-bg-d593058b-39d8-4202-a916-699e382319b6: url('https:\/\/www.phippselectronics.com\/wp-content\/uploads\/2022\/08\/Setting-up-a-NodeMCU-Server.jpg');}","hash":"d593058b-39d8-4202-a916-699e382319b6","url":"https:\/\/www.phippselectronics.com\/wp-content\/uploads\/2022\/08\/Setting-up-a-NodeMCU-Server.jpg"}];</script></head>\n";
  html += "<body>\n";
  html += "<h1>ESP8266 Web Server</h1> <h1>STA mode</h1>\n";
  html += "<h1>Press the button to toggle LED:</h1>\n";

  html += "<h1><a title=\"ledon\" href=\"ledon\">ledon</a></h1>\n";
  html += "<h1><a title=\"ledoff\" href=\"ledoff\">ledoff</a></h1>\n";

  html += "<script>(()=>{class RocketElementorPreload{constructor(){this.deviceMode=document.createElement("span"),this.deviceMode.id="elementor-device-mode-wpr",this.deviceMode.setAttribute("class","elementor-screen-only"),document.body.appendChild(this.deviceMode)}t(){let t=getComputedStyle(this.deviceMode,":after").content.replace(/"/g,"");this.animationSettingKeys=this.i(t),document.querySelectorAll(".elementor-invisible[data-settings]").forEach(t=>{const e=t.getBoundingClientRect();if(e.bottom>=0&&e.top<=window.innerHeight)try{this.o(t)}catch(t){}})}o(t){const e=JSON.parse(t.dataset.settings),i=e.m||e.animation_delay||0,n=e[this.animationSettingKeys.find(t=>e[t])];if("none"===n)return void t.classList.remove("elementor-invisible");t.classList.remove(n),this.currentAnimation&&t.classList.remove(this.currentAnimation),this.currentAnimation=n;let o=setTimeout(()=>{t.classList.remove("elementor-invisible"),t.classList.add("animated",n),this.l(t,e)},i);window.addEventListener("rocket-startLoading",function(){clearTimeout(o)})}i(t="mobile"){const e=[""];switch(t){case"mobile":e.unshift("_mobile");case"tablet":e.unshift("_tablet");case"desktop":e.unshift("_desktop")}const i=[];return["animation","_animation"].forEach(t=>{e.forEach(e=>{i.push(t+e)})}),i}l(t,e){this.i().forEach(t=>delete e[t]),t.dataset.settings=JSON.stringify(e)}static run(){const t=new RocketElementorPreload;requestAnimationFrame(t.t.bind(t))}}document.addEventListener("DOMContentLoaded",RocketElementorPreload.run)})();</script></body></html>\n";

 return html;
}
Code Explanation
We start by importing the necessary libraries and setting the variable which holds authentication information of our wireless network. The ESP8266WiFi.h header file includes libraries for WiFi functionality, while the ESP8266WebServer.h includes server and HTTP-related libraries.
					#include <ESP8266WiFi.h>
#include <ESP8266WebServer.h>

/*SSID & Password*/
const char* ssid = "YOUR_SSID";  // Enter SSID here
const char* password = "YOUR_PASSWORD";  //Enter Password here
Next, we create a web server object. We’ll want to use port 80 for this. We declare a global variable called LEDpin holding the pin number of the LED that we want to control and also a variable called LEDstatus to hold its status.
					ESP8266WebServer server(80);

uint8_t LEDpin = D3;
bool LEDstatus = false;
The first part of the setup function sets the NodeMCU pin as an output, begins the serial debug port, then begins connecting to the Wi-Fi network. We inform the user if it connected successfully and display the webserver’s IP address.
					void setup() {

  pinMode(LEDpin, OUTPUT);

  Serial.begin(115200);
  Serial.println(" ");
  Serial.println("Connecting: ");
  Serial.println(ssid);

  WiFi.begin(ssid, password);

  while(WiFi.status() != WL_CONNECTED)
  {
    delay(500);
    Serial.println(".");
  }
  Serial.println(" ");
  Serial.print("Connected at: ");
  Serial.println(WiFi.localIP()
In the second part of the function, we utilize the server object. Several server.on( ) statements state that whenever we receive a specific HTTP address request we execute an action through several handler functions. We see here, for example, that the “/” is actually the root HTTP address. The “/ledon” is another HTTP equivalent address. The handler functions are Connect_handler, LED_ON_handler, LED_OFF_handler, and Not_found_handler.
					  server.on("/", Connect_handler);
  server.on("/ledon", LED_ON_handler);
  server.on("/ledoff", LED_OFF_handler);
  server.onNotFound(Not_found_handler);

  server.begin();
  Serial.println("Web server has began");
}
The loop part starts executing a necessary client handler function server.handleClient( ). After that, we change the status of the LEDs according to the LEDstatus variable that may have been changed in the process.
					void loop() {
  // put your main code here, to run repeatedly:
  server.handleClient();

  if(LEDstatus){
    digitalWrite(LEDpin, HIGH);
  }else{
    digitalWrite(LEDpin, LOW);
  }
}
Next, we have the server.on( ) handler functions declared. You’ll see that it changes the LEDstatus variable and executes the server.send( ) function. This server.send( ) function sends first a status (200 = OK), then the actual webpage through HTTP in HTML format (“text/html”). The actual webpage is a string type executed by the SendClient( ) function.
					void Connect_handler()
{
  LEDstatus = false;
  Serial.println("LED has been turned OFF");
  server.send(200, "text/html", SendClient());
}

void LED_ON_handler()
{
  LEDstatus = true;
  Serial.println("LED has been turned ON");
  server.send(200, "text/html", SendClient());
}

void LED_OFF_handler()
{
  LEDstatus = false;
  Serial.println("LED has been turned OFF");
  server.send(200, "text/html", SendClient());
}

void Not_found_handler()
{
  server.send(404, "text/plain", "address not found");
}
Lastly, we have the SendClient( ) function. This function simply formats the string-type HTML webpage that the client requests. You’ll be able to write your own HTML code through any HTML editor. This webpage contains the links required to turn ON or OFF the LED. Once the user presses these links, the client will perform a GET request to the web server with the specified address link. Accordingly, the NodeMCU will perform a specific action based on this address link.
					String SendClient()
{

  String html ="<!doctype html>\n";
  html += "<html> <head> <title>HTML Editor - Full Version</title> <style id="wpr-lazyload-bg-container"></style><style id="wpr-lazyload-bg-exclusion">.elementor-397637 .elementor-element.elementor-element-39d2aed:not(.elementor-motion-effects-element-type-background), .elementor-397637 .elementor-element.elementor-element-39d2aed > .elementor-motion-effects-container > .elementor-motion-effects-layer{--wpr-bg-d593058b-39d8-4202-a916-699e382319b6: url('https://www.phippselectronics.com/wp-content/uploads/2022/08/Setting-up-a-NodeMCU-Server.jpg');}</style>
<noscript>
<style id="wpr-lazyload-bg-nostyle">#wcs-debug #wcs-debug-contents .wcs-debug-tip{--wpr-bg-2d7d0cf3-3fa5-4e63-a5ca-03a919b6d0b1: url('https://www.phippselectronics.com/wp-content/cache/../plugins/woo-conditional-shipping-pro/frontend/img/tip2.svg');}#wcs-debug #wcs-debug-header .wcs-debug-toggle{--wpr-bg-e2a1054f-3e5b-4097-b96f-87a6ac1facd6: url('https://www.phippselectronics.com/wp-content/cache/../plugins/woo-conditional-shipping-pro/frontend/img/arrow.svg');}#wcs-notices .conditional-shipping-notice.conditional-shipping-notice-style-success.conditional-shipping-notice-style-warning, #wcs-notices .conditional-shipping-notice.conditional-shipping-notice-style-warning.conditional-shipping-notice-style-warning, #wcs-notices .conditional-shipping-notice.conditional-shipping-notice-style-error.conditional-shipping-notice-style-warning,
.wcs-shipping-notices .conditional-shipping-notice.conditional-shipping-notice-style-success.conditional-shipping-notice-style-warning,
.wcs-shipping-notices .conditional-shipping-notice.conditional-shipping-notice-style-warning.conditional-shipping-notice-style-warning,
.wcs-shipping-notices .conditional-shipping-notice.conditional-shipping-notice-style-error.conditional-shipping-notice-style-warning{--wpr-bg-96ca079f-a228-4783-baa5-9c71723a7b5b: url('https://www.phippselectronics.com/wp-content/cache/../plugins/woo-conditional-shipping-pro/frontend/img/notices/warning.svg');}#wcs-notices .conditional-shipping-notice.conditional-shipping-notice-style-success.conditional-shipping-notice-style-success, #wcs-notices .conditional-shipping-notice.conditional-shipping-notice-style-warning.conditional-shipping-notice-style-success, #wcs-notices .conditional-shipping-notice.conditional-shipping-notice-style-error.conditional-shipping-notice-style-success,
.wcs-shipping-notices .conditional-shipping-notice.conditional-shipping-notice-style-success.conditional-shipping-notice-style-success,
.wcs-shipping-notices .conditional-shipping-notice.conditional-shipping-notice-style-warning.conditional-shipping-notice-style-success,
.wcs-shipping-notices .conditional-shipping-notice.conditional-shipping-notice-style-error.conditional-shipping-notice-style-success{--wpr-bg-d1902f5a-ea6c-499b-a3ec-f9594cfc8231: url('https://www.phippselectronics.com/wp-content/cache/../plugins/woo-conditional-shipping-pro/frontend/img/notices/yes-alt.svg');}#wcs-notices .conditional-shipping-notice.conditional-shipping-notice-style-success.conditional-shipping-notice-style-error, #wcs-notices .conditional-shipping-notice.conditional-shipping-notice-style-warning.conditional-shipping-notice-style-error, #wcs-notices .conditional-shipping-notice.conditional-shipping-notice-style-error.conditional-shipping-notice-style-error,
.wcs-shipping-notices .conditional-shipping-notice.conditional-shipping-notice-style-success.conditional-shipping-notice-style-error,
.wcs-shipping-notices .conditional-shipping-notice.conditional-shipping-notice-style-warning.conditional-shipping-notice-style-error,
.wcs-shipping-notices .conditional-shipping-notice.conditional-shipping-notice-style-error.conditional-shipping-notice-style-error{--wpr-bg-a8f8162d-9607-4942-b4bd-cb78d0062346: url('https://www.phippselectronics.com/wp-content/cache/../plugins/woo-conditional-shipping-pro/frontend/img/notices/dismiss.svg');}.mejs-overlay-button{--wpr-bg-f9f2e990-2bb1-4ee2-aa35-aa7301ab3ebe: url('https://www.phippselectronics.com/wp-includes/js/mediaelement/mejs-controls.svg');}.mejs-overlay-loading-bg-img{--wpr-bg-50bcf0ca-c281-4d41-b1a9-d4921c3046cf: url('https://www.phippselectronics.com/wp-includes/js/mediaelement/mejs-controls.svg');}.mejs-button>button{--wpr-bg-4357da67-3e00-4fa7-8a90-f0a2eb859c8f: url('https://www.phippselectronics.com/wp-includes/js/mediaelement/mejs-controls.svg');}.yith-wcan-filters .yith-wcan-filter .filter-title.collapsable.closed:after, .yith-wcan-filters .yith-wcan-filter .filter-title.collapsable:not(.opened):after, .yith-wcan-filters .yith-wcan-filter .filter-title.collapsable:not(.open):after{--wpr-bg-90066b07-ff6b-419c-b975-4553bb9c9109: url('https://www.phippselectronics.com/wp-content/plugins/yith-woocommerce-ajax-product-filter-premium/assets/images/arrow-down.svg');}.yith-wcan-filters .yith-wcan-filter .filter-title.collapsable.open:after, .yith-wcan-filters .yith-wcan-filter .filter-title.collapsable.opened:after{--wpr-bg-71f6b62f-71ff-4751-858c-c00db31cac55: url('https://www.phippselectronics.com/wp-content/plugins/yith-woocommerce-ajax-product-filter-premium/assets/images/arrow-up.svg');}.yith-wcan-filters .yith-wcan-filter .filter-items .filter-item.active.color:not(.no-color):not(.no-image):not(.label-right) > a:after{--wpr-bg-7b2d2835-3d60-4a90-8b8f-62459421fcfe: url('https://www.phippselectronics.com/wp-content/plugins/yith-woocommerce-ajax-product-filter-premium/assets/images/close.svg');}.yith-wcan-filters .yith-wcan-filter .filter-items .filter-item.label.active.with-image:not(.label-right) > a:after{--wpr-bg-c30f3b0a-5c8c-4f1c-9be6-49066fb20752: url('https://www.phippselectronics.com/wp-content/plugins/yith-woocommerce-ajax-product-filter-premium/assets/images/close.svg');}.yith-wcan-filters .yith-wcan-filter .filter-items .filter-item.hierarchy-collapsable.closed > .toggle-handle{--wpr-bg-edf15c0c-1674-4674-b2f7-540075d226ea: url('https://www.phippselectronics.com/wp-content/plugins/yith-woocommerce-ajax-product-filter-premium/assets/images/arrow-down.svg');}.yith-wcan-filters .yith-wcan-filter .filter-items .filter-item.hierarchy-collapsable.opened > .toggle-handle{--wpr-bg-9f98d42a-2937-49fb-9115-d0281114792a: url('https://www.phippselectronics.com/wp-content/plugins/yith-woocommerce-ajax-product-filter-premium/assets/images/arrow-up.svg');}.yith-wcan-filters .yith-wcan-filter .yith-wcan-dropdown.closed:after, .yith-wcan-filters .yith-wcan-filter .yith-wcan-dropdown:not(.opened):after, .yith-wcan-filters .yith-wcan-filter .yith-wcan-dropdown:not(.open):after{--wpr-bg-92ecdafe-ae3b-46e1-9ce3-3b9d668e5b83: url('https://www.phippselectronics.com/wp-content/plugins/yith-woocommerce-ajax-product-filter-premium/assets/images/arrow-down.svg');}.yith-wcan-filters .yith-wcan-filter .yith-wcan-dropdown.open:after, .yith-wcan-filters .yith-wcan-filter .yith-wcan-dropdown.opened:after{--wpr-bg-69ad3b7d-79f9-45cf-a145-8171480b2466: url('https://www.phippselectronics.com/wp-content/plugins/yith-woocommerce-ajax-product-filter-premium/assets/images/arrow-up.svg');}.yith-wcan-filters .yith-wcan-filter .yith-wcan-dropdown .dropdown-wrapper .search-field-container:after{--wpr-bg-17655136-1365-4119-b5cf-1065bd36eaeb: url('https://www.phippselectronics.com/wp-content/plugins/yith-woocommerce-ajax-product-filter-premium/assets/images/search.svg');}.yith-wcan-filters .yith-wcan-filter.filter-placeholder .select-placeholder.closed:after, .yith-wcan-filters .yith-wcan-filter.filter-placeholder .select-placeholder:not(.opened):after, .yith-wcan-filters .yith-wcan-filter.filter-placeholder .select-placeholder:not(.open):after{--wpr-bg-0a44a53f-5721-49aa-b79c-0afaee6e038d: url('https://www.phippselectronics.com/wp-content/plugins/yith-woocommerce-ajax-product-filter-premium/assets/images/arrow-down.svg');}.yith-wcan-filters .yith-wcan-filter.filter-placeholder .select-placeholder.open:after, .yith-wcan-filters .yith-wcan-filter.filter-placeholder .select-placeholder.opened:after{--wpr-bg-811cf39e-7221-4c22-aebd-2f821dad2361: url('https://www.phippselectronics.com/wp-content/plugins/yith-woocommerce-ajax-product-filter-premium/assets/images/arrow-up.svg');}.yith-wcan-filters.custom-style span.checkboxbutton.checked:before{--wpr-bg-fc1bcd1b-63e1-428a-8c8f-11ca6ddb21b1: url('https://www.phippselectronics.com/wp-content/plugins/yith-woocommerce-ajax-product-filter-premium/assets/images/check.svg');}.yith-wcan-filters.horizontal:not(.filters-modal) .yith-wcan-filter.filter-placeholder .filter-content.closed:after, .yith-wcan-filters.horizontal:not(.filters-modal) .yith-wcan-filter.filter-placeholder .filter-content:not(.opened):after, .yith-wcan-filters.horizontal:not(.filters-modal) .yith-wcan-filter.filter-placeholder .filter-content:not(.open):after{--wpr-bg-bfe2d25d-1bb7-471d-980d-85874d744aac: url('https://www.phippselectronics.com/wp-content/plugins/yith-woocommerce-ajax-product-filter-premium/assets/images/arrow-down.svg');}.yith-wcan-filters.horizontal:not(.filters-modal) .yith-wcan-filter.filter-placeholder .filter-content.open:after, .yith-wcan-filters.horizontal:not(.filters-modal) .yith-wcan-filter.filter-placeholder .filter-content.opened:after{--wpr-bg-6461f983-33de-44ae-87e3-3099001990f6: url('https://www.phippselectronics.com/wp-content/plugins/yith-woocommerce-ajax-product-filter-premium/assets/images/arrow-up.svg');}.yith-wcan-active-filters .active-filter .active-filter-label:after{--wpr-bg-5fee3d76-ee4b-4b77-be8a-28d0555a4d6f: url('https://www.phippselectronics.com/wp-content/plugins/yith-woocommerce-ajax-product-filter-premium/assets/images/close.svg');}.yith-wcan-filters-opener i.filter-icon{--wpr-bg-d77bded7-8e2d-493f-b5b8-1e13cf458879: url('https://www.phippselectronics.com/wp-content/plugins/yith-woocommerce-ajax-product-filter-premium/assets/images/filters.svg');}.selectBox-dropdown .selectBox-arrow{--wpr-bg-143300b1-f393-4e59-9718-f37fdf241b45: url('https://www.phippselectronics.com/wp-content/plugins/yith-woocommerce-wishlist-premium/assets/images/jquery.selectBox-arrow.gif');}div.pp_woocommerce .pp_loaderIcon::before{--wpr-bg-bd69f014-1b72-43c9-a63f-bcf966c06198: url('https://www.phippselectronics.com/wp-content/plugins/woocommerce/assets/images/icons/loader.svg');}.selectBox-dropdown .selectBox-arrow{--wpr-bg-d4999d35-1c5e-41e4-8c71-e9a4e0cfec0d: url('https://www.phippselectronics.com/wp-content/plugins/yith-woocommerce-wishlist-premium/assets/images/jquery.selectBox-arrow.png');}.selectBox-dropdown.selectBox-menuShowing .selectBox-arrow{--wpr-bg-10b35172-12ae-4868-a4d8-c9d14b919fb2: url('https://www.phippselectronics.com/wp-content/plugins/yith-woocommerce-wishlist-premium/assets/images/jquery.selectBox-arrow.png');}.woocommerce-js .blockUI.blockOverlay::before{--wpr-bg-0846e3fe-142d-4964-84b9-ad44168a8889: url('https://www.phippselectronics.com/wp-content/plugins/woocommerce/assets/images/icons/loader.svg');}.woocommerce-js .loader::before{--wpr-bg-a40b777b-9582-4df2-b9de-dd6fa8742a49: url('https://www.phippselectronics.com/wp-content/plugins/woocommerce/assets/images/icons/loader.svg');}button.pswp__button{--wpr-bg-826f914a-0298-4e82-90d7-75981c931569: url('https://www.phippselectronics.com/wp-content/plugins/woocommerce/assets/css/photoswipe/default-skin/default-skin.png');}#add_payment_method #payment div.payment_box .wc-credit-card-form-card-cvc.visa,#add_payment_method #payment div.payment_box .wc-credit-card-form-card-expiry.visa,#add_payment_method #payment div.payment_box .wc-credit-card-form-card-number.visa,.woocommerce-cart #payment div.payment_box .wc-credit-card-form-card-cvc.visa,.woocommerce-cart #payment div.payment_box .wc-credit-card-form-card-expiry.visa,.woocommerce-cart #payment div.payment_box .wc-credit-card-form-card-number.visa,.woocommerce-checkout #payment div.payment_box .wc-credit-card-form-card-cvc.visa,.woocommerce-checkout #payment div.payment_box .wc-credit-card-form-card-expiry.visa,.woocommerce-checkout #payment div.payment_box .wc-credit-card-form-card-number.visa{--wpr-bg-382fc6fa-4c57-4131-992b-842fdbcb0daf: url('https://www.phippselectronics.com/wp-content/plugins/woocommerce/assets/images/icons/credit-cards/visa.svg');}#add_payment_method #payment div.payment_box .wc-credit-card-form-card-cvc.mastercard,#add_payment_method #payment div.payment_box .wc-credit-card-form-card-expiry.mastercard,#add_payment_method #payment div.payment_box .wc-credit-card-form-card-number.mastercard,.woocommerce-cart #payment div.payment_box .wc-credit-card-form-card-cvc.mastercard,.woocommerce-cart #payment div.payment_box .wc-credit-card-form-card-expiry.mastercard,.woocommerce-cart #payment div.payment_box .wc-credit-card-form-card-number.mastercard,.woocommerce-checkout #payment div.payment_box .wc-credit-card-form-card-cvc.mastercard,.woocommerce-checkout #payment div.payment_box .wc-credit-card-form-card-expiry.mastercard,.woocommerce-checkout #payment div.payment_box .wc-credit-card-form-card-number.mastercard{--wpr-bg-41c7723d-fab7-4354-bb73-f47bcd317aea: url('https://www.phippselectronics.com/wp-content/plugins/woocommerce/assets/images/icons/credit-cards/mastercard.svg');}#add_payment_method #payment div.payment_box .wc-credit-card-form-card-cvc.laser,#add_payment_method #payment div.payment_box .wc-credit-card-form-card-expiry.laser,#add_payment_method #payment div.payment_box .wc-credit-card-form-card-number.laser,.woocommerce-cart #payment div.payment_box .wc-credit-card-form-card-cvc.laser,.woocommerce-cart #payment div.payment_box .wc-credit-card-form-card-expiry.laser,.woocommerce-cart #payment div.payment_box .wc-credit-card-form-card-number.laser,.woocommerce-checkout #payment div.payment_box .wc-credit-card-form-card-cvc.laser,.woocommerce-checkout #payment div.payment_box .wc-credit-card-form-card-expiry.laser,.woocommerce-checkout #payment div.payment_box .wc-credit-card-form-card-number.laser{--wpr-bg-a669b83a-b77a-4f78-a1eb-b98c3b419717: url('https://www.phippselectronics.com/wp-content/plugins/woocommerce/assets/images/icons/credit-cards/laser.svg');}#add_payment_method #payment div.payment_box .wc-credit-card-form-card-cvc.dinersclub,#add_payment_method #payment div.payment_box .wc-credit-card-form-card-expiry.dinersclub,#add_payment_method #payment div.payment_box .wc-credit-card-form-card-number.dinersclub,.woocommerce-cart #payment div.payment_box .wc-credit-card-form-card-cvc.dinersclub,.woocommerce-cart #payment div.payment_box .wc-credit-card-form-card-expiry.dinersclub,.woocommerce-cart #payment div.payment_box .wc-credit-card-form-card-number.dinersclub,.woocommerce-checkout #payment div.payment_box .wc-credit-card-form-card-cvc.dinersclub,.woocommerce-checkout #payment div.payment_box .wc-credit-card-form-card-expiry.dinersclub,.woocommerce-checkout #payment div.payment_box .wc-credit-card-form-card-number.dinersclub{--wpr-bg-70d52f51-b6dc-4d78-a0de-5c9165e4edc3: url('https://www.phippselectronics.com/wp-content/plugins/woocommerce/assets/images/icons/credit-cards/diners.svg');}#add_payment_method #payment div.payment_box .wc-credit-card-form-card-cvc.maestro,#add_payment_method #payment div.payment_box .wc-credit-card-form-card-expiry.maestro,#add_payment_method #payment div.payment_box .wc-credit-card-form-card-number.maestro,.woocommerce-cart #payment div.payment_box .wc-credit-card-form-card-cvc.maestro,.woocommerce-cart #payment div.payment_box .wc-credit-card-form-card-expiry.maestro,.woocommerce-cart #payment div.payment_box .wc-credit-card-form-card-number.maestro,.woocommerce-checkout #payment div.payment_box .wc-credit-card-form-card-cvc.maestro,.woocommerce-checkout #payment div.payment_box .wc-credit-card-form-card-expiry.maestro,.woocommerce-checkout #payment div.payment_box .wc-credit-card-form-card-number.maestro{--wpr-bg-9168df8f-eda5-4990-9ceb-e2f5a70afa03: url('https://www.phippselectronics.com/wp-content/plugins/woocommerce/assets/images/icons/credit-cards/maestro.svg');}#add_payment_method #payment div.payment_box .wc-credit-card-form-card-cvc.jcb,#add_payment_method #payment div.payment_box .wc-credit-card-form-card-expiry.jcb,#add_payment_method #payment div.payment_box .wc-credit-card-form-card-number.jcb,.woocommerce-cart #payment div.payment_box .wc-credit-card-form-card-cvc.jcb,.woocommerce-cart #payment div.payment_box .wc-credit-card-form-card-expiry.jcb,.woocommerce-cart #payment div.payment_box .wc-credit-card-form-card-number.jcb,.woocommerce-checkout #payment div.payment_box .wc-credit-card-form-card-cvc.jcb,.woocommerce-checkout #payment div.payment_box .wc-credit-card-form-card-expiry.jcb,.woocommerce-checkout #payment div.payment_box .wc-credit-card-form-card-number.jcb{--wpr-bg-4281cfe1-ca05-4438-8019-0838280c05fc: url('https://www.phippselectronics.com/wp-content/plugins/woocommerce/assets/images/icons/credit-cards/jcb.svg');}#add_payment_method #payment div.payment_box .wc-credit-card-form-card-cvc.amex,#add_payment_method #payment div.payment_box .wc-credit-card-form-card-expiry.amex,#add_payment_method #payment div.payment_box .wc-credit-card-form-card-number.amex,.woocommerce-cart #payment div.payment_box .wc-credit-card-form-card-cvc.amex,.woocommerce-cart #payment div.payment_box .wc-credit-card-form-card-expiry.amex,.woocommerce-cart #payment div.payment_box .wc-credit-card-form-card-number.amex,.woocommerce-checkout #payment div.payment_box .wc-credit-card-form-card-cvc.amex,.woocommerce-checkout #payment div.payment_box .wc-credit-card-form-card-expiry.amex,.woocommerce-checkout #payment div.payment_box .wc-credit-card-form-card-number.amex{--wpr-bg-8d9bacb0-df34-4b30-9967-055299bd6d5f: url('https://www.phippselectronics.com/wp-content/plugins/woocommerce/assets/images/icons/credit-cards/amex.svg');}#add_payment_method #payment div.payment_box .wc-credit-card-form-card-cvc.discover,#add_payment_method #payment div.payment_box .wc-credit-card-form-card-expiry.discover,#add_payment_method #payment div.payment_box .wc-credit-card-form-card-number.discover,.woocommerce-cart #payment div.payment_box .wc-credit-card-form-card-cvc.discover,.woocommerce-cart #payment div.payment_box .wc-credit-card-form-card-expiry.discover,.woocommerce-cart #payment div.payment_box .wc-credit-card-form-card-number.discover,.woocommerce-checkout #payment div.payment_box .wc-credit-card-form-card-cvc.discover,.woocommerce-checkout #payment div.payment_box .wc-credit-card-form-card-expiry.discover,.woocommerce-checkout #payment div.payment_box .wc-credit-card-form-card-number.discover{--wpr-bg-28227cd9-5477-493b-955f-2d8154853ab3: url('https://www.phippselectronics.com/wp-content/plugins/woocommerce/assets/images/icons/credit-cards/discover.svg');}.zm-loader:before{--wpr-bg-739f8cab-d401-4f8b-9172-888af181354d: url('https://www.phippselectronics.com/wp-content/plugins/woocommerce/assets/images/icons/loader.svg');}.yith-ywot-empty-state-container{--wpr-bg-80d8f5b9-8fba-498b-90b1-8c37c2fff516: url('https://www.phippselectronics.com/wp-content/plugins/yith-woocommerce-order-tracking-premium/assets/images/carriers.jpg');}.dgwt-wcas-inner-preloader{--wpr-bg-9153d084-f338-443a-9211-b42ab9490c5f: url('https://www.phippselectronics.com/wp-content/plugins/ajax-search-for-woocommerce-premium/assets/img/preloader.gif');}.woocommerce-checkout #payment div.payment_box input.js-sv-wc-payment-gateway-credit-card-form-account-number,#add_payment_method input.js-sv-wc-payment-gateway-credit-card-form-account-number{--wpr-bg-ff6834e3-2e70-43d3-9966-081711d8a33e: url('https://www.phippselectronics.com/wp-content/plugins/woocommerce-gateway-paypal-powered-by-braintree/vendor/skyverge/wc-plugin-framework/woocommerce/payment-gateway/assets/images/card-cc-plain.svg');}.woocommerce-checkout #payment div.payment_box input.js-sv-wc-payment-gateway-credit-card-form-account-number.visa,#add_payment_method input.js-sv-wc-payment-gateway-credit-card-form-account-number.visa{--wpr-bg-0a28889a-f8bc-4ac4-aaf5-a4d56958a2be: url('https://www.phippselectronics.com/wp-content/plugins/woocommerce-gateway-paypal-powered-by-braintree/vendor/skyverge/wc-plugin-framework/woocommerce/payment-gateway/assets/images/card-visa.svg');}.woocommerce-checkout #payment div.payment_box input.js-sv-wc-payment-gateway-credit-card-form-account-number.mastercard,#add_payment_method input.js-sv-wc-payment-gateway-credit-card-form-account-number.mastercard{--wpr-bg-db8206fe-cf22-4600-bd27-90d7cdee2ac9: url('https://www.phippselectronics.com/wp-content/plugins/woocommerce-gateway-paypal-powered-by-braintree/vendor/skyverge/wc-plugin-framework/woocommerce/payment-gateway/assets/images/card-mastercard.svg');}.woocommerce-checkout #payment div.payment_box input.js-sv-wc-payment-gateway-credit-card-form-account-number.dinersclub,#add_payment_method input.js-sv-wc-payment-gateway-credit-card-form-account-number.dinersclub{--wpr-bg-06d19fd1-66d8-47cf-a01f-b54c64d7dcb0: url('https://www.phippselectronics.com/wp-content/plugins/woocommerce-gateway-paypal-powered-by-braintree/vendor/skyverge/wc-plugin-framework/woocommerce/payment-gateway/assets/images/card-dinersclub.svg');}.woocommerce-checkout #payment div.payment_box input.js-sv-wc-payment-gateway-credit-card-form-account-number.maestro,#add_payment_method input.js-sv-wc-payment-gateway-credit-card-form-account-number.maestro{--wpr-bg-ed0c82e3-65f5-474d-8fb1-19869ff926cf: url('https://www.phippselectronics.com/wp-content/plugins/woocommerce-gateway-paypal-powered-by-braintree/vendor/skyverge/wc-plugin-framework/woocommerce/payment-gateway/assets/images/card-maestro.svg');}.woocommerce-checkout #payment div.payment_box input.js-sv-wc-payment-gateway-credit-card-form-account-number.jcb,#add_payment_method input.js-sv-wc-payment-gateway-credit-card-form-account-number.jcb{--wpr-bg-413f72a8-4e18-486e-81af-928ff8103642: url('https://www.phippselectronics.com/wp-content/plugins/woocommerce-gateway-paypal-powered-by-braintree/vendor/skyverge/wc-plugin-framework/woocommerce/payment-gateway/assets/images/card-jcb.svg');}.woocommerce-checkout #payment div.payment_box input.js-sv-wc-payment-gateway-credit-card-form-account-number.amex,#add_payment_method input.js-sv-wc-payment-gateway-credit-card-form-account-number.amex{--wpr-bg-58828694-3b45-4441-b7b9-7cd1e8dbf519: url('https://www.phippselectronics.com/wp-content/plugins/woocommerce-gateway-paypal-powered-by-braintree/vendor/skyverge/wc-plugin-framework/woocommerce/payment-gateway/assets/images/card-amex.svg');}.woocommerce-checkout #payment div.payment_box input.js-sv-wc-payment-gateway-credit-card-form-account-number.discover,#add_payment_method input.js-sv-wc-payment-gateway-credit-card-form-account-number.discover{--wpr-bg-36378bdf-91a8-44cd-b58e-e75894742dfd: url('https://www.phippselectronics.com/wp-content/plugins/woocommerce-gateway-paypal-powered-by-braintree/vendor/skyverge/wc-plugin-framework/woocommerce/payment-gateway/assets/images/card-discover.svg');}.woocommerce-checkout #payment div.payment_box input.js-sv-wc-payment-gateway-credit-card-form-account-number.visaelectron,#add_payment_method input.js-sv-wc-payment-gateway-credit-card-form-account-number.visaelectron{--wpr-bg-a21db38c-4270-4651-ba9d-33360a979c42: url('https://www.phippselectronics.com/wp-content/plugins/woocommerce-gateway-paypal-powered-by-braintree/vendor/skyverge/wc-plugin-framework/woocommerce/payment-gateway/assets/images/card-visa-electron.svg');}.woocommerce-checkout #payment div.payment_box input.js-sv-wc-payment-gateway-credit-card-form-account-number.invalid-card-type,#add_payment_method input.js-sv-wc-payment-gateway-credit-card-form-account-number.invalid-card-type{--wpr-bg-0608c577-9088-4a69-901f-9fcc868ae446: url('https://www.phippselectronics.com/wp-content/plugins/woocommerce-gateway-paypal-powered-by-braintree/vendor/skyverge/wc-plugin-framework/woocommerce/payment-gateway/assets/images/card-cc-invalid.svg');}.yith-ywar-main-wrapper .yith-ywar-filter-data .filter-buttons .filter-button.rating-label:after{--wpr-bg-82ef3a2e-3275-43cf-ba93-12935c4a04c5: url('https://www.phippselectronics.com/wp-content/plugins/yith-woocommerce-advanced-reviews-premium/assets/images/close.svg');}.gform_wrapper.gravity-theme .chosen-container-single .chosen-single abbr{--wpr-bg-429cc130-f4b7-4cdf-8a0f-30a6fd233323: url('https://www.phippselectronics.com/wp-content/plugins/gravityforms/legacy/css/chosen-sprite.png');}.gform_wrapper.gravity-theme .chosen-container-single .chosen-single div b{--wpr-bg-68685c63-b760-462b-9c52-ea46e23b0daa: url('https://www.phippselectronics.com/wp-content/plugins/gravityforms/legacy/css/chosen-sprite.png');}.gform_wrapper.gravity-theme .chosen-container-single .chosen-search input[type=text]{--wpr-bg-5fc81c24-9e6a-4a94-9b5c-224eb37db6ac: url('https://www.phippselectronics.com/wp-content/plugins/gravityforms/legacy/css/chosen-sprite.png');}.gform_wrapper.gravity-theme .chosen-container-multi .chosen-choices li.search-choice .search-choice-close{--wpr-bg-7b3b29a6-04aa-46b7-ac45-87c35763de19: url('https://www.phippselectronics.com/wp-content/plugins/gravityforms/legacy/css/chosen-sprite.png');}.gform_wrapper.gravity-theme .chosen-rtl .chosen-search input[type=text]{--wpr-bg-7986b95a-6b53-4382-8132-d77ca3ab9e5a: url('https://www.phippselectronics.com/wp-content/plugins/gravityforms/legacy/css/chosen-sprite.png');}.gform_wrapper.gravity-theme .gform_card_icon_container div.gform_card_icon.gform_card_icon_selected::after{--wpr-bg-623e26b8-868b-48f7-81aa-75bac107972f: url('https://www.phippselectronics.com/wp-content/plugins/gravityforms/images/gf-creditcards-check.svg');}.gform_wrapper.gravity-theme .gfield_list_icons button{--wpr-bg-13d75d6f-3b7f-4218-b583-edac635adb6f: url('https://www.phippselectronics.com/wp-content/plugins/gravityforms/images/list-add.svg');}.gform_wrapper.gravity-theme .chosen-container .chosen-results-scroll-down span,.gform_wrapper.gravity-theme .chosen-container .chosen-results-scroll-up span,.gform_wrapper.gravity-theme .chosen-container-multi .chosen-choices .search-choice .search-choice-close,.gform_wrapper.gravity-theme .chosen-container-single .chosen-search input[type=text],.gform_wrapper.gravity-theme .chosen-container-single .chosen-single abbr,.gform_wrapper.gravity-theme .chosen-container-single .chosen-single div b,.gform_wrapper.gravity-theme .chosen-rtl .chosen-search input[type=text]{--wpr-bg-d575ff09-5983-499d-b93e-d149ebfcc1bb: url('https://www.phippselectronics.com/wp-content/plugins/gravityforms/legacy/css/chosen-sprite@2x.png');}.gform_wrapper.gravity-theme .gform_card_icon_container div.gform_card_icon{--wpr-bg-c8396f5e-dcce-4dfb-9c8e-1180218de6a2: url('https://www.phippselectronics.com/wp-content/plugins/gravityforms/images/gf-creditcards.svg');}.gform_wrapper.gravity-theme .ginput_container_creditcard .ginput_card_security_code_icon{--wpr-bg-f2b298b3-b2d6-41d5-b2a7-dd69449cc457: url('https://www.phippselectronics.com/wp-content/plugins/gravityforms/images/gf-creditcards.svg');}.gform_wrapper.gravity-theme .gfield_list_icons button.delete_list_item{--wpr-bg-d53d75d6-210a-44bf-a26b-cee6d3093ee6: url('https://www.phippselectronics.com/wp-content/plugins/gravityforms/images/list-remove.svg');}.gravity-theme.ui-datepicker .ui-datepicker-header select{--wpr-bg-2372b264-8f30-4984-b0fc-a2060ca0d8e7: url('https://www.phippselectronics.com/wp-content/plugins/gravityforms/images/theme/down-arrow.svg');}button.pswp__button{--wpr-bg-ee178150-fc6b-4257-b299-1db82914cc2e: url('https://www.phippselectronics.com/wp-content/plugins/woocommerce/assets/css/photoswipe/default-skin/default-skin.png');}.pswp__button,.pswp__button--arrow--left:before,.pswp__button--arrow--right:before{--wpr-bg-98b43960-e18a-4de4-ace3-e8d8fcf217a7: url('https://www.phippselectronics.com/wp-content/plugins/woocommerce/assets/css/photoswipe/default-skin/default-skin.png');}.pswp__preloader--active .pswp__preloader__icn{--wpr-bg-eb35da31-3acb-400a-a52c-10b4e8bf1897: url('https://www.phippselectronics.com/wp-content/plugins/woocommerce/assets/css/photoswipe/default-skin/preloader.gif');}.pswp--svg .pswp__button,.pswp--svg .pswp__button--arrow--left:before,.pswp--svg .pswp__button--arrow--right:before{--wpr-bg-8b4e5892-ae51-4972-b848-71d5f65b16ba: url('https://www.phippselectronics.com/wp-content/plugins/woocommerce/assets/css/photoswipe/default-skin/default-skin.svg');}.rll-youtube-player .play{--wpr-bg-f12cc713-75b3-4606-9a4e-139715ec2c4c: url('https://www.phippselectronics.com/wp-content/plugins/wp-rocket/assets/img/youtube.png');}.css-sprite-motor_icon{--wpr-bg-bf383cc8-11eb-4142-9b31-bcfd5c62d160: url('https://www.phippselectronics.com/wp-content/uploads/2023/10/css-sprite-combined.png');}.css-sprite-breadboard_icon{--wpr-bg-5a14e0eb-5f2a-4f4f-abfa-69c81e765279: url('https://www.phippselectronics.com/wp-content/uploads/2023/10/css-sprite-combined.png');}.css-sprite-led_icon{--wpr-bg-8dd59c05-e831-4966-9bde-8d1a9bb7f424: url('https://www.phippselectronics.com/wp-content/uploads/2023/10/css-sprite-combined.png');}.css-sprite-power_icon{--wpr-bg-b9f197b1-a681-4e1c-ac71-b53b85a5a0ea: url('https://www.phippselectronics.com/wp-content/uploads/2023/10/css-sprite-combined.png');}.css-sprite-fuse_icon{--wpr-bg-07f8d258-121e-434b-9d7d-ac4a187a70ea: url('https://www.phippselectronics.com/wp-content/uploads/2023/10/css-sprite-combined.png');}.css-sprite-resistor_icon_2{--wpr-bg-86bc1af9-1e15-4fe9-a376-8bbc00c30109: url('https://www.phippselectronics.com/wp-content/uploads/2023/10/css-sprite-combined.png');}.css-sprite-transistor_icon{--wpr-bg-66196a66-6604-4f8e-a87c-da88f5ae663f: url('https://www.phippselectronics.com/wp-content/uploads/2023/10/css-sprite-combined.png');}.css-sprite-sensor_icon{--wpr-bg-d931abc4-e2ea-43de-80fe-4f31ec553e36: url('https://www.phippselectronics.com/wp-content/uploads/2023/10/css-sprite-combined.png');}.css-sprite-capacitor_icon{--wpr-bg-da6198ad-e847-4260-ac41-453777ffdecc: url('https://www.phippselectronics.com/wp-content/uploads/2023/10/css-sprite-combined.png');}.css-sprite-diode_icon{--wpr-bg-e99de59c-b049-47f3-8753-17811c11a726: url('https://www.phippselectronics.com/wp-content/uploads/2023/10/css-sprite-combined.png');}.css-sprite-logo-phipps-signature-black{--wpr-bg-38c58bef-72e5-4166-aec0-90e28516af65: url('https://www.phippselectronics.com/wp-content/uploads/2023/10/css-sprite-combined.png');}</style>
</noscript>
<script type="application/javascript">const rocket_pairs = [{"selector":"#wcs-debug #wcs-debug-contents .wcs-debug-tip","style":"#wcs-debug #wcs-debug-contents .wcs-debug-tip{--wpr-bg-2d7d0cf3-3fa5-4e63-a5ca-03a919b6d0b1: url('https:\/\/www.phippselectronics.com\/wp-content\/cache\/..\/plugins\/woo-conditional-shipping-pro\/frontend\/img\/tip2.svg');}","hash":"2d7d0cf3-3fa5-4e63-a5ca-03a919b6d0b1","url":"https:\/\/www.phippselectronics.com\/wp-content\/cache\/..\/plugins\/woo-conditional-shipping-pro\/frontend\/img\/tip2.svg"},{"selector":"#wcs-debug #wcs-debug-header .wcs-debug-toggle","style":"#wcs-debug #wcs-debug-header .wcs-debug-toggle{--wpr-bg-e2a1054f-3e5b-4097-b96f-87a6ac1facd6: url('https:\/\/www.phippselectronics.com\/wp-content\/cache\/..\/plugins\/woo-conditional-shipping-pro\/frontend\/img\/arrow.svg');}","hash":"e2a1054f-3e5b-4097-b96f-87a6ac1facd6","url":"https:\/\/www.phippselectronics.com\/wp-content\/cache\/..\/plugins\/woo-conditional-shipping-pro\/frontend\/img\/arrow.svg"},{"selector":"#wcs-notices .conditional-shipping-notice.conditional-shipping-notice-style-success.conditional-shipping-notice-style-warning, #wcs-notices .conditional-shipping-notice.conditional-shipping-notice-style-warning.conditional-shipping-notice-style-warning, #wcs-notices .conditional-shipping-notice.conditional-shipping-notice-style-error.conditional-shipping-notice-style-warning,\n.wcs-shipping-notices .conditional-shipping-notice.conditional-shipping-notice-style-success.conditional-shipping-notice-style-warning,\n.wcs-shipping-notices .conditional-shipping-notice.conditional-shipping-notice-style-warning.conditional-shipping-notice-style-warning,\n.wcs-shipping-notices .conditional-shipping-notice.conditional-shipping-notice-style-error.conditional-shipping-notice-style-warning","style":"#wcs-notices .conditional-shipping-notice.conditional-shipping-notice-style-success.conditional-shipping-notice-style-warning, #wcs-notices .conditional-shipping-notice.conditional-shipping-notice-style-warning.conditional-shipping-notice-style-warning, #wcs-notices .conditional-shipping-notice.conditional-shipping-notice-style-error.conditional-shipping-notice-style-warning,\n.wcs-shipping-notices .conditional-shipping-notice.conditional-shipping-notice-style-success.conditional-shipping-notice-style-warning,\n.wcs-shipping-notices .conditional-shipping-notice.conditional-shipping-notice-style-warning.conditional-shipping-notice-style-warning,\n.wcs-shipping-notices .conditional-shipping-notice.conditional-shipping-notice-style-error.conditional-shipping-notice-style-warning{--wpr-bg-96ca079f-a228-4783-baa5-9c71723a7b5b: url('https:\/\/www.phippselectronics.com\/wp-content\/cache\/..\/plugins\/woo-conditional-shipping-pro\/frontend\/img\/notices\/warning.svg');}","hash":"96ca079f-a228-4783-baa5-9c71723a7b5b","url":"https:\/\/www.phippselectronics.com\/wp-content\/cache\/..\/plugins\/woo-conditional-shipping-pro\/frontend\/img\/notices\/warning.svg"},{"selector":"#wcs-notices .conditional-shipping-notice.conditional-shipping-notice-style-success.conditional-shipping-notice-style-success, #wcs-notices .conditional-shipping-notice.conditional-shipping-notice-style-warning.conditional-shipping-notice-style-success, #wcs-notices .conditional-shipping-notice.conditional-shipping-notice-style-error.conditional-shipping-notice-style-success,\n.wcs-shipping-notices .conditional-shipping-notice.conditional-shipping-notice-style-success.conditional-shipping-notice-style-success,\n.wcs-shipping-notices .conditional-shipping-notice.conditional-shipping-notice-style-warning.conditional-shipping-notice-style-success,\n.wcs-shipping-notices .conditional-shipping-notice.conditional-shipping-notice-style-error.conditional-shipping-notice-style-success","style":"#wcs-notices .conditional-shipping-notice.conditional-shipping-notice-style-success.conditional-shipping-notice-style-success, #wcs-notices .conditional-shipping-notice.conditional-shipping-notice-style-warning.conditional-shipping-notice-style-success, #wcs-notices .conditional-shipping-notice.conditional-shipping-notice-style-error.conditional-shipping-notice-style-success,\n.wcs-shipping-notices .conditional-shipping-notice.conditional-shipping-notice-style-success.conditional-shipping-notice-style-success,\n.wcs-shipping-notices .conditional-shipping-notice.conditional-shipping-notice-style-warning.conditional-shipping-notice-style-success,\n.wcs-shipping-notices .conditional-shipping-notice.conditional-shipping-notice-style-error.conditional-shipping-notice-style-success{--wpr-bg-d1902f5a-ea6c-499b-a3ec-f9594cfc8231: url('https:\/\/www.phippselectronics.com\/wp-content\/cache\/..\/plugins\/woo-conditional-shipping-pro\/frontend\/img\/notices\/yes-alt.svg');}","hash":"d1902f5a-ea6c-499b-a3ec-f9594cfc8231","url":"https:\/\/www.phippselectronics.com\/wp-content\/cache\/..\/plugins\/woo-conditional-shipping-pro\/frontend\/img\/notices\/yes-alt.svg"},{"selector":"#wcs-notices .conditional-shipping-notice.conditional-shipping-notice-style-success.conditional-shipping-notice-style-error, #wcs-notices .conditional-shipping-notice.conditional-shipping-notice-style-warning.conditional-shipping-notice-style-error, #wcs-notices .conditional-shipping-notice.conditional-shipping-notice-style-error.conditional-shipping-notice-style-error,\n.wcs-shipping-notices .conditional-shipping-notice.conditional-shipping-notice-style-success.conditional-shipping-notice-style-error,\n.wcs-shipping-notices .conditional-shipping-notice.conditional-shipping-notice-style-warning.conditional-shipping-notice-style-error,\n.wcs-shipping-notices .conditional-shipping-notice.conditional-shipping-notice-style-error.conditional-shipping-notice-style-error","style":"#wcs-notices .conditional-shipping-notice.conditional-shipping-notice-style-success.conditional-shipping-notice-style-error, #wcs-notices .conditional-shipping-notice.conditional-shipping-notice-style-warning.conditional-shipping-notice-style-error, #wcs-notices .conditional-shipping-notice.conditional-shipping-notice-style-error.conditional-shipping-notice-style-error,\n.wcs-shipping-notices .conditional-shipping-notice.conditional-shipping-notice-style-success.conditional-shipping-notice-style-error,\n.wcs-shipping-notices .conditional-shipping-notice.conditional-shipping-notice-style-warning.conditional-shipping-notice-style-error,\n.wcs-shipping-notices .conditional-shipping-notice.conditional-shipping-notice-style-error.conditional-shipping-notice-style-error{--wpr-bg-a8f8162d-9607-4942-b4bd-cb78d0062346: url('https:\/\/www.phippselectronics.com\/wp-content\/cache\/..\/plugins\/woo-conditional-shipping-pro\/frontend\/img\/notices\/dismiss.svg');}","hash":"a8f8162d-9607-4942-b4bd-cb78d0062346","url":"https:\/\/www.phippselectronics.com\/wp-content\/cache\/..\/plugins\/woo-conditional-shipping-pro\/frontend\/img\/notices\/dismiss.svg"},{"selector":".mejs-overlay-button","style":".mejs-overlay-button{--wpr-bg-f9f2e990-2bb1-4ee2-aa35-aa7301ab3ebe: url('https:\/\/www.phippselectronics.com\/wp-includes\/js\/mediaelement\/mejs-controls.svg');}","hash":"f9f2e990-2bb1-4ee2-aa35-aa7301ab3ebe","url":"https:\/\/www.phippselectronics.com\/wp-includes\/js\/mediaelement\/mejs-controls.svg"},{"selector":".mejs-overlay-loading-bg-img","style":".mejs-overlay-loading-bg-img{--wpr-bg-50bcf0ca-c281-4d41-b1a9-d4921c3046cf: url('https:\/\/www.phippselectronics.com\/wp-includes\/js\/mediaelement\/mejs-controls.svg');}","hash":"50bcf0ca-c281-4d41-b1a9-d4921c3046cf","url":"https:\/\/www.phippselectronics.com\/wp-includes\/js\/mediaelement\/mejs-controls.svg"},{"selector":".mejs-button>button","style":".mejs-button>button{--wpr-bg-4357da67-3e00-4fa7-8a90-f0a2eb859c8f: url('https:\/\/www.phippselectronics.com\/wp-includes\/js\/mediaelement\/mejs-controls.svg');}","hash":"4357da67-3e00-4fa7-8a90-f0a2eb859c8f","url":"https:\/\/www.phippselectronics.com\/wp-includes\/js\/mediaelement\/mejs-controls.svg"},{"selector":".yith-wcan-filters .yith-wcan-filter .filter-title.collapsable.closed, .yith-wcan-filters .yith-wcan-filter .filter-title.collapsable:not(.opened), .yith-wcan-filters .yith-wcan-filter .filter-title.collapsable:not(.open)","style":".yith-wcan-filters .yith-wcan-filter .filter-title.collapsable.closed:after, .yith-wcan-filters .yith-wcan-filter .filter-title.collapsable:not(.opened):after, .yith-wcan-filters .yith-wcan-filter .filter-title.collapsable:not(.open):after{--wpr-bg-90066b07-ff6b-419c-b975-4553bb9c9109: url('https:\/\/www.phippselectronics.com\/wp-content\/plugins\/yith-woocommerce-ajax-product-filter-premium\/assets\/images\/arrow-down.svg');}","hash":"90066b07-ff6b-419c-b975-4553bb9c9109","url":"https:\/\/www.phippselectronics.com\/wp-content\/plugins\/yith-woocommerce-ajax-product-filter-premium\/assets\/images\/arrow-down.svg"},{"selector":".yith-wcan-filters .yith-wcan-filter .filter-title.collapsable.open, .yith-wcan-filters .yith-wcan-filter .filter-title.collapsable.opened","style":".yith-wcan-filters .yith-wcan-filter .filter-title.collapsable.open:after, .yith-wcan-filters .yith-wcan-filter .filter-title.collapsable.opened:after{--wpr-bg-71f6b62f-71ff-4751-858c-c00db31cac55: url('https:\/\/www.phippselectronics.com\/wp-content\/plugins\/yith-woocommerce-ajax-product-filter-premium\/assets\/images\/arrow-up.svg');}","hash":"71f6b62f-71ff-4751-858c-c00db31cac55","url":"https:\/\/www.phippselectronics.com\/wp-content\/plugins\/yith-woocommerce-ajax-product-filter-premium\/assets\/images\/arrow-up.svg"},{"selector":".yith-wcan-filters .yith-wcan-filter .filter-items .filter-item.active.color:not(.no-color):not(.no-image):not(.label-right) > a","style":".yith-wcan-filters .yith-wcan-filter .filter-items .filter-item.active.color:not(.no-color):not(.no-image):not(.label-right) > a:after{--wpr-bg-7b2d2835-3d60-4a90-8b8f-62459421fcfe: url('https:\/\/www.phippselectronics.com\/wp-content\/plugins\/yith-woocommerce-ajax-product-filter-premium\/assets\/images\/close.svg');}","hash":"7b2d2835-3d60-4a90-8b8f-62459421fcfe","url":"https:\/\/www.phippselectronics.com\/wp-content\/plugins\/yith-woocommerce-ajax-product-filter-premium\/assets\/images\/close.svg"},{"selector":".yith-wcan-filters .yith-wcan-filter .filter-items .filter-item.label.active.with-image:not(.label-right) > a","style":".yith-wcan-filters .yith-wcan-filter .filter-items .filter-item.label.active.with-image:not(.label-right) > a:after{--wpr-bg-c30f3b0a-5c8c-4f1c-9be6-49066fb20752: url('https:\/\/www.phippselectronics.com\/wp-content\/plugins\/yith-woocommerce-ajax-product-filter-premium\/assets\/images\/close.svg');}","hash":"c30f3b0a-5c8c-4f1c-9be6-49066fb20752","url":"https:\/\/www.phippselectronics.com\/wp-content\/plugins\/yith-woocommerce-ajax-product-filter-premium\/assets\/images\/close.svg"},{"selector":".yith-wcan-filters .yith-wcan-filter .filter-items .filter-item.hierarchy-collapsable.closed > .toggle-handle","style":".yith-wcan-filters .yith-wcan-filter .filter-items .filter-item.hierarchy-collapsable.closed > .toggle-handle{--wpr-bg-edf15c0c-1674-4674-b2f7-540075d226ea: url('https:\/\/www.phippselectronics.com\/wp-content\/plugins\/yith-woocommerce-ajax-product-filter-premium\/assets\/images\/arrow-down.svg');}","hash":"edf15c0c-1674-4674-b2f7-540075d226ea","url":"https:\/\/www.phippselectronics.com\/wp-content\/plugins\/yith-woocommerce-ajax-product-filter-premium\/assets\/images\/arrow-down.svg"},{"selector":".yith-wcan-filters .yith-wcan-filter .filter-items .filter-item.hierarchy-collapsable.opened > .toggle-handle","style":".yith-wcan-filters .yith-wcan-filter .filter-items .filter-item.hierarchy-collapsable.opened > .toggle-handle{--wpr-bg-9f98d42a-2937-49fb-9115-d0281114792a: url('https:\/\/www.phippselectronics.com\/wp-content\/plugins\/yith-woocommerce-ajax-product-filter-premium\/assets\/images\/arrow-up.svg');}","hash":"9f98d42a-2937-49fb-9115-d0281114792a","url":"https:\/\/www.phippselectronics.com\/wp-content\/plugins\/yith-woocommerce-ajax-product-filter-premium\/assets\/images\/arrow-up.svg"},{"selector":".yith-wcan-filters .yith-wcan-filter .yith-wcan-dropdown.closed, .yith-wcan-filters .yith-wcan-filter .yith-wcan-dropdown:not(.opened), .yith-wcan-filters .yith-wcan-filter .yith-wcan-dropdown:not(.open)","style":".yith-wcan-filters .yith-wcan-filter .yith-wcan-dropdown.closed:after, .yith-wcan-filters .yith-wcan-filter .yith-wcan-dropdown:not(.opened):after, .yith-wcan-filters .yith-wcan-filter .yith-wcan-dropdown:not(.open):after{--wpr-bg-92ecdafe-ae3b-46e1-9ce3-3b9d668e5b83: url('https:\/\/www.phippselectronics.com\/wp-content\/plugins\/yith-woocommerce-ajax-product-filter-premium\/assets\/images\/arrow-down.svg');}","hash":"92ecdafe-ae3b-46e1-9ce3-3b9d668e5b83","url":"https:\/\/www.phippselectronics.com\/wp-content\/plugins\/yith-woocommerce-ajax-product-filter-premium\/assets\/images\/arrow-down.svg"},{"selector":".yith-wcan-filters .yith-wcan-filter .yith-wcan-dropdown.open, .yith-wcan-filters .yith-wcan-filter .yith-wcan-dropdown.opened","style":".yith-wcan-filters .yith-wcan-filter .yith-wcan-dropdown.open:after, .yith-wcan-filters .yith-wcan-filter .yith-wcan-dropdown.opened:after{--wpr-bg-69ad3b7d-79f9-45cf-a145-8171480b2466: url('https:\/\/www.phippselectronics.com\/wp-content\/plugins\/yith-woocommerce-ajax-product-filter-premium\/assets\/images\/arrow-up.svg');}","hash":"69ad3b7d-79f9-45cf-a145-8171480b2466","url":"https:\/\/www.phippselectronics.com\/wp-content\/plugins\/yith-woocommerce-ajax-product-filter-premium\/assets\/images\/arrow-up.svg"},{"selector":".yith-wcan-filters .yith-wcan-filter .yith-wcan-dropdown .dropdown-wrapper .search-field-container","style":".yith-wcan-filters .yith-wcan-filter .yith-wcan-dropdown .dropdown-wrapper .search-field-container:after{--wpr-bg-17655136-1365-4119-b5cf-1065bd36eaeb: url('https:\/\/www.phippselectronics.com\/wp-content\/plugins\/yith-woocommerce-ajax-product-filter-premium\/assets\/images\/search.svg');}","hash":"17655136-1365-4119-b5cf-1065bd36eaeb","url":"https:\/\/www.phippselectronics.com\/wp-content\/plugins\/yith-woocommerce-ajax-product-filter-premium\/assets\/images\/search.svg"},{"selector":".yith-wcan-filters .yith-wcan-filter.filter-placeholder .select-placeholder.closed, .yith-wcan-filters .yith-wcan-filter.filter-placeholder .select-placeholder:not(.opened), .yith-wcan-filters .yith-wcan-filter.filter-placeholder .select-placeholder:not(.open)","style":".yith-wcan-filters .yith-wcan-filter.filter-placeholder .select-placeholder.closed:after, .yith-wcan-filters .yith-wcan-filter.filter-placeholder .select-placeholder:not(.opened):after, .yith-wcan-filters .yith-wcan-filter.filter-placeholder .select-placeholder:not(.open):after{--wpr-bg-0a44a53f-5721-49aa-b79c-0afaee6e038d: url('https:\/\/www.phippselectronics.com\/wp-content\/plugins\/yith-woocommerce-ajax-product-filter-premium\/assets\/images\/arrow-down.svg');}","hash":"0a44a53f-5721-49aa-b79c-0afaee6e038d","url":"https:\/\/www.phippselectronics.com\/wp-content\/plugins\/yith-woocommerce-ajax-product-filter-premium\/assets\/images\/arrow-down.svg"},{"selector":".yith-wcan-filters .yith-wcan-filter.filter-placeholder .select-placeholder.open, .yith-wcan-filters .yith-wcan-filter.filter-placeholder .select-placeholder.opened","style":".yith-wcan-filters .yith-wcan-filter.filter-placeholder .select-placeholder.open:after, .yith-wcan-filters .yith-wcan-filter.filter-placeholder .select-placeholder.opened:after{--wpr-bg-811cf39e-7221-4c22-aebd-2f821dad2361: url('https:\/\/www.phippselectronics.com\/wp-content\/plugins\/yith-woocommerce-ajax-product-filter-premium\/assets\/images\/arrow-up.svg');}","hash":"811cf39e-7221-4c22-aebd-2f821dad2361","url":"https:\/\/www.phippselectronics.com\/wp-content\/plugins\/yith-woocommerce-ajax-product-filter-premium\/assets\/images\/arrow-up.svg"},{"selector":".yith-wcan-filters.custom-style span.checkboxbutton.checked","style":".yith-wcan-filters.custom-style span.checkboxbutton.checked:before{--wpr-bg-fc1bcd1b-63e1-428a-8c8f-11ca6ddb21b1: url('https:\/\/www.phippselectronics.com\/wp-content\/plugins\/yith-woocommerce-ajax-product-filter-premium\/assets\/images\/check.svg');}","hash":"fc1bcd1b-63e1-428a-8c8f-11ca6ddb21b1","url":"https:\/\/www.phippselectronics.com\/wp-content\/plugins\/yith-woocommerce-ajax-product-filter-premium\/assets\/images\/check.svg"},{"selector":".yith-wcan-filters.horizontal:not(.filters-modal) .yith-wcan-filter.filter-placeholder .filter-content.closed, .yith-wcan-filters.horizontal:not(.filters-modal) .yith-wcan-filter.filter-placeholder .filter-content:not(.opened), .yith-wcan-filters.horizontal:not(.filters-modal) .yith-wcan-filter.filter-placeholder .filter-content:not(.open)","style":".yith-wcan-filters.horizontal:not(.filters-modal) .yith-wcan-filter.filter-placeholder .filter-content.closed:after, .yith-wcan-filters.horizontal:not(.filters-modal) .yith-wcan-filter.filter-placeholder .filter-content:not(.opened):after, .yith-wcan-filters.horizontal:not(.filters-modal) .yith-wcan-filter.filter-placeholder .filter-content:not(.open):after{--wpr-bg-bfe2d25d-1bb7-471d-980d-85874d744aac: url('https:\/\/www.phippselectronics.com\/wp-content\/plugins\/yith-woocommerce-ajax-product-filter-premium\/assets\/images\/arrow-down.svg');}","hash":"bfe2d25d-1bb7-471d-980d-85874d744aac","url":"https:\/\/www.phippselectronics.com\/wp-content\/plugins\/yith-woocommerce-ajax-product-filter-premium\/assets\/images\/arrow-down.svg"},{"selector":".yith-wcan-filters.horizontal:not(.filters-modal) .yith-wcan-filter.filter-placeholder .filter-content.open, .yith-wcan-filters.horizontal:not(.filters-modal) .yith-wcan-filter.filter-placeholder .filter-content.opened","style":".yith-wcan-filters.horizontal:not(.filters-modal) .yith-wcan-filter.filter-placeholder .filter-content.open:after, .yith-wcan-filters.horizontal:not(.filters-modal) .yith-wcan-filter.filter-placeholder .filter-content.opened:after{--wpr-bg-6461f983-33de-44ae-87e3-3099001990f6: url('https:\/\/www.phippselectronics.com\/wp-content\/plugins\/yith-woocommerce-ajax-product-filter-premium\/assets\/images\/arrow-up.svg');}","hash":"6461f983-33de-44ae-87e3-3099001990f6","url":"https:\/\/www.phippselectronics.com\/wp-content\/plugins\/yith-woocommerce-ajax-product-filter-premium\/assets\/images\/arrow-up.svg"},{"selector":".yith-wcan-active-filters .active-filter .active-filter-label","style":".yith-wcan-active-filters .active-filter .active-filter-label:after{--wpr-bg-5fee3d76-ee4b-4b77-be8a-28d0555a4d6f: url('https:\/\/www.phippselectronics.com\/wp-content\/plugins\/yith-woocommerce-ajax-product-filter-premium\/assets\/images\/close.svg');}","hash":"5fee3d76-ee4b-4b77-be8a-28d0555a4d6f","url":"https:\/\/www.phippselectronics.com\/wp-content\/plugins\/yith-woocommerce-ajax-product-filter-premium\/assets\/images\/close.svg"},{"selector":".yith-wcan-filters-opener i.filter-icon","style":".yith-wcan-filters-opener i.filter-icon{--wpr-bg-d77bded7-8e2d-493f-b5b8-1e13cf458879: url('https:\/\/www.phippselectronics.com\/wp-content\/plugins\/yith-woocommerce-ajax-product-filter-premium\/assets\/images\/filters.svg');}","hash":"d77bded7-8e2d-493f-b5b8-1e13cf458879","url":"https:\/\/www.phippselectronics.com\/wp-content\/plugins\/yith-woocommerce-ajax-product-filter-premium\/assets\/images\/filters.svg"},{"selector":".selectBox-dropdown .selectBox-arrow","style":".selectBox-dropdown .selectBox-arrow{--wpr-bg-143300b1-f393-4e59-9718-f37fdf241b45: url('https:\/\/www.phippselectronics.com\/wp-content\/plugins\/yith-woocommerce-wishlist-premium\/assets\/images\/jquery.selectBox-arrow.gif');}","hash":"143300b1-f393-4e59-9718-f37fdf241b45","url":"https:\/\/www.phippselectronics.com\/wp-content\/plugins\/yith-woocommerce-wishlist-premium\/assets\/images\/jquery.selectBox-arrow.gif"},{"selector":"div.pp_woocommerce .pp_loaderIcon","style":"div.pp_woocommerce .pp_loaderIcon::before{--wpr-bg-bd69f014-1b72-43c9-a63f-bcf966c06198: url('https:\/\/www.phippselectronics.com\/wp-content\/plugins\/woocommerce\/assets\/images\/icons\/loader.svg');}","hash":"bd69f014-1b72-43c9-a63f-bcf966c06198","url":"https:\/\/www.phippselectronics.com\/wp-content\/plugins\/woocommerce\/assets\/images\/icons\/loader.svg"},{"selector":".selectBox-dropdown .selectBox-arrow","style":".selectBox-dropdown .selectBox-arrow{--wpr-bg-d4999d35-1c5e-41e4-8c71-e9a4e0cfec0d: url('https:\/\/www.phippselectronics.com\/wp-content\/plugins\/yith-woocommerce-wishlist-premium\/assets\/images\/jquery.selectBox-arrow.png');}","hash":"d4999d35-1c5e-41e4-8c71-e9a4e0cfec0d","url":"https:\/\/www.phippselectronics.com\/wp-content\/plugins\/yith-woocommerce-wishlist-premium\/assets\/images\/jquery.selectBox-arrow.png"},{"selector":".selectBox-dropdown.selectBox-menuShowing .selectBox-arrow","style":".selectBox-dropdown.selectBox-menuShowing .selectBox-arrow{--wpr-bg-10b35172-12ae-4868-a4d8-c9d14b919fb2: url('https:\/\/www.phippselectronics.com\/wp-content\/plugins\/yith-woocommerce-wishlist-premium\/assets\/images\/jquery.selectBox-arrow.png');}","hash":"10b35172-12ae-4868-a4d8-c9d14b919fb2","url":"https:\/\/www.phippselectronics.com\/wp-content\/plugins\/yith-woocommerce-wishlist-premium\/assets\/images\/jquery.selectBox-arrow.png"},{"selector":".woocommerce-js .blockUI.blockOverlay","style":".woocommerce-js .blockUI.blockOverlay::before{--wpr-bg-0846e3fe-142d-4964-84b9-ad44168a8889: url('https:\/\/www.phippselectronics.com\/wp-content\/plugins\/woocommerce\/assets\/images\/icons\/loader.svg');}","hash":"0846e3fe-142d-4964-84b9-ad44168a8889","url":"https:\/\/www.phippselectronics.com\/wp-content\/plugins\/woocommerce\/assets\/images\/icons\/loader.svg"},{"selector":".woocommerce-js .loader","style":".woocommerce-js .loader::before{--wpr-bg-a40b777b-9582-4df2-b9de-dd6fa8742a49: url('https:\/\/www.phippselectronics.com\/wp-content\/plugins\/woocommerce\/assets\/images\/icons\/loader.svg');}","hash":"a40b777b-9582-4df2-b9de-dd6fa8742a49","url":"https:\/\/www.phippselectronics.com\/wp-content\/plugins\/woocommerce\/assets\/images\/icons\/loader.svg"},{"selector":"button.pswp__button","style":"button.pswp__button{--wpr-bg-826f914a-0298-4e82-90d7-75981c931569: url('https:\/\/www.phippselectronics.com\/wp-content\/plugins\/woocommerce\/assets\/css\/photoswipe\/default-skin\/default-skin.png');}","hash":"826f914a-0298-4e82-90d7-75981c931569","url":"https:\/\/www.phippselectronics.com\/wp-content\/plugins\/woocommerce\/assets\/css\/photoswipe\/default-skin\/default-skin.png"},{"selector":"#add_payment_method #payment div.payment_box .wc-credit-card-form-card-cvc.visa,#add_payment_method #payment div.payment_box .wc-credit-card-form-card-expiry.visa,#add_payment_method #payment div.payment_box .wc-credit-card-form-card-number.visa,.woocommerce-cart #payment div.payment_box .wc-credit-card-form-card-cvc.visa,.woocommerce-cart #payment div.payment_box .wc-credit-card-form-card-expiry.visa,.woocommerce-cart #payment div.payment_box .wc-credit-card-form-card-number.visa,.woocommerce-checkout #payment div.payment_box .wc-credit-card-form-card-cvc.visa,.woocommerce-checkout #payment div.payment_box .wc-credit-card-form-card-expiry.visa,.woocommerce-checkout #payment div.payment_box .wc-credit-card-form-card-number.visa","style":"#add_payment_method #payment div.payment_box .wc-credit-card-form-card-cvc.visa,#add_payment_method #payment div.payment_box .wc-credit-card-form-card-expiry.visa,#add_payment_method #payment div.payment_box .wc-credit-card-form-card-number.visa,.woocommerce-cart #payment div.payment_box .wc-credit-card-form-card-cvc.visa,.woocommerce-cart #payment div.payment_box .wc-credit-card-form-card-expiry.visa,.woocommerce-cart #payment div.payment_box .wc-credit-card-form-card-number.visa,.woocommerce-checkout #payment div.payment_box .wc-credit-card-form-card-cvc.visa,.woocommerce-checkout #payment div.payment_box .wc-credit-card-form-card-expiry.visa,.woocommerce-checkout #payment div.payment_box .wc-credit-card-form-card-number.visa{--wpr-bg-382fc6fa-4c57-4131-992b-842fdbcb0daf: url('https:\/\/www.phippselectronics.com\/wp-content\/plugins\/woocommerce\/assets\/images\/icons\/credit-cards\/visa.svg');}","hash":"382fc6fa-4c57-4131-992b-842fdbcb0daf","url":"https:\/\/www.phippselectronics.com\/wp-content\/plugins\/woocommerce\/assets\/images\/icons\/credit-cards\/visa.svg"},{"selector":"#add_payment_method #payment div.payment_box .wc-credit-card-form-card-cvc.mastercard,#add_payment_method #payment div.payment_box .wc-credit-card-form-card-expiry.mastercard,#add_payment_method #payment div.payment_box .wc-credit-card-form-card-number.mastercard,.woocommerce-cart #payment div.payment_box .wc-credit-card-form-card-cvc.mastercard,.woocommerce-cart #payment div.payment_box .wc-credit-card-form-card-expiry.mastercard,.woocommerce-cart #payment div.payment_box .wc-credit-card-form-card-number.mastercard,.woocommerce-checkout #payment div.payment_box .wc-credit-card-form-card-cvc.mastercard,.woocommerce-checkout #payment div.payment_box .wc-credit-card-form-card-expiry.mastercard,.woocommerce-checkout #payment div.payment_box .wc-credit-card-form-card-number.mastercard","style":"#add_payment_method #payment div.payment_box .wc-credit-card-form-card-cvc.mastercard,#add_payment_method #payment div.payment_box .wc-credit-card-form-card-expiry.mastercard,#add_payment_method #payment div.payment_box .wc-credit-card-form-card-number.mastercard,.woocommerce-cart #payment div.payment_box .wc-credit-card-form-card-cvc.mastercard,.woocommerce-cart #payment div.payment_box .wc-credit-card-form-card-expiry.mastercard,.woocommerce-cart #payment div.payment_box .wc-credit-card-form-card-number.mastercard,.woocommerce-checkout #payment div.payment_box .wc-credit-card-form-card-cvc.mastercard,.woocommerce-checkout #payment div.payment_box .wc-credit-card-form-card-expiry.mastercard,.woocommerce-checkout #payment div.payment_box .wc-credit-card-form-card-number.mastercard{--wpr-bg-41c7723d-fab7-4354-bb73-f47bcd317aea: url('https:\/\/www.phippselectronics.com\/wp-content\/plugins\/woocommerce\/assets\/images\/icons\/credit-cards\/mastercard.svg');}","hash":"41c7723d-fab7-4354-bb73-f47bcd317aea","url":"https:\/\/www.phippselectronics.com\/wp-content\/plugins\/woocommerce\/assets\/images\/icons\/credit-cards\/mastercard.svg"},{"selector":"#add_payment_method #payment div.payment_box .wc-credit-card-form-card-cvc.laser,#add_payment_method #payment div.payment_box .wc-credit-card-form-card-expiry.laser,#add_payment_method #payment div.payment_box .wc-credit-card-form-card-number.laser,.woocommerce-cart #payment div.payment_box .wc-credit-card-form-card-cvc.laser,.woocommerce-cart #payment div.payment_box .wc-credit-card-form-card-expiry.laser,.woocommerce-cart #payment div.payment_box .wc-credit-card-form-card-number.laser,.woocommerce-checkout #payment div.payment_box .wc-credit-card-form-card-cvc.laser,.woocommerce-checkout #payment div.payment_box .wc-credit-card-form-card-expiry.laser,.woocommerce-checkout #payment div.payment_box .wc-credit-card-form-card-number.laser","style":"#add_payment_method #payment div.payment_box .wc-credit-card-form-card-cvc.laser,#add_payment_method #payment div.payment_box .wc-credit-card-form-card-expiry.laser,#add_payment_method #payment div.payment_box .wc-credit-card-form-card-number.laser,.woocommerce-cart #payment div.payment_box .wc-credit-card-form-card-cvc.laser,.woocommerce-cart #payment div.payment_box .wc-credit-card-form-card-expiry.laser,.woocommerce-cart #payment div.payment_box .wc-credit-card-form-card-number.laser,.woocommerce-checkout #payment div.payment_box .wc-credit-card-form-card-cvc.laser,.woocommerce-checkout #payment div.payment_box .wc-credit-card-form-card-expiry.laser,.woocommerce-checkout #payment div.payment_box .wc-credit-card-form-card-number.laser{--wpr-bg-a669b83a-b77a-4f78-a1eb-b98c3b419717: url('https:\/\/www.phippselectronics.com\/wp-content\/plugins\/woocommerce\/assets\/images\/icons\/credit-cards\/laser.svg');}","hash":"a669b83a-b77a-4f78-a1eb-b98c3b419717","url":"https:\/\/www.phippselectronics.com\/wp-content\/plugins\/woocommerce\/assets\/images\/icons\/credit-cards\/laser.svg"},{"selector":"#add_payment_method #payment div.payment_box .wc-credit-card-form-card-cvc.dinersclub,#add_payment_method #payment div.payment_box .wc-credit-card-form-card-expiry.dinersclub,#add_payment_method #payment div.payment_box .wc-credit-card-form-card-number.dinersclub,.woocommerce-cart #payment div.payment_box .wc-credit-card-form-card-cvc.dinersclub,.woocommerce-cart #payment div.payment_box .wc-credit-card-form-card-expiry.dinersclub,.woocommerce-cart #payment div.payment_box .wc-credit-card-form-card-number.dinersclub,.woocommerce-checkout #payment div.payment_box .wc-credit-card-form-card-cvc.dinersclub,.woocommerce-checkout #payment div.payment_box .wc-credit-card-form-card-expiry.dinersclub,.woocommerce-checkout #payment div.payment_box .wc-credit-card-form-card-number.dinersclub","style":"#add_payment_method #payment div.payment_box .wc-credit-card-form-card-cvc.dinersclub,#add_payment_method #payment div.payment_box .wc-credit-card-form-card-expiry.dinersclub,#add_payment_method #payment div.payment_box .wc-credit-card-form-card-number.dinersclub,.woocommerce-cart #payment div.payment_box .wc-credit-card-form-card-cvc.dinersclub,.woocommerce-cart #payment div.payment_box .wc-credit-card-form-card-expiry.dinersclub,.woocommerce-cart #payment div.payment_box .wc-credit-card-form-card-number.dinersclub,.woocommerce-checkout #payment div.payment_box .wc-credit-card-form-card-cvc.dinersclub,.woocommerce-checkout #payment div.payment_box .wc-credit-card-form-card-expiry.dinersclub,.woocommerce-checkout #payment div.payment_box .wc-credit-card-form-card-number.dinersclub{--wpr-bg-70d52f51-b6dc-4d78-a0de-5c9165e4edc3: url('https:\/\/www.phippselectronics.com\/wp-content\/plugins\/woocommerce\/assets\/images\/icons\/credit-cards\/diners.svg');}","hash":"70d52f51-b6dc-4d78-a0de-5c9165e4edc3","url":"https:\/\/www.phippselectronics.com\/wp-content\/plugins\/woocommerce\/assets\/images\/icons\/credit-cards\/diners.svg"},{"selector":"#add_payment_method #payment div.payment_box .wc-credit-card-form-card-cvc.maestro,#add_payment_method #payment div.payment_box .wc-credit-card-form-card-expiry.maestro,#add_payment_method #payment div.payment_box .wc-credit-card-form-card-number.maestro,.woocommerce-cart #payment div.payment_box .wc-credit-card-form-card-cvc.maestro,.woocommerce-cart #payment div.payment_box .wc-credit-card-form-card-expiry.maestro,.woocommerce-cart #payment div.payment_box .wc-credit-card-form-card-number.maestro,.woocommerce-checkout #payment div.payment_box .wc-credit-card-form-card-cvc.maestro,.woocommerce-checkout #payment div.payment_box .wc-credit-card-form-card-expiry.maestro,.woocommerce-checkout #payment div.payment_box .wc-credit-card-form-card-number.maestro","style":"#add_payment_method #payment div.payment_box .wc-credit-card-form-card-cvc.maestro,#add_payment_method #payment div.payment_box .wc-credit-card-form-card-expiry.maestro,#add_payment_method #payment div.payment_box .wc-credit-card-form-card-number.maestro,.woocommerce-cart #payment div.payment_box .wc-credit-card-form-card-cvc.maestro,.woocommerce-cart #payment div.payment_box .wc-credit-card-form-card-expiry.maestro,.woocommerce-cart #payment div.payment_box .wc-credit-card-form-card-number.maestro,.woocommerce-checkout #payment div.payment_box .wc-credit-card-form-card-cvc.maestro,.woocommerce-checkout #payment div.payment_box .wc-credit-card-form-card-expiry.maestro,.woocommerce-checkout #payment div.payment_box .wc-credit-card-form-card-number.maestro{--wpr-bg-9168df8f-eda5-4990-9ceb-e2f5a70afa03: url('https:\/\/www.phippselectronics.com\/wp-content\/plugins\/woocommerce\/assets\/images\/icons\/credit-cards\/maestro.svg');}","hash":"9168df8f-eda5-4990-9ceb-e2f5a70afa03","url":"https:\/\/www.phippselectronics.com\/wp-content\/plugins\/woocommerce\/assets\/images\/icons\/credit-cards\/maestro.svg"},{"selector":"#add_payment_method #payment div.payment_box .wc-credit-card-form-card-cvc.jcb,#add_payment_method #payment div.payment_box .wc-credit-card-form-card-expiry.jcb,#add_payment_method #payment div.payment_box .wc-credit-card-form-card-number.jcb,.woocommerce-cart #payment div.payment_box .wc-credit-card-form-card-cvc.jcb,.woocommerce-cart #payment div.payment_box .wc-credit-card-form-card-expiry.jcb,.woocommerce-cart #payment div.payment_box .wc-credit-card-form-card-number.jcb,.woocommerce-checkout #payment div.payment_box .wc-credit-card-form-card-cvc.jcb,.woocommerce-checkout #payment div.payment_box .wc-credit-card-form-card-expiry.jcb,.woocommerce-checkout #payment div.payment_box .wc-credit-card-form-card-number.jcb","style":"#add_payment_method #payment div.payment_box .wc-credit-card-form-card-cvc.jcb,#add_payment_method #payment div.payment_box .wc-credit-card-form-card-expiry.jcb,#add_payment_method #payment div.payment_box .wc-credit-card-form-card-number.jcb,.woocommerce-cart #payment div.payment_box .wc-credit-card-form-card-cvc.jcb,.woocommerce-cart #payment div.payment_box .wc-credit-card-form-card-expiry.jcb,.woocommerce-cart #payment div.payment_box .wc-credit-card-form-card-number.jcb,.woocommerce-checkout #payment div.payment_box .wc-credit-card-form-card-cvc.jcb,.woocommerce-checkout #payment div.payment_box .wc-credit-card-form-card-expiry.jcb,.woocommerce-checkout #payment div.payment_box .wc-credit-card-form-card-number.jcb{--wpr-bg-4281cfe1-ca05-4438-8019-0838280c05fc: url('https:\/\/www.phippselectronics.com\/wp-content\/plugins\/woocommerce\/assets\/images\/icons\/credit-cards\/jcb.svg');}","hash":"4281cfe1-ca05-4438-8019-0838280c05fc","url":"https:\/\/www.phippselectronics.com\/wp-content\/plugins\/woocommerce\/assets\/images\/icons\/credit-cards\/jcb.svg"},{"selector":"#add_payment_method #payment div.payment_box .wc-credit-card-form-card-cvc.amex,#add_payment_method #payment div.payment_box .wc-credit-card-form-card-expiry.amex,#add_payment_method #payment div.payment_box .wc-credit-card-form-card-number.amex,.woocommerce-cart #payment div.payment_box .wc-credit-card-form-card-cvc.amex,.woocommerce-cart #payment div.payment_box .wc-credit-card-form-card-expiry.amex,.woocommerce-cart #payment div.payment_box .wc-credit-card-form-card-number.amex,.woocommerce-checkout #payment div.payment_box .wc-credit-card-form-card-cvc.amex,.woocommerce-checkout #payment div.payment_box .wc-credit-card-form-card-expiry.amex,.woocommerce-checkout #payment div.payment_box .wc-credit-card-form-card-number.amex","style":"#add_payment_method #payment div.payment_box .wc-credit-card-form-card-cvc.amex,#add_payment_method #payment div.payment_box .wc-credit-card-form-card-expiry.amex,#add_payment_method #payment div.payment_box .wc-credit-card-form-card-number.amex,.woocommerce-cart #payment div.payment_box .wc-credit-card-form-card-cvc.amex,.woocommerce-cart #payment div.payment_box .wc-credit-card-form-card-expiry.amex,.woocommerce-cart #payment div.payment_box .wc-credit-card-form-card-number.amex,.woocommerce-checkout #payment div.payment_box .wc-credit-card-form-card-cvc.amex,.woocommerce-checkout #payment div.payment_box .wc-credit-card-form-card-expiry.amex,.woocommerce-checkout #payment div.payment_box .wc-credit-card-form-card-number.amex{--wpr-bg-8d9bacb0-df34-4b30-9967-055299bd6d5f: url('https:\/\/www.phippselectronics.com\/wp-content\/plugins\/woocommerce\/assets\/images\/icons\/credit-cards\/amex.svg');}","hash":"8d9bacb0-df34-4b30-9967-055299bd6d5f","url":"https:\/\/www.phippselectronics.com\/wp-content\/plugins\/woocommerce\/assets\/images\/icons\/credit-cards\/amex.svg"},{"selector":"#add_payment_method #payment div.payment_box .wc-credit-card-form-card-cvc.discover,#add_payment_method #payment div.payment_box .wc-credit-card-form-card-expiry.discover,#add_payment_method #payment div.payment_box .wc-credit-card-form-card-number.discover,.woocommerce-cart #payment div.payment_box .wc-credit-card-form-card-cvc.discover,.woocommerce-cart #payment div.payment_box .wc-credit-card-form-card-expiry.discover,.woocommerce-cart #payment div.payment_box .wc-credit-card-form-card-number.discover,.woocommerce-checkout #payment div.payment_box .wc-credit-card-form-card-cvc.discover,.woocommerce-checkout #payment div.payment_box .wc-credit-card-form-card-expiry.discover,.woocommerce-checkout #payment div.payment_box .wc-credit-card-form-card-number.discover","style":"#add_payment_method #payment div.payment_box .wc-credit-card-form-card-cvc.discover,#add_payment_method #payment div.payment_box .wc-credit-card-form-card-expiry.discover,#add_payment_method #payment div.payment_box .wc-credit-card-form-card-number.discover,.woocommerce-cart #payment div.payment_box .wc-credit-card-form-card-cvc.discover,.woocommerce-cart #payment div.payment_box .wc-credit-card-form-card-expiry.discover,.woocommerce-cart #payment div.payment_box .wc-credit-card-form-card-number.discover,.woocommerce-checkout #payment div.payment_box .wc-credit-card-form-card-cvc.discover,.woocommerce-checkout #payment div.payment_box .wc-credit-card-form-card-expiry.discover,.woocommerce-checkout #payment div.payment_box .wc-credit-card-form-card-number.discover{--wpr-bg-28227cd9-5477-493b-955f-2d8154853ab3: url('https:\/\/www.phippselectronics.com\/wp-content\/plugins\/woocommerce\/assets\/images\/icons\/credit-cards\/discover.svg');}","hash":"28227cd9-5477-493b-955f-2d8154853ab3","url":"https:\/\/www.phippselectronics.com\/wp-content\/plugins\/woocommerce\/assets\/images\/icons\/credit-cards\/discover.svg"},{"selector":".zm-loader","style":".zm-loader:before{--wpr-bg-739f8cab-d401-4f8b-9172-888af181354d: url('https:\/\/www.phippselectronics.com\/wp-content\/plugins\/woocommerce\/assets\/images\/icons\/loader.svg');}","hash":"739f8cab-d401-4f8b-9172-888af181354d","url":"https:\/\/www.phippselectronics.com\/wp-content\/plugins\/woocommerce\/assets\/images\/icons\/loader.svg"},{"selector":".yith-ywot-empty-state-container","style":".yith-ywot-empty-state-container{--wpr-bg-80d8f5b9-8fba-498b-90b1-8c37c2fff516: url('https:\/\/www.phippselectronics.com\/wp-content\/plugins\/yith-woocommerce-order-tracking-premium\/assets\/images\/carriers.jpg');}","hash":"80d8f5b9-8fba-498b-90b1-8c37c2fff516","url":"https:\/\/www.phippselectronics.com\/wp-content\/plugins\/yith-woocommerce-order-tracking-premium\/assets\/images\/carriers.jpg"},{"selector":".dgwt-wcas-inner-preloader","style":".dgwt-wcas-inner-preloader{--wpr-bg-9153d084-f338-443a-9211-b42ab9490c5f: url('https:\/\/www.phippselectronics.com\/wp-content\/plugins\/ajax-search-for-woocommerce-premium\/assets\/img\/preloader.gif');}","hash":"9153d084-f338-443a-9211-b42ab9490c5f","url":"https:\/\/www.phippselectronics.com\/wp-content\/plugins\/ajax-search-for-woocommerce-premium\/assets\/img\/preloader.gif"},{"selector":".woocommerce-checkout #payment div.payment_box input.js-sv-wc-payment-gateway-credit-card-form-account-number,#add_payment_method input.js-sv-wc-payment-gateway-credit-card-form-account-number","style":".woocommerce-checkout #payment div.payment_box input.js-sv-wc-payment-gateway-credit-card-form-account-number,#add_payment_method input.js-sv-wc-payment-gateway-credit-card-form-account-number{--wpr-bg-ff6834e3-2e70-43d3-9966-081711d8a33e: url('https:\/\/www.phippselectronics.com\/wp-content\/plugins\/woocommerce-gateway-paypal-powered-by-braintree\/vendor\/skyverge\/wc-plugin-framework\/woocommerce\/payment-gateway\/assets\/images\/card-cc-plain.svg');}","hash":"ff6834e3-2e70-43d3-9966-081711d8a33e","url":"https:\/\/www.phippselectronics.com\/wp-content\/plugins\/woocommerce-gateway-paypal-powered-by-braintree\/vendor\/skyverge\/wc-plugin-framework\/woocommerce\/payment-gateway\/assets\/images\/card-cc-plain.svg"},{"selector":".woocommerce-checkout #payment div.payment_box input.js-sv-wc-payment-gateway-credit-card-form-account-number.visa,#add_payment_method input.js-sv-wc-payment-gateway-credit-card-form-account-number.visa","style":".woocommerce-checkout #payment div.payment_box input.js-sv-wc-payment-gateway-credit-card-form-account-number.visa,#add_payment_method input.js-sv-wc-payment-gateway-credit-card-form-account-number.visa{--wpr-bg-0a28889a-f8bc-4ac4-aaf5-a4d56958a2be: url('https:\/\/www.phippselectronics.com\/wp-content\/plugins\/woocommerce-gateway-paypal-powered-by-braintree\/vendor\/skyverge\/wc-plugin-framework\/woocommerce\/payment-gateway\/assets\/images\/card-visa.svg');}","hash":"0a28889a-f8bc-4ac4-aaf5-a4d56958a2be","url":"https:\/\/www.phippselectronics.com\/wp-content\/plugins\/woocommerce-gateway-paypal-powered-by-braintree\/vendor\/skyverge\/wc-plugin-framework\/woocommerce\/payment-gateway\/assets\/images\/card-visa.svg"},{"selector":".woocommerce-checkout #payment div.payment_box input.js-sv-wc-payment-gateway-credit-card-form-account-number.mastercard,#add_payment_method input.js-sv-wc-payment-gateway-credit-card-form-account-number.mastercard","style":".woocommerce-checkout #payment div.payment_box input.js-sv-wc-payment-gateway-credit-card-form-account-number.mastercard,#add_payment_method input.js-sv-wc-payment-gateway-credit-card-form-account-number.mastercard{--wpr-bg-db8206fe-cf22-4600-bd27-90d7cdee2ac9: url('https:\/\/www.phippselectronics.com\/wp-content\/plugins\/woocommerce-gateway-paypal-powered-by-braintree\/vendor\/skyverge\/wc-plugin-framework\/woocommerce\/payment-gateway\/assets\/images\/card-mastercard.svg');}","hash":"db8206fe-cf22-4600-bd27-90d7cdee2ac9","url":"https:\/\/www.phippselectronics.com\/wp-content\/plugins\/woocommerce-gateway-paypal-powered-by-braintree\/vendor\/skyverge\/wc-plugin-framework\/woocommerce\/payment-gateway\/assets\/images\/card-mastercard.svg"},{"selector":".woocommerce-checkout #payment div.payment_box input.js-sv-wc-payment-gateway-credit-card-form-account-number.dinersclub,#add_payment_method input.js-sv-wc-payment-gateway-credit-card-form-account-number.dinersclub","style":".woocommerce-checkout #payment div.payment_box input.js-sv-wc-payment-gateway-credit-card-form-account-number.dinersclub,#add_payment_method input.js-sv-wc-payment-gateway-credit-card-form-account-number.dinersclub{--wpr-bg-06d19fd1-66d8-47cf-a01f-b54c64d7dcb0: url('https:\/\/www.phippselectronics.com\/wp-content\/plugins\/woocommerce-gateway-paypal-powered-by-braintree\/vendor\/skyverge\/wc-plugin-framework\/woocommerce\/payment-gateway\/assets\/images\/card-dinersclub.svg');}","hash":"06d19fd1-66d8-47cf-a01f-b54c64d7dcb0","url":"https:\/\/www.phippselectronics.com\/wp-content\/plugins\/woocommerce-gateway-paypal-powered-by-braintree\/vendor\/skyverge\/wc-plugin-framework\/woocommerce\/payment-gateway\/assets\/images\/card-dinersclub.svg"},{"selector":".woocommerce-checkout #payment div.payment_box input.js-sv-wc-payment-gateway-credit-card-form-account-number.maestro,#add_payment_method input.js-sv-wc-payment-gateway-credit-card-form-account-number.maestro","style":".woocommerce-checkout #payment div.payment_box input.js-sv-wc-payment-gateway-credit-card-form-account-number.maestro,#add_payment_method input.js-sv-wc-payment-gateway-credit-card-form-account-number.maestro{--wpr-bg-ed0c82e3-65f5-474d-8fb1-19869ff926cf: url('https:\/\/www.phippselectronics.com\/wp-content\/plugins\/woocommerce-gateway-paypal-powered-by-braintree\/vendor\/skyverge\/wc-plugin-framework\/woocommerce\/payment-gateway\/assets\/images\/card-maestro.svg');}","hash":"ed0c82e3-65f5-474d-8fb1-19869ff926cf","url":"https:\/\/www.phippselectronics.com\/wp-content\/plugins\/woocommerce-gateway-paypal-powered-by-braintree\/vendor\/skyverge\/wc-plugin-framework\/woocommerce\/payment-gateway\/assets\/images\/card-maestro.svg"},{"selector":".woocommerce-checkout #payment div.payment_box input.js-sv-wc-payment-gateway-credit-card-form-account-number.jcb,#add_payment_method input.js-sv-wc-payment-gateway-credit-card-form-account-number.jcb","style":".woocommerce-checkout #payment div.payment_box input.js-sv-wc-payment-gateway-credit-card-form-account-number.jcb,#add_payment_method input.js-sv-wc-payment-gateway-credit-card-form-account-number.jcb{--wpr-bg-413f72a8-4e18-486e-81af-928ff8103642: url('https:\/\/www.phippselectronics.com\/wp-content\/plugins\/woocommerce-gateway-paypal-powered-by-braintree\/vendor\/skyverge\/wc-plugin-framework\/woocommerce\/payment-gateway\/assets\/images\/card-jcb.svg');}","hash":"413f72a8-4e18-486e-81af-928ff8103642","url":"https:\/\/www.phippselectronics.com\/wp-content\/plugins\/woocommerce-gateway-paypal-powered-by-braintree\/vendor\/skyverge\/wc-plugin-framework\/woocommerce\/payment-gateway\/assets\/images\/card-jcb.svg"},{"selector":".woocommerce-checkout #payment div.payment_box input.js-sv-wc-payment-gateway-credit-card-form-account-number.amex,#add_payment_method input.js-sv-wc-payment-gateway-credit-card-form-account-number.amex","style":".woocommerce-checkout #payment div.payment_box input.js-sv-wc-payment-gateway-credit-card-form-account-number.amex,#add_payment_method input.js-sv-wc-payment-gateway-credit-card-form-account-number.amex{--wpr-bg-58828694-3b45-4441-b7b9-7cd1e8dbf519: url('https:\/\/www.phippselectronics.com\/wp-content\/plugins\/woocommerce-gateway-paypal-powered-by-braintree\/vendor\/skyverge\/wc-plugin-framework\/woocommerce\/payment-gateway\/assets\/images\/card-amex.svg');}","hash":"58828694-3b45-4441-b7b9-7cd1e8dbf519","url":"https:\/\/www.phippselectronics.com\/wp-content\/plugins\/woocommerce-gateway-paypal-powered-by-braintree\/vendor\/skyverge\/wc-plugin-framework\/woocommerce\/payment-gateway\/assets\/images\/card-amex.svg"},{"selector":".woocommerce-checkout #payment div.payment_box input.js-sv-wc-payment-gateway-credit-card-form-account-number.discover,#add_payment_method input.js-sv-wc-payment-gateway-credit-card-form-account-number.discover","style":".woocommerce-checkout #payment div.payment_box input.js-sv-wc-payment-gateway-credit-card-form-account-number.discover,#add_payment_method input.js-sv-wc-payment-gateway-credit-card-form-account-number.discover{--wpr-bg-36378bdf-91a8-44cd-b58e-e75894742dfd: url('https:\/\/www.phippselectronics.com\/wp-content\/plugins\/woocommerce-gateway-paypal-powered-by-braintree\/vendor\/skyverge\/wc-plugin-framework\/woocommerce\/payment-gateway\/assets\/images\/card-discover.svg');}","hash":"36378bdf-91a8-44cd-b58e-e75894742dfd","url":"https:\/\/www.phippselectronics.com\/wp-content\/plugins\/woocommerce-gateway-paypal-powered-by-braintree\/vendor\/skyverge\/wc-plugin-framework\/woocommerce\/payment-gateway\/assets\/images\/card-discover.svg"},{"selector":".woocommerce-checkout #payment div.payment_box input.js-sv-wc-payment-gateway-credit-card-form-account-number.visaelectron,#add_payment_method input.js-sv-wc-payment-gateway-credit-card-form-account-number.visaelectron","style":".woocommerce-checkout #payment div.payment_box input.js-sv-wc-payment-gateway-credit-card-form-account-number.visaelectron,#add_payment_method input.js-sv-wc-payment-gateway-credit-card-form-account-number.visaelectron{--wpr-bg-a21db38c-4270-4651-ba9d-33360a979c42: url('https:\/\/www.phippselectronics.com\/wp-content\/plugins\/woocommerce-gateway-paypal-powered-by-braintree\/vendor\/skyverge\/wc-plugin-framework\/woocommerce\/payment-gateway\/assets\/images\/card-visa-electron.svg');}","hash":"a21db38c-4270-4651-ba9d-33360a979c42","url":"https:\/\/www.phippselectronics.com\/wp-content\/plugins\/woocommerce-gateway-paypal-powered-by-braintree\/vendor\/skyverge\/wc-plugin-framework\/woocommerce\/payment-gateway\/assets\/images\/card-visa-electron.svg"},{"selector":".woocommerce-checkout #payment div.payment_box input.js-sv-wc-payment-gateway-credit-card-form-account-number.invalid-card-type,#add_payment_method input.js-sv-wc-payment-gateway-credit-card-form-account-number.invalid-card-type","style":".woocommerce-checkout #payment div.payment_box input.js-sv-wc-payment-gateway-credit-card-form-account-number.invalid-card-type,#add_payment_method input.js-sv-wc-payment-gateway-credit-card-form-account-number.invalid-card-type{--wpr-bg-0608c577-9088-4a69-901f-9fcc868ae446: url('https:\/\/www.phippselectronics.com\/wp-content\/plugins\/woocommerce-gateway-paypal-powered-by-braintree\/vendor\/skyverge\/wc-plugin-framework\/woocommerce\/payment-gateway\/assets\/images\/card-cc-invalid.svg');}","hash":"0608c577-9088-4a69-901f-9fcc868ae446","url":"https:\/\/www.phippselectronics.com\/wp-content\/plugins\/woocommerce-gateway-paypal-powered-by-braintree\/vendor\/skyverge\/wc-plugin-framework\/woocommerce\/payment-gateway\/assets\/images\/card-cc-invalid.svg"},{"selector":".yith-ywar-main-wrapper .yith-ywar-filter-data .filter-buttons .filter-button.rating-label","style":".yith-ywar-main-wrapper .yith-ywar-filter-data .filter-buttons .filter-button.rating-label:after{--wpr-bg-82ef3a2e-3275-43cf-ba93-12935c4a04c5: url('https:\/\/www.phippselectronics.com\/wp-content\/plugins\/yith-woocommerce-advanced-reviews-premium\/assets\/images\/close.svg');}","hash":"82ef3a2e-3275-43cf-ba93-12935c4a04c5","url":"https:\/\/www.phippselectronics.com\/wp-content\/plugins\/yith-woocommerce-advanced-reviews-premium\/assets\/images\/close.svg"},{"selector":".gform_wrapper.gravity-theme .chosen-container-single .chosen-single abbr","style":".gform_wrapper.gravity-theme .chosen-container-single .chosen-single abbr{--wpr-bg-429cc130-f4b7-4cdf-8a0f-30a6fd233323: url('https:\/\/www.phippselectronics.com\/wp-content\/plugins\/gravityforms\/legacy\/css\/chosen-sprite.png');}","hash":"429cc130-f4b7-4cdf-8a0f-30a6fd233323","url":"https:\/\/www.phippselectronics.com\/wp-content\/plugins\/gravityforms\/legacy\/css\/chosen-sprite.png"},{"selector":".gform_wrapper.gravity-theme .chosen-container-single .chosen-single div b","style":".gform_wrapper.gravity-theme .chosen-container-single .chosen-single div b{--wpr-bg-68685c63-b760-462b-9c52-ea46e23b0daa: url('https:\/\/www.phippselectronics.com\/wp-content\/plugins\/gravityforms\/legacy\/css\/chosen-sprite.png');}","hash":"68685c63-b760-462b-9c52-ea46e23b0daa","url":"https:\/\/www.phippselectronics.com\/wp-content\/plugins\/gravityforms\/legacy\/css\/chosen-sprite.png"},{"selector":".gform_wrapper.gravity-theme .chosen-container-single .chosen-search input[type=text]","style":".gform_wrapper.gravity-theme .chosen-container-single .chosen-search input[type=text]{--wpr-bg-5fc81c24-9e6a-4a94-9b5c-224eb37db6ac: url('https:\/\/www.phippselectronics.com\/wp-content\/plugins\/gravityforms\/legacy\/css\/chosen-sprite.png');}","hash":"5fc81c24-9e6a-4a94-9b5c-224eb37db6ac","url":"https:\/\/www.phippselectronics.com\/wp-content\/plugins\/gravityforms\/legacy\/css\/chosen-sprite.png"},{"selector":".gform_wrapper.gravity-theme .chosen-container-multi .chosen-choices li.search-choice .search-choice-close","style":".gform_wrapper.gravity-theme .chosen-container-multi .chosen-choices li.search-choice .search-choice-close{--wpr-bg-7b3b29a6-04aa-46b7-ac45-87c35763de19: url('https:\/\/www.phippselectronics.com\/wp-content\/plugins\/gravityforms\/legacy\/css\/chosen-sprite.png');}","hash":"7b3b29a6-04aa-46b7-ac45-87c35763de19","url":"https:\/\/www.phippselectronics.com\/wp-content\/plugins\/gravityforms\/legacy\/css\/chosen-sprite.png"},{"selector":".gform_wrapper.gravity-theme .chosen-rtl .chosen-search input[type=text]","style":".gform_wrapper.gravity-theme .chosen-rtl .chosen-search input[type=text]{--wpr-bg-7986b95a-6b53-4382-8132-d77ca3ab9e5a: url('https:\/\/www.phippselectronics.com\/wp-content\/plugins\/gravityforms\/legacy\/css\/chosen-sprite.png');}","hash":"7986b95a-6b53-4382-8132-d77ca3ab9e5a","url":"https:\/\/www.phippselectronics.com\/wp-content\/plugins\/gravityforms\/legacy\/css\/chosen-sprite.png"},{"selector":".gform_wrapper.gravity-theme .gform_card_icon_container div.gform_card_icon.gform_card_icon_selected","style":".gform_wrapper.gravity-theme .gform_card_icon_container div.gform_card_icon.gform_card_icon_selected::after{--wpr-bg-623e26b8-868b-48f7-81aa-75bac107972f: url('https:\/\/www.phippselectronics.com\/wp-content\/plugins\/gravityforms\/images\/gf-creditcards-check.svg');}","hash":"623e26b8-868b-48f7-81aa-75bac107972f","url":"https:\/\/www.phippselectronics.com\/wp-content\/plugins\/gravityforms\/images\/gf-creditcards-check.svg"},{"selector":".gform_wrapper.gravity-theme .gfield_list_icons button","style":".gform_wrapper.gravity-theme .gfield_list_icons button{--wpr-bg-13d75d6f-3b7f-4218-b583-edac635adb6f: url('https:\/\/www.phippselectronics.com\/wp-content\/plugins\/gravityforms\/images\/list-add.svg');}","hash":"13d75d6f-3b7f-4218-b583-edac635adb6f","url":"https:\/\/www.phippselectronics.com\/wp-content\/plugins\/gravityforms\/images\/list-add.svg"},{"selector":".gform_wrapper.gravity-theme .chosen-container .chosen-results-scroll-down span,.gform_wrapper.gravity-theme .chosen-container .chosen-results-scroll-up span,.gform_wrapper.gravity-theme .chosen-container-multi .chosen-choices .search-choice .search-choice-close,.gform_wrapper.gravity-theme .chosen-container-single .chosen-search input[type=text],.gform_wrapper.gravity-theme .chosen-container-single .chosen-single abbr,.gform_wrapper.gravity-theme .chosen-container-single .chosen-single div b,.gform_wrapper.gravity-theme .chosen-rtl .chosen-search input[type=text]","style":".gform_wrapper.gravity-theme .chosen-container .chosen-results-scroll-down span,.gform_wrapper.gravity-theme .chosen-container .chosen-results-scroll-up span,.gform_wrapper.gravity-theme .chosen-container-multi .chosen-choices .search-choice .search-choice-close,.gform_wrapper.gravity-theme .chosen-container-single .chosen-search input[type=text],.gform_wrapper.gravity-theme .chosen-container-single .chosen-single abbr,.gform_wrapper.gravity-theme .chosen-container-single .chosen-single div b,.gform_wrapper.gravity-theme .chosen-rtl .chosen-search input[type=text]{--wpr-bg-d575ff09-5983-499d-b93e-d149ebfcc1bb: url('https:\/\/www.phippselectronics.com\/wp-content\/plugins\/gravityforms\/legacy\/css\/chosen-sprite@2x.png');}","hash":"d575ff09-5983-499d-b93e-d149ebfcc1bb","url":"https:\/\/www.phippselectronics.com\/wp-content\/plugins\/gravityforms\/legacy\/css\/chosen-sprite@2x.png"},{"selector":".gform_wrapper.gravity-theme .gform_card_icon_container div.gform_card_icon","style":".gform_wrapper.gravity-theme .gform_card_icon_container div.gform_card_icon{--wpr-bg-c8396f5e-dcce-4dfb-9c8e-1180218de6a2: url('https:\/\/www.phippselectronics.com\/wp-content\/plugins\/gravityforms\/images\/gf-creditcards.svg');}","hash":"c8396f5e-dcce-4dfb-9c8e-1180218de6a2","url":"https:\/\/www.phippselectronics.com\/wp-content\/plugins\/gravityforms\/images\/gf-creditcards.svg"},{"selector":".gform_wrapper.gravity-theme .ginput_container_creditcard .ginput_card_security_code_icon","style":".gform_wrapper.gravity-theme .ginput_container_creditcard .ginput_card_security_code_icon{--wpr-bg-f2b298b3-b2d6-41d5-b2a7-dd69449cc457: url('https:\/\/www.phippselectronics.com\/wp-content\/plugins\/gravityforms\/images\/gf-creditcards.svg');}","hash":"f2b298b3-b2d6-41d5-b2a7-dd69449cc457","url":"https:\/\/www.phippselectronics.com\/wp-content\/plugins\/gravityforms\/images\/gf-creditcards.svg"},{"selector":".gform_wrapper.gravity-theme .gfield_list_icons button.delete_list_item","style":".gform_wrapper.gravity-theme .gfield_list_icons button.delete_list_item{--wpr-bg-d53d75d6-210a-44bf-a26b-cee6d3093ee6: url('https:\/\/www.phippselectronics.com\/wp-content\/plugins\/gravityforms\/images\/list-remove.svg');}","hash":"d53d75d6-210a-44bf-a26b-cee6d3093ee6","url":"https:\/\/www.phippselectronics.com\/wp-content\/plugins\/gravityforms\/images\/list-remove.svg"},{"selector":".gravity-theme.ui-datepicker .ui-datepicker-header select","style":".gravity-theme.ui-datepicker .ui-datepicker-header select{--wpr-bg-2372b264-8f30-4984-b0fc-a2060ca0d8e7: url('https:\/\/www.phippselectronics.com\/wp-content\/plugins\/gravityforms\/images\/theme\/down-arrow.svg');}","hash":"2372b264-8f30-4984-b0fc-a2060ca0d8e7","url":"https:\/\/www.phippselectronics.com\/wp-content\/plugins\/gravityforms\/images\/theme\/down-arrow.svg"},{"selector":"button.pswp__button","style":"button.pswp__button{--wpr-bg-ee178150-fc6b-4257-b299-1db82914cc2e: url('https:\/\/www.phippselectronics.com\/wp-content\/plugins\/woocommerce\/assets\/css\/photoswipe\/default-skin\/default-skin.png');}","hash":"ee178150-fc6b-4257-b299-1db82914cc2e","url":"https:\/\/www.phippselectronics.com\/wp-content\/plugins\/woocommerce\/assets\/css\/photoswipe\/default-skin\/default-skin.png"},{"selector":".pswp__button,.pswp__button--arrow--left,.pswp__button--arrow--right","style":".pswp__button,.pswp__button--arrow--left:before,.pswp__button--arrow--right:before{--wpr-bg-98b43960-e18a-4de4-ace3-e8d8fcf217a7: url('https:\/\/www.phippselectronics.com\/wp-content\/plugins\/woocommerce\/assets\/css\/photoswipe\/default-skin\/default-skin.png');}","hash":"98b43960-e18a-4de4-ace3-e8d8fcf217a7","url":"https:\/\/www.phippselectronics.com\/wp-content\/plugins\/woocommerce\/assets\/css\/photoswipe\/default-skin\/default-skin.png"},{"selector":".pswp__preloader--active .pswp__preloader__icn","style":".pswp__preloader--active .pswp__preloader__icn{--wpr-bg-eb35da31-3acb-400a-a52c-10b4e8bf1897: url('https:\/\/www.phippselectronics.com\/wp-content\/plugins\/woocommerce\/assets\/css\/photoswipe\/default-skin\/preloader.gif');}","hash":"eb35da31-3acb-400a-a52c-10b4e8bf1897","url":"https:\/\/www.phippselectronics.com\/wp-content\/plugins\/woocommerce\/assets\/css\/photoswipe\/default-skin\/preloader.gif"},{"selector":".pswp--svg .pswp__button,.pswp--svg .pswp__button--arrow--left,.pswp--svg .pswp__button--arrow--right","style":".pswp--svg .pswp__button,.pswp--svg .pswp__button--arrow--left:before,.pswp--svg .pswp__button--arrow--right:before{--wpr-bg-8b4e5892-ae51-4972-b848-71d5f65b16ba: url('https:\/\/www.phippselectronics.com\/wp-content\/plugins\/woocommerce\/assets\/css\/photoswipe\/default-skin\/default-skin.svg');}","hash":"8b4e5892-ae51-4972-b848-71d5f65b16ba","url":"https:\/\/www.phippselectronics.com\/wp-content\/plugins\/woocommerce\/assets\/css\/photoswipe\/default-skin\/default-skin.svg"},{"selector":".rll-youtube-player .play","style":".rll-youtube-player .play{--wpr-bg-f12cc713-75b3-4606-9a4e-139715ec2c4c: url('https:\/\/www.phippselectronics.com\/wp-content\/plugins\/wp-rocket\/assets\/img\/youtube.png');}","hash":"f12cc713-75b3-4606-9a4e-139715ec2c4c","url":"https:\/\/www.phippselectronics.com\/wp-content\/plugins\/wp-rocket\/assets\/img\/youtube.png"},{"selector":".css-sprite-motor_icon","style":".css-sprite-motor_icon{--wpr-bg-bf383cc8-11eb-4142-9b31-bcfd5c62d160: url('https:\/\/www.phippselectronics.com\/wp-content\/uploads\/2023\/10\/css-sprite-combined.png');}","hash":"bf383cc8-11eb-4142-9b31-bcfd5c62d160","url":"https:\/\/www.phippselectronics.com\/wp-content\/uploads\/2023\/10\/css-sprite-combined.png"},{"selector":".css-sprite-breadboard_icon","style":".css-sprite-breadboard_icon{--wpr-bg-5a14e0eb-5f2a-4f4f-abfa-69c81e765279: url('https:\/\/www.phippselectronics.com\/wp-content\/uploads\/2023\/10\/css-sprite-combined.png');}","hash":"5a14e0eb-5f2a-4f4f-abfa-69c81e765279","url":"https:\/\/www.phippselectronics.com\/wp-content\/uploads\/2023\/10\/css-sprite-combined.png"},{"selector":".css-sprite-led_icon","style":".css-sprite-led_icon{--wpr-bg-8dd59c05-e831-4966-9bde-8d1a9bb7f424: url('https:\/\/www.phippselectronics.com\/wp-content\/uploads\/2023\/10\/css-sprite-combined.png');}","hash":"8dd59c05-e831-4966-9bde-8d1a9bb7f424","url":"https:\/\/www.phippselectronics.com\/wp-content\/uploads\/2023\/10\/css-sprite-combined.png"},{"selector":".css-sprite-power_icon","style":".css-sprite-power_icon{--wpr-bg-b9f197b1-a681-4e1c-ac71-b53b85a5a0ea: url('https:\/\/www.phippselectronics.com\/wp-content\/uploads\/2023\/10\/css-sprite-combined.png');}","hash":"b9f197b1-a681-4e1c-ac71-b53b85a5a0ea","url":"https:\/\/www.phippselectronics.com\/wp-content\/uploads\/2023\/10\/css-sprite-combined.png"},{"selector":".css-sprite-fuse_icon","style":".css-sprite-fuse_icon{--wpr-bg-07f8d258-121e-434b-9d7d-ac4a187a70ea: url('https:\/\/www.phippselectronics.com\/wp-content\/uploads\/2023\/10\/css-sprite-combined.png');}","hash":"07f8d258-121e-434b-9d7d-ac4a187a70ea","url":"https:\/\/www.phippselectronics.com\/wp-content\/uploads\/2023\/10\/css-sprite-combined.png"},{"selector":".css-sprite-resistor_icon_2","style":".css-sprite-resistor_icon_2{--wpr-bg-86bc1af9-1e15-4fe9-a376-8bbc00c30109: url('https:\/\/www.phippselectronics.com\/wp-content\/uploads\/2023\/10\/css-sprite-combined.png');}","hash":"86bc1af9-1e15-4fe9-a376-8bbc00c30109","url":"https:\/\/www.phippselectronics.com\/wp-content\/uploads\/2023\/10\/css-sprite-combined.png"},{"selector":".css-sprite-transistor_icon","style":".css-sprite-transistor_icon{--wpr-bg-66196a66-6604-4f8e-a87c-da88f5ae663f: url('https:\/\/www.phippselectronics.com\/wp-content\/uploads\/2023\/10\/css-sprite-combined.png');}","hash":"66196a66-6604-4f8e-a87c-da88f5ae663f","url":"https:\/\/www.phippselectronics.com\/wp-content\/uploads\/2023\/10\/css-sprite-combined.png"},{"selector":".css-sprite-sensor_icon","style":".css-sprite-sensor_icon{--wpr-bg-d931abc4-e2ea-43de-80fe-4f31ec553e36: url('https:\/\/www.phippselectronics.com\/wp-content\/uploads\/2023\/10\/css-sprite-combined.png');}","hash":"d931abc4-e2ea-43de-80fe-4f31ec553e36","url":"https:\/\/www.phippselectronics.com\/wp-content\/uploads\/2023\/10\/css-sprite-combined.png"},{"selector":".css-sprite-capacitor_icon","style":".css-sprite-capacitor_icon{--wpr-bg-da6198ad-e847-4260-ac41-453777ffdecc: url('https:\/\/www.phippselectronics.com\/wp-content\/uploads\/2023\/10\/css-sprite-combined.png');}","hash":"da6198ad-e847-4260-ac41-453777ffdecc","url":"https:\/\/www.phippselectronics.com\/wp-content\/uploads\/2023\/10\/css-sprite-combined.png"},{"selector":".css-sprite-diode_icon","style":".css-sprite-diode_icon{--wpr-bg-e99de59c-b049-47f3-8753-17811c11a726: url('https:\/\/www.phippselectronics.com\/wp-content\/uploads\/2023\/10\/css-sprite-combined.png');}","hash":"e99de59c-b049-47f3-8753-17811c11a726","url":"https:\/\/www.phippselectronics.com\/wp-content\/uploads\/2023\/10\/css-sprite-combined.png"},{"selector":".css-sprite-logo-phipps-signature-black","style":".css-sprite-logo-phipps-signature-black{--wpr-bg-38c58bef-72e5-4166-aec0-90e28516af65: url('https:\/\/www.phippselectronics.com\/wp-content\/uploads\/2023\/10\/css-sprite-combined.png');}","hash":"38c58bef-72e5-4166-aec0-90e28516af65","url":"https:\/\/www.phippselectronics.com\/wp-content\/uploads\/2023\/10\/css-sprite-combined.png"}]; const rocket_excluded_pairs = [{"selector":".elementor-397637 .elementor-element.elementor-element-39d2aed:not(.elementor-motion-effects-element-type-background), .elementor-397637 .elementor-element.elementor-element-39d2aed > .elementor-motion-effects-container > .elementor-motion-effects-layer","style":".elementor-397637 .elementor-element.elementor-element-39d2aed:not(.elementor-motion-effects-element-type-background), .elementor-397637 .elementor-element.elementor-element-39d2aed > .elementor-motion-effects-container > .elementor-motion-effects-layer{--wpr-bg-d593058b-39d8-4202-a916-699e382319b6: url('https:\/\/www.phippselectronics.com\/wp-content\/uploads\/2022\/08\/Setting-up-a-NodeMCU-Server.jpg');}","hash":"d593058b-39d8-4202-a916-699e382319b6","url":"https:\/\/www.phippselectronics.com\/wp-content\/uploads\/2022\/08\/Setting-up-a-NodeMCU-Server.jpg"}];</script></head>\n";
  html += "<body>\n";
  html += "<h1>ESP8266 Web Server</h1> <h1>STA mode</h1>\n";
  html += "<h1>Press the button to toggle LED:</h1>\n";

  html += "<h1><a title=\"ledon\" href=\"ledon\">ledon</a></h1>\n";
  html += "<h1><a title=\"ledoff\" href=\"ledoff\">ledoff</a></h1>\n";

  html += "</body></html>\n";

 return html;
}
Converting HTML Code For Arduino
Prior to uploading HTML code to the device, some modifications need to be made to the code so it can be interpreted correctly.
To do that, there is a tool that can be used that allows raw HTML code to be pasted in, and it will then output the code in the correct format to be uploaded. Click the button below to open up the tool
Accessing The Webserver
After the code has been compiled and uploaded successfully, we’ll want to access the webpage. See the IP address of the web server through the Serial Monitor.
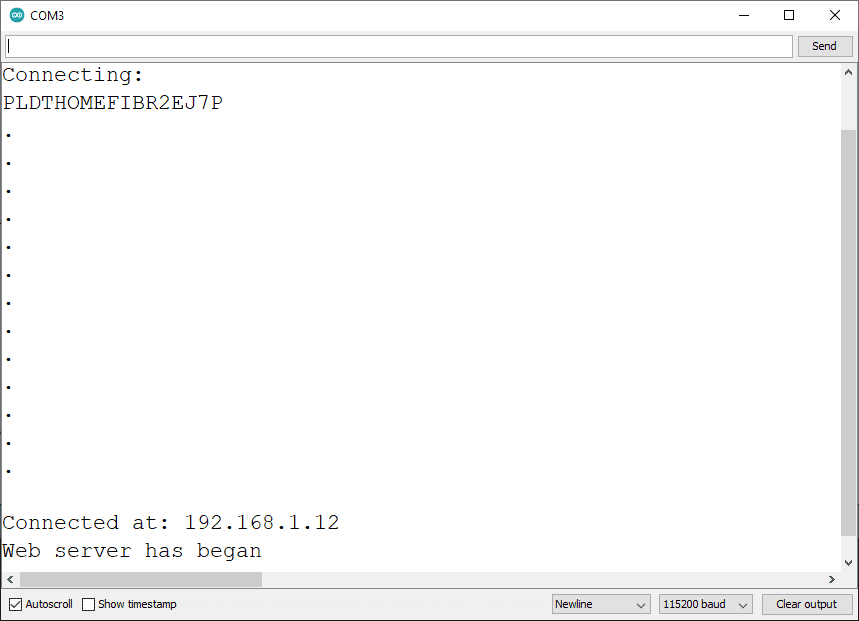
You should see the webpage that you had made. Click on the links and see both the link address and LED change accordingly.