These days almost every smartphone has Bluetooth. How awesome would it be if you could control the world by using just your phone’s Bluetooth feature? Well, it’s possible and simply, and it is precisely what we will learn right now!
Introduction
Simple bare-metal microcontroller code runs on the basis of a never-ending loop. This situation is unlike what’s being employed on more complex systems such as Embedded OSs or CPUs where several tasks or threads run along with each other. Each of these tasks and threads has its own main loop. As simple systems need only simple, easy-to-understand code, there’s no point in implementing complex systems; and this is where basic state machines may come into play.
What is a State Machine?
A state machine is a graphical representation of states, transitions, and input and output parameters of a given process or function. It’s a very useful tool in engineering as it can both abstract and simplify processes. Consider a fairly simple state machine for pressing a button:
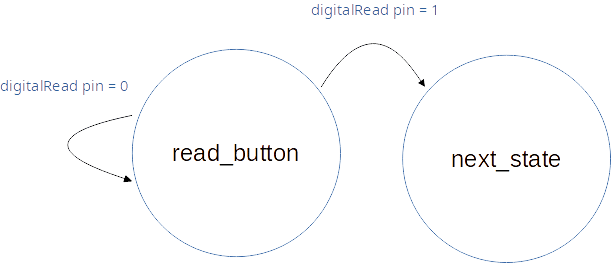
There are two states here, namely read_button and next_state. The read_button state continues to be in its current state while its digitalRead pin input is 0. Once the digitalRead pin input becomes 1 a transition to the next state occurs.
Simple state machines can be applied to everyday embedded products such as Vendo machines, coffee makers, washing machines, and the like. More complicated state machines can be found on computers or home entertainment systems. The next part discusses more scenarios on implementing state machines on an embedded system such as the Arduino.
Example Scenarios in Using a State Machine
- Controlling the speed and direction of a fan using a temperature and an IR sensor.
- Inputting data on an LCD with a touch screen interface.
- Implementing a motion sensor to consecutively light up the steps of a staircase.
- Implementing a mechanical arm that can pick up certain objects.
- Assigning a task after an Ultrasonic sensor detects obstacles.
With these examples, we can have some idea of what kind of state machine to write for a given application. Continue reading the next part for an example.
Example Code Using a State Machine
Here we have a DHT11 sensor, a push-button switch, and an OLED display all hooked up to an Arduino MEGA. The DHT11 is both a temperature and humidity sensor connected via a 1-wire serial interface. The OLED screen is 128×64 pixels interfaced through I2C. The DHT11 is a slow capacitive type sensor that must be timed at least 2 seconds before capturing data. After acquiring both humidity and temperature data, it will be displayed on the OLED screen. The user has the option of displaying the temperature in Fahrenheit or Celsius by pressing a push-button switch.
Here is a simplified state machine for this design:
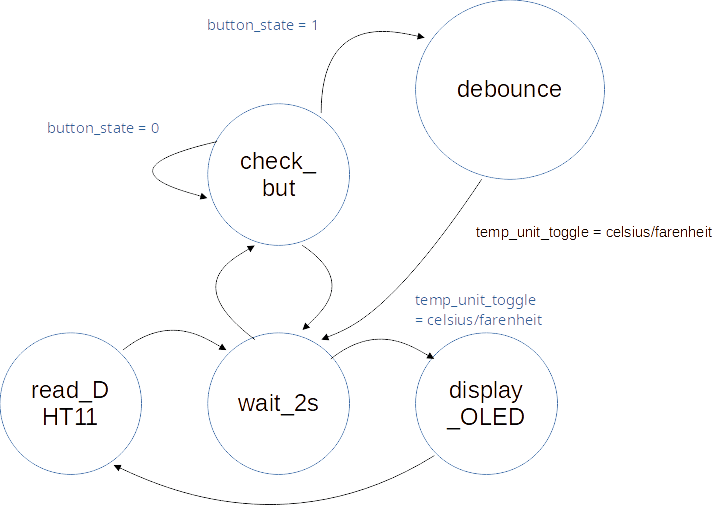
Here are the states and their functions:
- read_DHT11 – responsible for reading the DHT11 sensor.
- wait_2s – responsible for running a millis() timer that counts up to 2 secs to produce the delay required by the DHT11 sensor.
- check_button – this state is for checking a user button press to be able to switch temperature units.
- debounce – a state with another timer function to debounce the switch press and toggle the temperature unit.
- display_OLED – this state is responsible for displaying temperature and humidity with the desired unit.
Here is the code. (Note that the explanation for the DHT11 and the OLED codes are reserved for another topic).
					#include <Wire.h>
#include "DHT.h"
#include <Adafruit_GFX.h>
#include <Adafruit_SSD1306.h>

#define BUTTON  8
#define BUTTON_H  10
#define DHT11_WAIT  2000
#define DEBOUNCE_WAIT 300

Adafruit_SSD1306 display = Adafruit_SSD1306(128, 64, &Wire, -1);

// Uncomment one of the lines below for whatever DHT sensor type you're using!
#define DHTTYPE DHT11 // DHT 11
//#define DHTTYPE DHT21 // DHT 21 (AM2301)
//#define DHTTYPE DHT22 // DHT 22 (AM2302), AM2321
//DHT Sensor;
uint8_t DHTPin = 2;
DHT dht(DHTPin, DHTTYPE);

float Temp;
float Humidity;
float Temp_F;

// state machine enums
enum state_t{read_DHT11, wait_2s, check_but_press, debounce, display_OLED};
enum state_t state;

enum button_state_t{unpressed = 1, pressed = 0};
enum button_state_t button_state;

enum DHT11_disp_t{celsius, farenheit};
enum DHT11_disp_t DHT11_disp;

// timer variables
unsigned long milli_time_read1;
unsigned long milli_time_read2;
unsigned long milli_time_read_DHT11;
unsigned long milli_time_read_debounce;

void setup() {
  Serial.begin(115200);
  Serial.println("start");
  pinMode(BUTTON_H, OUTPUT);
  digitalWrite(BUTTON_H, LOW);
  pinMode(BUTTON, INPUT_PULLUP);
  pinMode(DHTPin, INPUT);
  dht.begin();
  // by default, we'll generate the high voltage from the 3.3v line internally! (neat!)
  display.begin(SSD1306_SWITCHCAPVCC, 0x3C);  // initialize with the I2C addr 0x3C (for the 128x64)
   // init done
  display.display();
  delay(100);
  display.clearDisplay();
  display.display();
  display.setTextSize(1);
  display.setTextColor(WHITE);
}

void loop() {

  milli_time_read1 = millis();

  // state machine starts here
  switch (state) {
    case read_DHT11:
      Humidity = dht.readHumidity();
      // Read temperature as Celsius (the default)
      Temp = dht.readTemperature();
      // Read temperature as Fahrenheit (isFahrenheit = true)
      Temp_F= dht.readTemperature(true);

      // Check if any reads failed and exit early (to try again).
      if (isnan(Humidity) || isnan(Temp) || isnan(Temp_F)) {
        Serial.println(F("Failed to read from DHT sensor!"));
        return;
      }
      state = wait_2s;
      break;

    case wait_2s:
      if((milli_time_read1 - milli_time_read_DHT11) < DHT11_WAIT)
      {
        state = check_but_press;
      }else{
        milli_time_read_DHT11 = milli_time_read1;
        state = display_OLED;
      }
      break;

    case check_but_press:
      button_state = digitalRead(BUTTON);
      switch (button_state){
        case unpressed:
          state = wait_2s;
          break;
        case pressed:
          Serial.println("Pressed!");
          milli_time_read_debounce = millis();
          state = debounce;
          break;

        default:
          break;
      }
      break;

    case debounce:
      milli_time_read2 = millis();
      if((milli_time_read2 - milli_time_read_debounce) < DEBOUNCE_WAIT)
      {
        // wait DEBOUNCE_WAIT time

      }else{
        DHT11_disp ^= 1;  // switch celsius/fahrenheit
        state = wait_2s;
      }
      break;

    case display_OLED:
      display.setCursor(0,0);
      display.clearDisplay();

      display.setTextSize(1);
      display.setCursor(0,0);
      display.print("Temperature = ");

      if(DHT11_disp == celsius)
      {
        display.print(Temp);
        display.print("C");
      }
      else
      {
        if(DHT11_disp == farenheit)
        {
          display.print(Temp_F);
          display.print("F");
        }
      }

    // display humidity
      display.setCursor(0, 25);
      display.print("Humidity = ");
      display.print(Humidity);
      display.print("%");

      display.display();

      state = read_DHT11;
      break;

    default:
      break;
  }

}
The main state machine code of interest is here:
					  milli_time_read1 = millis();

  // state machine starts here
  switch (state) {
    case read_DHT11:
      Humidity = dht.readHumidity();
      // Read temperature as Celsius (the default)
      Temp = dht.readTemperature();
      // Read temperature as Fahrenheit (isFahrenheit = true)
      Temp_F= dht.readTemperature(true);

      // Check if any reads failed and exit early (to try again).
      if (isnan(Humidity) || isnan(Temp) || isnan(Temp_F)) {
        Serial.println(F("Failed to read from DHT sensor!"));
        return;
      }
      state = wait_2s;
      break;

    case wait_2s:
      if((milli_time_read1 - milli_time_read_DHT11) < DHT11_WAIT)
      {
        state = check_but_press;
      }else{
        milli_time_read_DHT11 = milli_time_read1;
        state = display_OLED;
      }
      break;

    case check_but_press:
      button_state = digitalRead(BUTTON);
      switch (button_state){
        case unpressed:
          state = wait_2s;
          break;
        case pressed:
          Serial.println("Pressed!");
          milli_time_read_debounce = millis();
          state = debounce;
          break;

        default:
          break;
      }
      break;

    case debounce:
      milli_time_read2 = millis();
      if((milli_time_read2 - milli_time_read_debounce) < DEBOUNCE_WAIT)
      {
        // wait DEBOUNCE_WAIT time

      }else{
        DHT11_disp ^= 1;  // switch celsius/fahrenheit
        state = wait_2s;
      }
      break;

    case display_OLED:
      display.setCursor(0,0);
      display.clearDisplay();

      display.setTextSize(1);
      display.setCursor(0,0);
      display.print("Temperature = ");

      if(DHT11_disp == celsius)
      {
        display.print(Temp);
        display.print("C");
      }
      else
      {
        if(DHT11_disp == farenheit)
        {
          display.print(Temp_F);
          display.print("F");
        }
      }

    // display humidity
      display.setCursor(0, 25);
      display.print("Humidity = ");
      display.print(Humidity);
      display.print("%");

      display.display();

      state = read_DHT11;
      break;

    default:
      break;
  }
The state machine states are declared at the beginning of the code by an enumeration:
					// state machine enums
enum state_t{read_DHT11, wait_2s, check_but_press, debounce, display_OLED};
enum state_t state;
Looking closely, all the states are laid out in a switch-case statement. For some, a condition must arise before state transition occurs, while for others it’s enough to run a couple of lines of code before transitioning.
The code could lazily be written with delay(2000) (for the DHT timer) and delay(300) (for the switch debounce) without any state machine (as can be seen below):
					void loop() {

  delay(DHT11_WAIT);

  if(digitalRead(BUTTON) == 0){
    delay(DEBOUNCE_WAIT);
    DHT11_disp ^= 1;
  }

  // read sensor
  Humidity = dht.readHumidity();
  // Read temperature as Celsius (the default)
  Temp = dht.readTemperature();
  // Read temperature as Fahrenheit (isFahrenheit = true)
  Temp_F= dht.readTemperature(true);

  // Check if any reads failed and exit early (to try again).
  if (isnan(Humidity) || isnan(Temp) || isnan(Temp_F)) {
    Serial.println(F("Failed to read from DHT sensor!"));
    return;
  }

  // display values in OLED
  display.setCursor(0,0);
  display.clearDisplay();

  display.setTextSize(1);
  display.setCursor(0,0);
  display.print("Temperature = ");

  if(DHT11_disp == celsius)
  {
    display.print(Temp);
    display.print("C");
  }
  else
  {
    if(DHT11_disp == farenheit)
    {
      display.print(Temp_F);
      display.print("F");
    }
  }

  // display humidity
  display.setCursor(0, 25);
  display.print("Humidity = ");
  display.print(Humidity);
  display.print("%");

  display.display();

}
This would miss the point of a well-defined and efficient program flow. If you do this, it will be very hard to catch the button press, or you’ll have to press it for a longer time which can be uncomfortable for some users. This will also waste precious MCU instruction cycles just by using the blocking delay( ) functions.
Summary
This article explained basic state machines and their uses. It’s a practical tool if you’re having problems lining up or timing your sensors to run in your code. Once you learn how to implement efficient state machines, you’ll be equipped with more flexibility in planning your program flow with the added bonus of saving precious MCU instruction cycles.


