Introduction
This tutorial details the GY-ML8511 module, how it functions and the method of building a simple project using the GY-ML8511 module and an Arduino.
Ultraviolet UV Ray Detection Module - GY-ML8511
The GY-ML85111 module has a built-in ultraviolet light sensor. The module outputs an analog signal in relation to the amount of UV light detected. This sensor detects 280-390nm light most effectively.

Pin Out
The GY-ML8511 has four pins.
| Pin | Description |
|---|---|
| EN | Enable |
| OUT | Analog Output |
| GND | Ground |
| 3.3 | 3.3V Power |
How it Works
The GY-ML8511 module has a sensor that detects ultraviolet lights. The analog signal output is between 0-1023 with a higher value indicating a higher the intensity of the ultraviolet light. Using formula and mapping, the output analog signal can be converted into light intensity with unit of mW/cm2.
Project - Arduino Ultraviolet Light Intensity Monitor
This project will demonstrate how to detect ultraviolet light intensity from a source and display the intensity via a value reading in the serial monitor.
Components
- Arduino Uno Board (1 pc.)
- Ultraviolet UV Ray Detection Module – Gy-Ml8511 (1 pc.)
- Jumper Wires
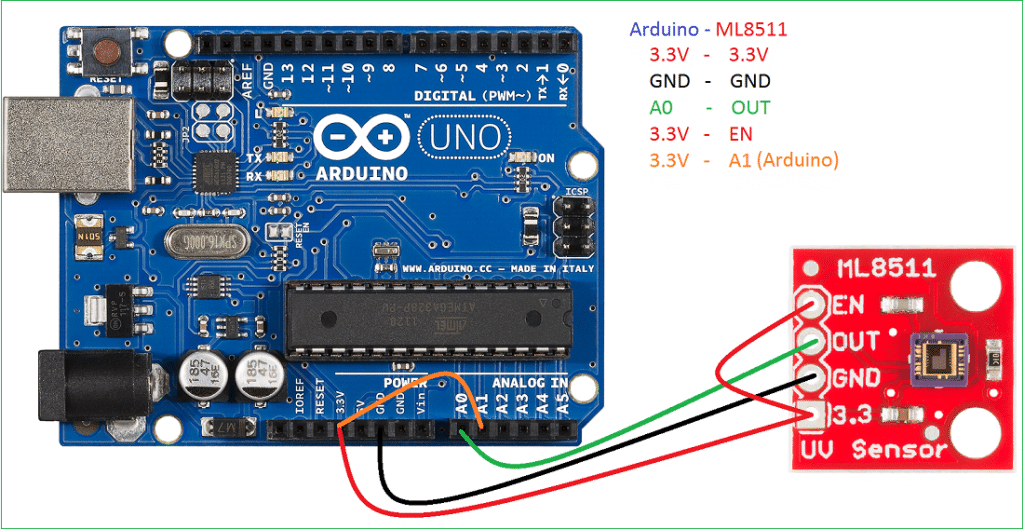
Wiring Diagram
The GY-ML8511 module pins are connected to the Arduino Uno board as follows:
| Module Pin | UNO Board Pin |
|---|---|
| Out | A0 |
| GND | Ground |
| 3.3 | 3.3V |
| Module Pin | Module Pin |
| EN | 3.3V |
| UNO Board Pin | UNO Board Pin |
| 3.3V | A1 |
Code
					int UVOUT = A0; //Output from the sensor
int REF_3V3 = A1; //3.3V power on the Arduino board
void setup()
{
  Serial.begin(9600);
  pinMode(UVOUT, INPUT);
  pinMode(REF_3V3, INPUT);
  Serial.println("MP8511 example");
}
void loop()
{
  int uvLevel = averageAnalogRead(UVOUT);
  int refLevel = averageAnalogRead(REF_3V3);

  //Use the 3.3V power pin as a reference to get a very accurate output value from sensor
  float outputVoltage = 3.3 / refLevel * uvLevel;

  float uvIntensity = mapfloat(outputVoltage, 0.99, 2.9, 0.0, 15.0);
  Serial.print("MP8511 output: ");
  Serial.print(uvLevel);
  Serial.print(" MP8511 voltage: ");
  Serial.print(outputVoltage);
  Serial.print(" UV Intensity (mW/cm^2): ");
  Serial.print(uvIntensity);

  Serial.println();

  delay(100);
}
//Takes an average of readings on a given pin
//Returns the average
int averageAnalogRead(int pinToRead)
{
  byte numberOfReadings = 8;
  unsigned int runningValue = 0;
  for(int x = 0 ; x < numberOfReadings ; x++)
    runningValue += analogRead(pinToRead);
  runningValue /= numberOfReadings;
  return(runningValue);
}
//The Arduino Map function but for floats
//From: http://forum.arduino.cc/index.php?topic=3922.0
float mapfloat(float x, float in_min, float in_max, float out_min, float out_max)
{
  return (x - in_min) * (out_max - out_min) / (in_max - in_min) + out_min;
}
Project Test
Wire the components to the Arduino as demonstrated in the wiring diagram. Connect the Arduino to a PC and upload the program. Open the Serial Monitor in the Arduino IDE, and the intensity of the UV light received by the sensor will be displayed.