If you’ve just purchased an RPI Pico and want to try it out immediately, this is the perfect article for you. The basic hardware and software setup will be explained and a simple sample code will be demonstrated.
Introduction
The Raspberry Pico is the first microcontroller to come out of the Raspberry Pi foundation. From having powerful, resource-hungry single-board computers (SBCs), the foundation decided to add to their product lineup a dedicated microcontroller to control much simpler components/peripherals.
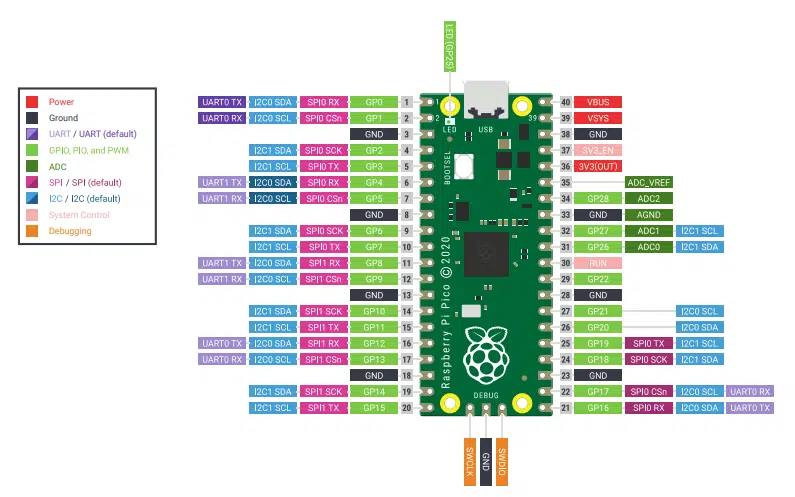
RPI Pico Specifications & Pin Out
The Raspberry Pi Pico’s main component is the RP2040 Arm Cortex M0+ processor which is s a dual-core processor clocked at 133MHz. The RPI Pico has 264KB of SRAM and 2MB of onboard flash memory. It has 26 GPIO pins and includes peripherals and features such as:
- 2 – SPI
- 2 – I2C
- 2 – UART
- 3 – ADCs (12-bit)
- A Temp sensor
- 8 – Programmable PIO
- USB (1.1) device and host
- On-chip timer and clock
This is the Raspberry Pi Pico pinout (also downloadable from its official website)
Preparing to use your RPI Pico Board
The RPI Pico is a 40-pin microcontroller board powered through a micro USB connector. This micro USB interface also allows easy programming through a BOOTSEL switch that switches from USB Mass storage mode (Boot loader mode) and RUN mode. It is in the USB mass storage mode that you can load programs easily (through the drag and drop method) on your Pico.
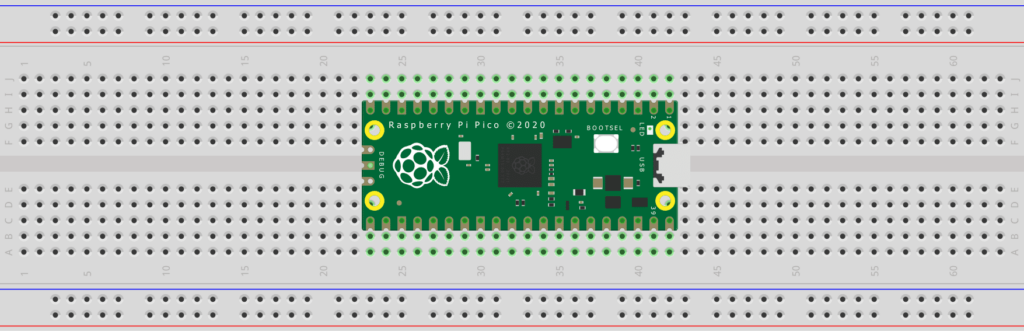
By mounting male or female headers through the through-hole mounting pads on its sides, you’ll be able to make connections to a breadboard or through connecting wires. It also has additional castellated through-holes on its sides which you can utilize to solder the board through SMD pads on another board.
Preparing your Programming Software
There are different programming environments that you can use to program the RPI Pico. Since this is a Raspberry Pi foundation product, using a Raspberry Pi or a PC (x86, Mac, or Linux) with a Raspbian OS makes sense. This method avoids extra setup procedures such as installing SDKs. So please install a Raspbian OS by going through this link.
In this Tutorial, the MicroPython language will be used as it’s fairly easy to understand. Thonny IDE will also be used as the main development environment as it’s readily available for Raspbian OS.
After booting up your Raspbian desktop (either through a Raspberry Pi or a PC), plug-in your Pico board through a USB cable to your PC while holding the BOOTSEL switch. This will cause it to be detected as a removable USB disk as seen below:
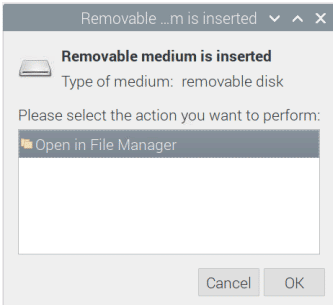
If you click OK then you’ll see what’s inside the disk.
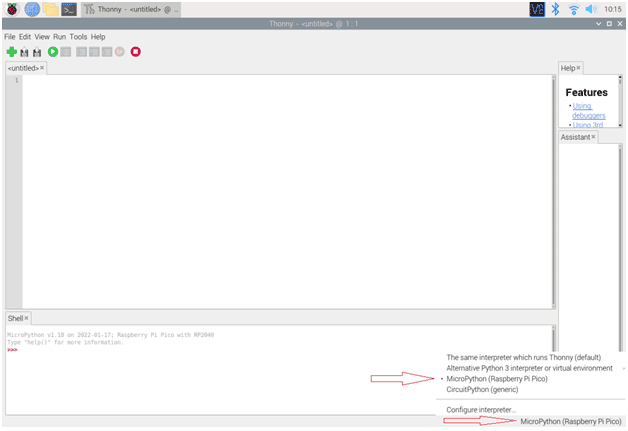
Next Open Thonny by clicking the Raspberry icon -> Programming -> Thonny Python IDE. Thonny should detect that you’ve plugged in the Pico and suggests installing the MicroPython OS firmware in it. If it’s the first time you’ve plugged your Pico it’s good to start with new firmware, so click Install.
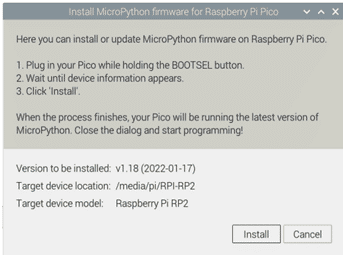
In case you encounter other issues with regards to this firmware please visit this MicroPython installation guide.
After installation, your Pico should come out of boot mode and be ready to be programmed with your own code.
Thonny should see your Pico accordingly and use the correct Python interpreter as seen below:
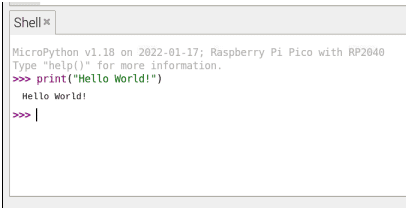
Test the interactive Python prompt (REPL) with the line print(“Hello World!”), and it should display it accordingly.
Create Sample Code
A blinking LED is an excellent place to start when testing a board. Insert this code snippet into the Thonny editor which is above the Shell window.
					from machine import Pin
import time

led = Pin(25, Pin.OUT)

while True:
    led.value(1)
    time.sleep(0.5)
    led.value(0)
    time.sleep(0.5)
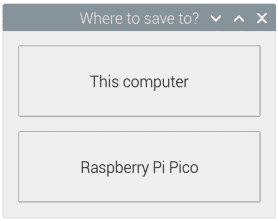
Save the code by clicking File->Save. If asked where you want to save it, save it on both your Computer and the Raspberry Pi Pico so you’ll have a backup. Enter the filename as main.py. In doing so, you’ll be able to launch this program automatically when you power up the board.
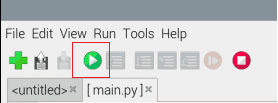
Click the Run Script button to execute the code in real-time on the Pico.
You should now see the Pico’s LED flashing every 0.5 seconds.
To explain the code further:
					from machine import Pin
import time
This part imports the necessary modules needed by the Pico to light up the LED correctly. Machine is a device-specific module for the Pico and includes the Pin class.
Time is a standard Python module and is needed to delay the blinking of our led with the sleep function.
To learn more about Python libraries, please access this link.
led = Pin(25, Pin.OUT)
Here is an assignment to an object called led from the Pin class with several properties. The first property, 25 is the actual GPIO port or id for the built-in LED of the RPI Pico. The Pin.OUT property specifies we are setting up the Pin mode as an output pin.
The rest of the code can be seen below:
					//from machine import Pin
//import time

//led = Pin(25, Pin.OUT)

while True:
    led.value(1)
    time.sleep(0.5)
    led.value(0)
    time.sleep(0.5)
There’s a never-ending loop using the while statement. Note that Python identifies indentation as a block of code, unlike other programming languages. This indentation is part of the while loop.
Value is a function from the led object (which is of class Pin) that turns the Pico’s LED ON or OFF depending on the value passed. Similarly, the sleep function from the time module is used with a value of 0.5 seconds to act as a delay.
To learn more about the Python language go to https://www.python.org/
Summary
Making your RPI Pico board run for the first time should be an easy task. By utilizing this tutorial, you should understand each part and step fully even if it’s meant for beginners. For more advanced learning, go to the official MicroPython and RPI Pico documentation.


