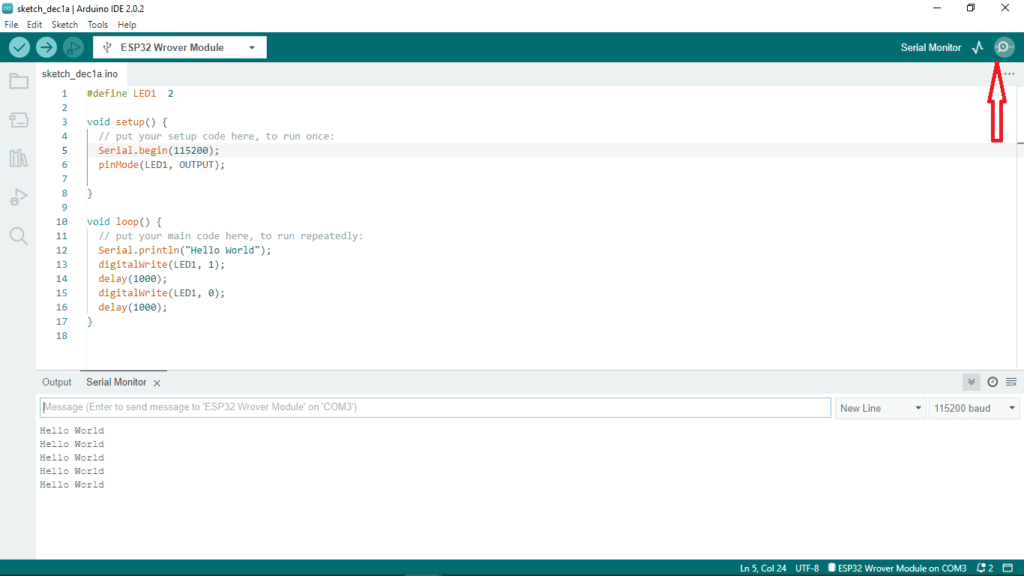
Phipps Electronics

Order within the next 

FREE SHIPPING OVER $199

50,000+ ORDERS

WORLDWIDE SHIPPING

SSL SECURED

ESP32 on the Arduino IDE

Contents

Your ESP32 device can easily work in the Arduino IDE. Continue reading the rest of the article to find out.

(This article uses the latest Arduino IDE version 2.X)

Introduction

The Arduino IDE is so easy to work with and is adapted very well by the maker community. Some people can argue that going out of the Arduino ecosystem can make it hard to develop code quickly. Several standard peripherals libraries are already built-in into the Arduino ecosystem so it’s hard to resist using them; consequently, you only need a few lines of code to set it up and make it work.

ESP32 has its own set of SDKs and this includes the Espressif IDF (IoT Development Framework). The ESP-IDF officially supports VSCode and Eclipse IDE. However, Espressif also has ESP-Arduino which is an Arduino-IDE and library-based development support package for ESP32 devices. With this, you get all the perks of the Arduino ecosystem for your ESP32 devices.

How to Setup ESP32 on the Arduino IDE

To set up ESP32 on Arduino IDE you’ll need to set an additional boards manager URL and the boards manager.

Setting up an Additional Boards Manager

On your Arduino IDE, go to File -> Preferences. Then type this on the Additional Boards Manager URLs: 

				
					https://dl.espressif.com/dl/package_esp32_index.json


Press OK, then after that, restart your Arduino IDE.

Adding a Board Manager

Next, add a board manager by clicking the Boards Manager icon on the left toolbar. Then type esp32 in the search box.

Choose a version to install (usually the latest). Click Install to install the package.

You are now ready to use your ESP32 boards on your Arduino IDE.

Creating Your First Code Sample

To make your first sample code, click on File -> New. On the new Arduino IDE window, click Tools -> Boards -> esp32 and then choose your board. There are many boards to choose from. The ESP32 Wrover Module will be used in this example.

After that, choose the corresponding COM port where your ESP32 board is connected. Go to Tools -> Port -> then choose that COM port.

Sample Code For ESP32 in the Arduino IDE

Here is a sample code snippet that you can use to test if your ESP32 Arduino setup is okay. Before proceeding, make sure you have a built-in LED on your dev board. Otherwise, connect a resistor (around 330 ohms) and an LED on port 2 of your ESP32.

				
					#define LED1  2

void setup() {
  // put your setup code here, to run once:
  Serial.begin(115200);
  pinMode(LED1, OUTPUT);

}

void loop() {
  // put your main code here, to run repeatedly:
  Serial.println("Hello World");
  digitalWrite(LED1, 1);
  delay(1000);
  digitalWrite(LED1, 0);
  delay(1000);
}


Upload this on your ESP32 board by clicking the Upload icon. Note that some ESP32 dev boards have an issue in that they need their Boot button to be pressed so that they can be programmed successfully.

If everything goes well, you should see your LED blinking on port 2. Open your serial monitor and you should also see the Hello World text pop up.

Conclusion

Setting up ESP32 boards on your Arduino IDE is easy. You simply have to use the Board Manager URL and Board Manager for this. You will now be able to write easy and portable Arduino codes on your ESP32.

SUBSCRIBE FOR NEW POST ALERTS

Subscribe to be the first to know when we publish a new article!
List Subscriptions(Required)

POPULAR POSTS

Scroll to Top