Would you like to implement switch debounce on the mechanical switches of your projects? Not sure how to do this? Read the rest of the article to find out.
Introduction
When using mechanical switches with your microcontroller projects, you’ll usually need to debounce these switches. The reason is these switches are fairly analog in nature; you’ll find that they may transition from one state to the other at times you don’t want them to. This situation can introduce erroneous states in your system. Consequently, this article will help you understand what switch debounce is and how to implement proper firmware routines for them.
What is Switch Bounce?
Electrical glitches appear when you press a mechanical switch. This is due to switch bounce. You may find switch bounce at times when you press a switch, when you release it, or even in between.
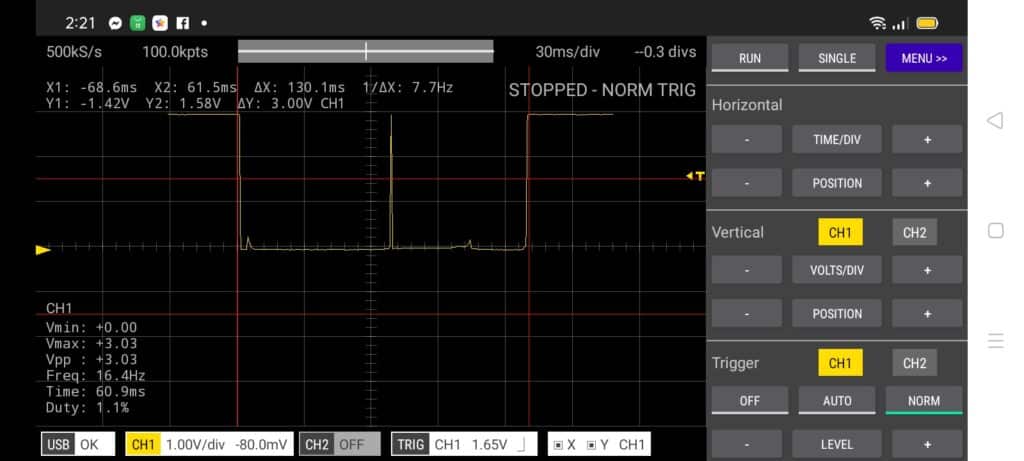
Below, you’ll see a generalized view of how your button press behaves as you push down on it. This button works along a pull-up resistor placed on one side of the pin. The other side of the pin is tied to ground. This serves as an active low push button switch.
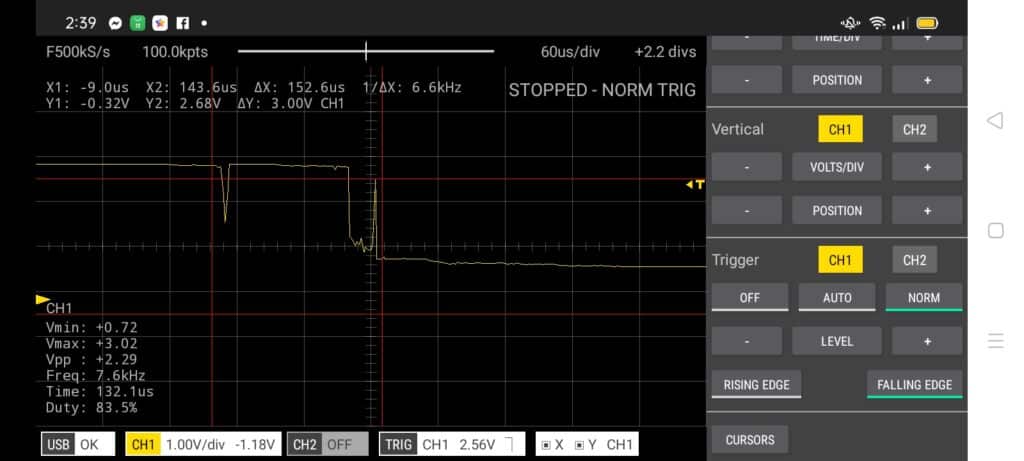
If you zoom in on the signal, you’ll actually find some glitches.
It’s also possible to find glitches on other parts of the waveform as well.
How Does Switch Debounce Affect an Embedded System
An embedded system such as in microcontrollers run code continuously, usually in a loop. The loop is necessary because of the system’s architecture. A program is executed through a sequence of statements through a program counter (PC). To keep the system going, the program counter must continue to count forever going through the statements in a loop.
Below is an excerpt of a system architecture of a simple PIC microcontroller.
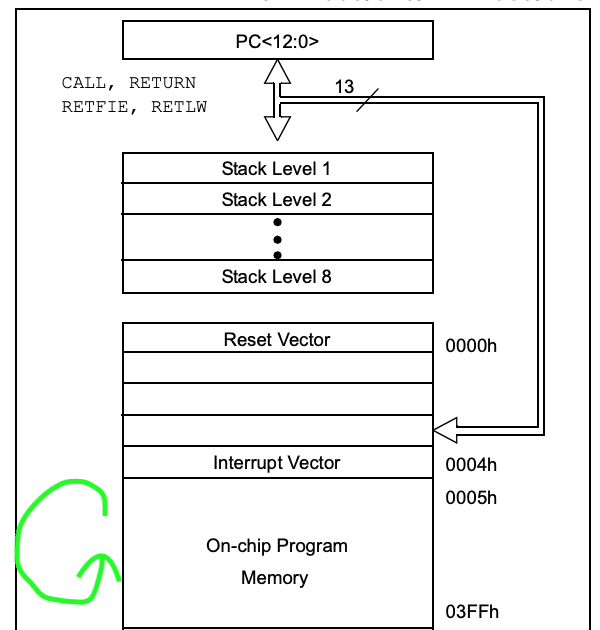
You get the input value of your switch through a statement in your program. Consequently, you only need to detect the press event once when you press the button. However, the looping code can interpret more values because of the glitches it picks along with your button press as your program runs. This means the loop time is several times faster than the time it takes for you to make the button press.
How to Take Care of Switch Bounce
Switch bounce can be eliminated through hardware with external components. However, implementing switch debounce in firmware is more economical as you don’t have to add extra parts. Many programmers implement their own debounce routine according to their taste.
Making Firmware for Switch Debounce
By Using a Simple Delay
The simplest way to eliminate switch bounce is by implementing a delay in your code the first time you detect the button press. Simply put it, the delay will ignore all the glitches up to the point when your signal has a steady value. With this, you should have a reasonable estimate of the length of your delay. A typical value of 300ms – 500ms is used sometimes. Below is an example code snippet inside a void loop.
					  if(digitalRead(button1) == 0)
  {

    delay(300); // debounce time

    // send note on
    midi.send(0x90, current_note1, 0x64);

  }
However, some may argue that this may waste precious CPU instruction cycles when you press the switch, especially if you’re concerned with your resources.
Interestingly, you can use any routine in your code that introduces a delay instead of making an actual delay, provided that your routine’s code execution time is greater than or equal to your intended debounce delay.
By Resetting a Counter or Event Variable while the Signal is still Changing Using a Pre Determined Debounce Time
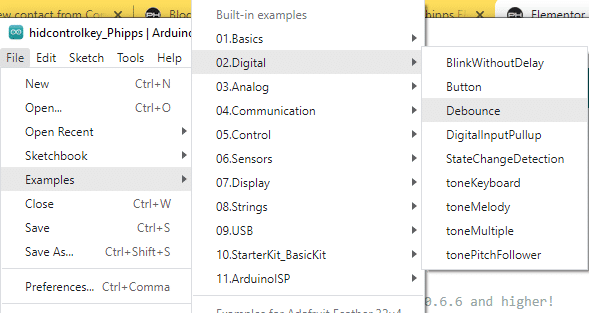
This debounce procedure is illustrated clearly on the built-in Arduino Examples Sketch -> Digital -> Debounce.
					/*
  Debounce

  Each time the input pin goes from LOW to HIGH (e.g. because of a push-button
  press), the output pin is toggled from LOW to HIGH or HIGH to LOW. There's a
  minimum delay between toggles to debounce the circuit (i.e. to ignore noise).

  The circuit:
  - LED attached from pin 13 to ground through 220 ohm resistor
  - pushbutton attached from pin 2 to +5V
  - 10 kilohm resistor attached from pin 2 to ground

  - Note: On most Arduino boards, there is already an LED on the board connected
    to pin 13, so you don't need any extra components for this example.

  created 21 Nov 2006
  by David A. Mellis
  modified 30 Aug 2011
  by Limor Fried
  modified 28 Dec 2012
  by Mike Walters
  modified 30 Aug 2016
  by Arturo Guadalupi

  This example code is in the public domain.

  https://www.arduino.cc/en/Tutorial/BuiltInExamples/Debounce
*/

// constants won't change. They're used here to set pin numbers:
const int buttonPin = 2;  // the number of the pushbutton pin
const int ledPin = 13;    // the number of the LED pin

// Variables will change:
int ledState = HIGH;        // the current state of the output pin
int buttonState;            // the current reading from the input pin
int lastButtonState = LOW;  // the previous reading from the input pin

// the following variables are unsigned longs because the time, measured in
// milliseconds, will quickly become a bigger number than can be stored in an int.
unsigned long lastDebounceTime = 0;  // the last time the output pin was toggled
unsigned long debounceDelay = 50;    // the debounce time; increase if the output flickers

void setup() {
  pinMode(buttonPin, INPUT);
  pinMode(ledPin, OUTPUT);

  // set initial LED state
  digitalWrite(ledPin, ledState);
}

void loop() {
  // read the state of the switch into a local variable:
  int reading = digitalRead(buttonPin);

  // check to see if you just pressed the button
  // (i.e. the input went from LOW to HIGH), and you've waited long enough
  // since the last press to ignore any noise:

  // If the switch changed, due to noise or pressing:
  if (reading != lastButtonState) {
    // reset the debouncing timer
    lastDebounceTime = millis();
  }

  if ((millis() - lastDebounceTime) > debounceDelay) {
    // whatever the reading is at, it's been there for longer than the debounce
    // delay, so take it as the actual current state:

    // if the button state has changed:
    if (reading != buttonState) {
      buttonState = reading;

      // only toggle the LED if the new button state is HIGH
      if (buttonState == HIGH) {
        ledState = !ledState;
      }
    }
  }

  // set the LED:
  digitalWrite(ledPin, ledState);

  // save the reading. Next time through the loop, it'll be the lastButtonState:
  lastButtonState = reading;
}
Here, two important variables buttonState and lastButtonState, are introduced. These variables are used to monitor your button pin input value.
The following two long variables lastDebounceTime and debounceDelay, are used as a timekeeper and an unchanging variable to compare time to (the debounce time), respectively.
					// Variables will change:
int ledState = HIGH;        // the current state of the output pin
int buttonState;            // the current reading from the input pin
int lastButtonState = LOW;  // the previous reading from the input pin

// the following variables are unsigned longs because the time, measured in
// milliseconds, will quickly become a bigger number than can be stored in an int.
unsigned long lastDebounceTime = 0;  // the last time the output pin was toggled
unsigned long debounceDelay = 50;    // the debounce time; increase if the output flickers
The looping code is self-explanatory. It simply reads the input pin, checks for switch bounce by comparing the previous button state from the current, and then resets the stored value time. Every transition change on the pin is regarded as a switch bounce unless the stored time value exceeds the debounce time and the final pin state becomes high. Note that you can change debounceDelay until you find your preferred value.
					void loop() {
  // read the state of the switch into a local variable:
  int reading = digitalRead(buttonPin);

  // check to see if you just pressed the button
  // (i.e. the input went from LOW to HIGH), and you've waited long enough
  // since the last press to ignore any noise:

  // If the switch changed, due to noise or pressing:
  if (reading != lastButtonState) {
    // reset the debouncing timer
    lastDebounceTime = millis();
  }

  if ((millis() - lastDebounceTime) > debounceDelay) {
    // whatever the reading is at, it's been there for longer than the debounce
    // delay, so take it as the actual current state:

    // if the button state has changed:
    if (reading != buttonState) {
      buttonState = reading;

      // only toggle the LED if the new button state is HIGH
      if (buttonState == HIGH) {
        ledState = !ledState;
      }
    }
  }
Conclusion
Switch debounce is a problem easily solved through firmware. You can create a delay routine or copy what the Arduino Example Debounce code does. With this knowledge, you’re on your way to creating glitch-free buttons as input.