Have you tried using queues to pass data between your tasks in FreeRTOS? Want to learn more about it? See this article on using queues for your multitasking applications.
Introduction
Using queues is an efficient way to transport data between tasks or threads in an RTOS environment. RTOS, unlike conventional bare metal programs, needs special care in handling data used by multiple threads or tasks. Imagine a task fetching a data entry while another tries modifying it. This situation would be a disaster. You can end up receiving garbled data, especially if you don’t work on your data set in one atomic operation. Here, we’ll look up queues specifically for FreeRTOS.
What is a Queue in FreeRTOS?
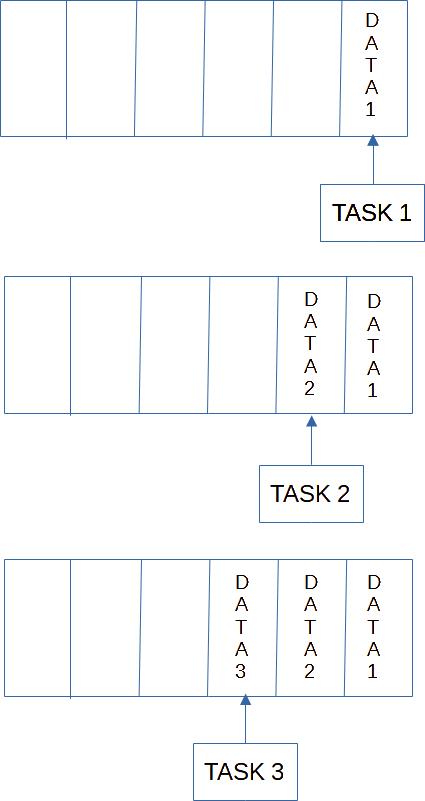
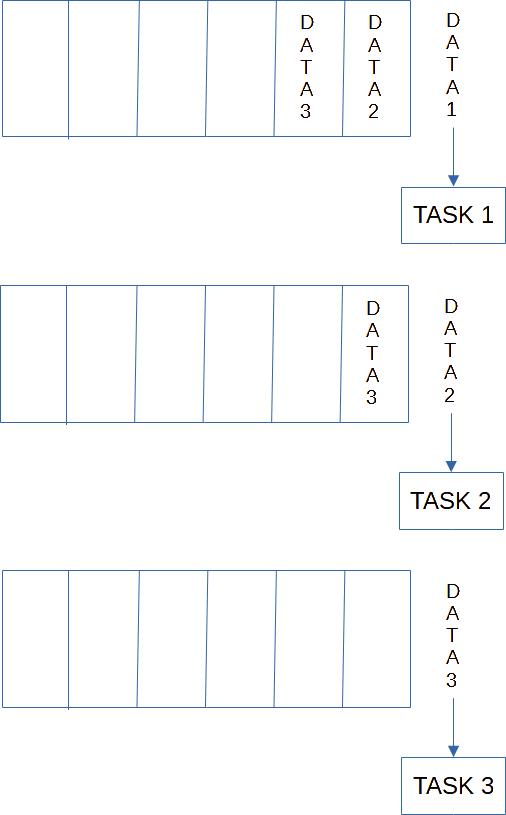
Queues are memory pools (in the form of a FIFO) that hold actual values. This FIFO, when accessed by tasks, empties a slot if a receive from queue occurs. Likewise, additional slots are populated if a send-to queue takes place. This is all done in a First-in, First-out fashion.
All the necessary data-handling operations are taken care of by the RTOS kernel. This means all queue APIs are “thread-safe.” The process includes accessing the queues from interrupt routines (although particular queue ISR APIs are used).
How Do you Use a Queue?
Declare a Queue Handle type
First, declare a queue handle using the queue handle type QueueHandle_t.
QueueHandle_t myQueue;
The handles make it easier to reference your queues.
Create your Queue
After that, create your queue (using the handle) using the xQueueCreate( ) function. Here, a queue with six slots is made, all with a slot size of an integer.
myQueue = xQueueCreate(6, sizeof(int));
The prototype for xQueueCreate( ) is:
					xQueueCreate( UBaseType_t uxQueueLength,
                             UBaseType_t uxItemSize );
Where:
uxQueueLength – is the length of the queue
uxItemSize – is the size of the item. It can hold different kinds of data types, including structures. If the type is too large, the pool can also hold pointers.
Send or Receive Items on the Queue
You can now send or receive items to or from the queue using your queue handle to reference the queue. Below is an example code to send data from the led_blink variable to myQueue with a blocking delay of 10 ticks if the queue is already full.
xQueueSend(myQueue, &led_blink, 10);
The prototype for xQueueSend( ) is:
					BaseType_t xQueueSend(
                            QueueHandle_t xQueue,
                            const void * pvItemToQueue,
                            TickType_t xTicksToWait
                         );
Where:
xQueue – is your Queue handle
pvItemToQueue – are the source items to copy to your queue.
xTicksTo Wait – is a waiting period to block if the queue is already full.
To receive items from the queue, use the xQueueReceive( ) API. Here, xQueueReceive( ) receives the first item from myQueue and transfers it to the led_blink variable. This statement doesn’t block and wait if no items are left on the queue; it simply continues to run the next commands.
xQueueReceive(myQueue, &led_blink, 0);
The prototype for xQueueReceive( ) is:
					BaseType_t xQueueReceive(
                               QueueHandle_t xQueue,
                               void *pvBuffer,
                               TickType_t xTicksToWait
                            );
Where:
xQueue – is the queue to receive from.
pvBuffer – is the receive buffer of the item from the queue.
xTicksToWait – is the blocking time if no more items can be fetched from the queue.
Example Queue Application 1
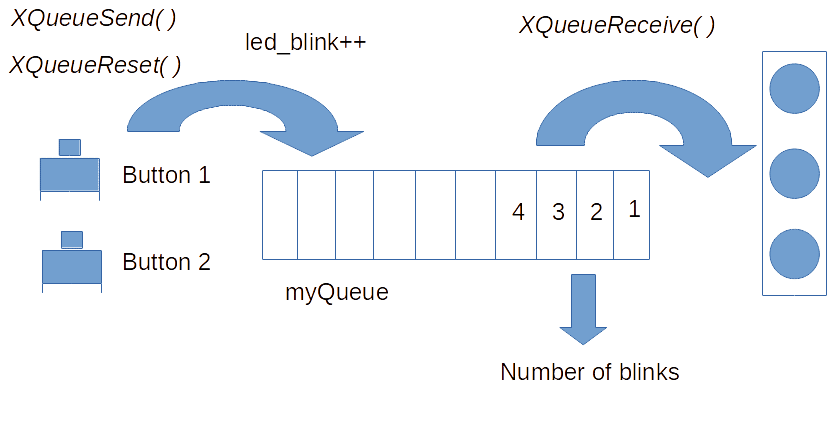
We can add a queue and modify the program of the previous blog about creating a simple multitasking application. Here, an LED strip runs its code on a task that blinks itself several times. The number of blinks is fetched from a queue myQueue. If there are no more items from the queue, the task continues with the current blink value. A second task uses a push button to send blink values to the same queue incrementally. Additionally, a second push button resets the queue and fills it with a default value of one. With this, every time a queue receive operation happens on the first blinking task, the number of blinks is displayed on the LED strip.
					#include <stdio.h>
#include <driver\gpio.h>
#include <freertos\FreeRTOS.h>
#include <freertos\task.h>
#include <freertos\queue.h>

#define LED_STRIP1_G GPIO_NUM_32
#define LED_STRIP1_R GPIO_NUM_33
#define LED_STRIP1_B GPIO_NUM_25

#define LED_STRIP2_G GPIO_NUM_26
#define LED_STRIP2_R GPIO_NUM_27
#define LED_STRIP2_B GPIO_NUM_2

#define LED_STRIP3_G GPIO_NUM_13
#define LED_STRIP3_R GPIO_NUM_14
#define LED_STRIP3_B GPIO_NUM_15

#define LED_STRIP1_BIT_MASK (1ULL << LED_STRIP1_G | 1ULL << LED_STRIP1_R | 1ULL << LED_STRIP1_B)
#define LED_STRIP2_BIT_MASK (1ULL << LED_STRIP2_G | 1ULL << LED_STRIP2_R | 1ULL << LED_STRIP2_B)
#define LED_STRIP3_BIT_MASK (1ULL << LED_STRIP3_G | 1ULL << LED_STRIP3_R | 1ULL << LED_STRIP3_B)

#define PUSH_BUTTON_1 GPIO_NUM_4
#define PUSH_BUTTON_2 GPIO_NUM_35
#define PUSH_BUTTON_3 GPIO_NUM_36

#define PUSH_BUTTON_1_BIT_MASK (1ULL << PUSH_BUTTON_1)
#define PUSH_BUTTON_2_BIT_MASK (1ULL << PUSH_BUTTON_2)
#define PUSH_BUTTON_3_BIT_MASK (1ULL << PUSH_BUTTON_3)


gpio_config_t myGPIOconfig;

void config_ports(void);

void Led_strip_task1(void *parameter);
void Send_to_Strip(void *paramters);


QueueHandle_t myQueue;


void app_main(void)
{
    config_ports();

    myQueue = xQueueCreate(10, sizeof(int));

    xTaskCreate(Led_strip_task1, "led_strip1_task", 1048, NULL, 1, NULL);
    xTaskCreate(Send_to_Strip, "send delay to strip",1048, NULL, 2, NULL);

    for(;;)
    {
        // should not reach this point.
    }
}

void config_ports(void)
{
    // Configure Digital I/O for LEDs
    myGPIOconfig.pin_bit_mask = (LED_STRIP1_BIT_MASK | LED_STRIP2_BIT_MASK | LED_STRIP3_BIT_MASK);
    myGPIOconfig.pull_down_en = GPIO_PULLDOWN_DISABLE;
    myGPIOconfig.pull_up_en = GPIO_PULLUP_DISABLE;
    myGPIOconfig.mode = GPIO_MODE_OUTPUT;
    myGPIOconfig.intr_type = GPIO_INTR_DISABLE;

    gpio_config(&myGPIOconfig);

    myGPIOconfig.pin_bit_mask = (PUSH_BUTTON_2_BIT_MASK | PUSH_BUTTON_3_BIT_MASK);
    myGPIOconfig.pull_down_en = GPIO_PULLDOWN_DISABLE;
    myGPIOconfig.pull_up_en = GPIO_PULLUP_DISABLE;
    myGPIOconfig.mode = GPIO_MODE_INPUT;
    myGPIOconfig.intr_type = GPIO_INTR_DISABLE;

    gpio_config(&myGPIOconfig);

    gpio_set_direction(PUSH_BUTTON_1, GPIO_MODE_INPUT);
    gpio_set_pull_mode(PUSH_BUTTON_1, GPIO_PULLUP_ONLY);

}


void Led_strip_task1(void *parameter)
{
    int led_blink = 1;
    int i;

    for(;;)
    {

        xQueueReceive(myQueue, &led_blink, 0);

        for(i=0;i<led_blink;i++)
        {

            gpio_set_level(LED_STRIP1_G, 1);
            vTaskDelay(200/portTICK_PERIOD_MS);
            gpio_set_level(LED_STRIP1_G, 0);

            gpio_set_level(LED_STRIP1_R, 1);
            vTaskDelay(200/portTICK_PERIOD_MS);
            gpio_set_level(LED_STRIP1_R, 0);

            gpio_set_level(LED_STRIP1_B, 1);
            vTaskDelay(200/portTICK_PERIOD_MS);
            gpio_set_level(LED_STRIP1_B, 0);

            vTaskDelay(200/portTICK_PERIOD_MS);
        }

        vTaskDelay(3000/portTICK_PERIOD_MS);


    }
}

void Send_to_Strip(void *paramters)
{
    int led_blink = 1;
    int reset_var = 1;

    for(;;)
    {

        if(gpio_get_level(PUSH_BUTTON_1) == 0)
        {

            led_blink++;
            xQueueSend(myQueue, &led_blink, 10);

            // debounce
            gpio_set_level(LED_STRIP1_R, 1);
            vTaskDelay(300/portTICK_PERIOD_MS);
            gpio_set_level(LED_STRIP1_R, 0);

        }

        if(gpio_get_level(PUSH_BUTTON_2) == 0)
        {
            xQueueReset(myQueue);

            xQueueSend(myQueue,&reset_var,0);

            led_blink = 1;

            // debounce
            gpio_set_level(LED_STRIP1_R, 1);
            vTaskDelay(300/portTICK_PERIOD_MS);
            gpio_set_level(LED_STRIP1_R, 0);

        }

        vTaskDelay(10);

    }
}
The task function prototypes are first declared, as well as the myQueue handle.
					void Led_strip_task1(void *parameter);
void Send_to_Strip(void *paramters);

QueueHandle_t myQueue;
After which, in main, the queue is created using the myQueue handle. Two tasks are also created, which are tied to the LED_strip_task1( ) and Send_to_Strip( ) functions. Once the tasks are created, these tasks will run.
					    myQueue = xQueueCreate(10, sizeof(int));

    xTaskCreate(Led_strip_task1, "led_strip1_task", 1048, NULL, 1, NULL);
    xTaskCreate(Send_to_Strip, "send delay to strip",1048, NULL, 2, NULL);
In LED_strip_task1( ), the xQueueReceive( ) operation receives the number of blinks required before proceeding to the for-loop to blink the LEDs.
					void Led_strip_task1(void *parameter)
{
    int led_blink = 1;
    int i;

    for(;;)
    {

        xQueueReceive(myQueue, &led_blink, 0);

        for(i=0;i<led_blink;i++)
        {

            gpio_set_level(LED_STRIP1_G, 1);
            vTaskDelay(200/portTICK_PERIOD_MS);
            gpio_set_level(LED_STRIP1_G, 0);

            gpio_set_level(LED_STRIP1_R, 1);
            vTaskDelay(200/portTICK_PERIOD_MS);
            gpio_set_level(LED_STRIP1_R, 0);

            gpio_set_level(LED_STRIP1_B, 1);
            vTaskDelay(200/portTICK_PERIOD_MS);
            gpio_set_level(LED_STRIP1_B, 0);

            vTaskDelay(200/portTICK_PERIOD_MS);
        }

        vTaskDelay(3000/portTICK_PERIOD_MS);


    }
}
In Send_to_Strip( ), the incremented led_blink variable is copied to the queue through xQueueSend( ) when push button 1 is pushed. The queue is reset and sent a value of 1 when button 2 is pressed.
					void Send_to_Strip(void *paramters)
{
    int led_blink = 1;
    int reset_var = 1;

    for(;;)
    {

        if(gpio_get_level(PUSH_BUTTON_1) == 0)
        {

            led_blink++;
            xQueueSend(myQueue, &led_blink, 10);

            // debounce
            gpio_set_level(LED_STRIP1_R, 1);
            vTaskDelay(300/portTICK_PERIOD_MS);
            gpio_set_level(LED_STRIP1_R, 0);

        }

        if(gpio_get_level(PUSH_BUTTON_2) == 0)
        {
            xQueueReset(myQueue);

            xQueueSend(myQueue,&reset_var,0);

            led_blink = 1;

            // debounce
            gpio_set_level(LED_STRIP1_R, 1);
            vTaskDelay(300/portTICK_PERIOD_MS);
            gpio_set_level(LED_STRIP1_R, 0);

        }

        vTaskDelay(10);

    }
}
See the code in action 🙂
The next article will demonstrate a multiple receivers queue example. Here, you’ll see how several concurrent tasks can work on data sourced from a queue.