Do you want to increase the accuracy of your ADCs but find that their current resolution constrains you? Try the oversampling technique.
Introduction
Your microcontroller’s ADC is an indispensable tool for collecting analog data from the outside world. However, sometimes, you may find you need to get cleaner noise-free readings to get better results. Also, you may not be satisfied with your current ADC resolution (10 or 12 bits, that’s what’s common nowadays) and want to upscale it without adding an external expensive high-resolution ADC.
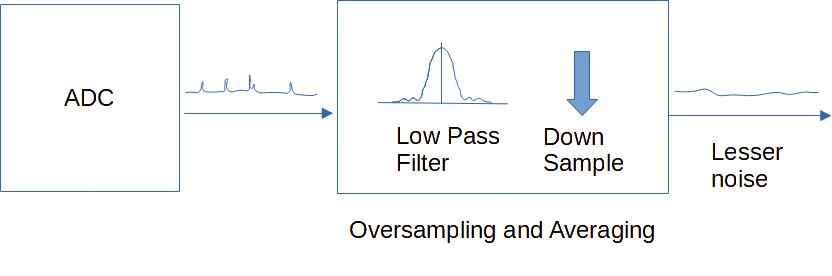
The solution is doing both oversampling and averaging on your ADC through firmware. This is a tried and tested method for any microcontroller-based ADC to filter noise and increase its resolution.
What is Oversampling and Averaging?
To oversample means to repeat the process of acquiring your ADC values. This process is best combined with averaging techniques. Through this, you effectively make a low-pass filter that averages a range of acquired values. This effectively filters out unwanted high-frequency noise acquired during acquisition or inherent in your ADC’s quantization. Because of this, you get a better SNR ratio which is suitable for most systems.
Increasing Bit Resolution
The same technique above effectively increases your ADC resolution. However, you’ll first have to know how much oversampling you need. If you’ll recall from your basic electronics, the Nyquist frequency (Fn) theorem states that you need at least two times the frequency of your waveform’s highest frequency as sampling frequency. This Nyquist frequency is the minimum sample frequency.
Fn = 2 x Fm
Fn = Nyquist frequency
Fm = Highest frequency of your sampled data
If you now go beyond the Nyquist frequency, you are effectively oversampling. If you oversample, you are also increasing the resolution of your measurement. This is the same principle of how oscilloscopes sample their data to get more accurate results.
The rule of thumb is to oversample your data by a factor of 4 to get an additional bit of resolution.
The main formula is:
Fos = 4^w x Fs
Fos = oversampling frequency
w = is the additional number of bits added
Fs = original sampling frequency
For example, to increase a 12-bit ADC’s resolution to 16-bits, replace w by 4.
Fos = 4^4 x Fs
So if your Fs = 1kHz, you should now sample at 256 kHz. That is 256 times your original sampling frequency.
Psuedo Code for Oversampling
Here is an example pseudo code to oversample a 12-bit ADC to become a 16-bit ADC.
Here are the definitions. NUM_OF_SAMPLES are the number of samples required to get a 16-bit resolution from a 12-bit. BIT_SHIFT_DIV means bit division by 256 to get the average of the result. Hence, you are really averaging the result.
Here are the variables used—a 16-bit result_12V variable for the resulting value. An int_dec counter is initialized to 256. And a long 32-bit variable accumator_12V to act as an accumulator to hold the values while averaging.
					// ADC averaging variables
// continuous voltage monitor mode

uint16_t result_12v; 	// Output result from oversampling and
						// averaging 16 samples from the ADC for
						// 14-bit measurement resolution


uint16_t int_dec=NUM_OF_SAMPLES; 	// integrate/decimate counter
						// we post a new result when
						// int_dec = 0

uint32_t accumulator_12v=0L; // heres where we integrate the ADC samples

volatile int result_12v_complete;
And here is the averaging ADC_isr() routine that executes whenever the ADC acquires a value. The accumaltor adds up the values until the number of samples have finished. After that, the result variable will hold the average value which is the accumulator divided by 256 through bit shifting 4 times. Note that adc_val holds the value of the ADC after every conversion.
							void ADC_isr(void)
		{

			accumulator_12v += adc_val;  	// read ADC value and add to running total

		    int_dec--;                       	// update decimation counter

		    if (int_dec == 0) { 				// if zero, then decimate
			    int_dec = NUM_OF_SAMPLES; 	 	// reset counter

			    result_12v = accumulator_12v >> BIT_SHIFT_DIV; 	// Shift to perform the divide operation
			    accumulator_12v = 0L; 			// dump accumulator
			    result_12v_complete = 1;
		    }


		}
The result_12V values are cleaner ADC data as well as higher resolution values than what your adc_val holds.
Conclusion
You can upgrade almost any type of ADC from a microcontroller to have a higher resolution and a cleaner noise-free output. This is through writing firmware for oversampling and averaging the ADC data.